Welcome
Welcome to SPOT - a very low cost entry into radio telemetry, using consumer-grade amateur radios. It provides the basic features that are common to other popular telemetry receivers including memory channels, scanning, and RF gain control for localization.
Throughout the manual we refer to the physical unit as a receiver, and the person operating it as an operator. The person who programs the receiver may be the operator or an administrator / support person.
Hardware Requirements
SPOT runs on consumer amateur radio hardware from a manufacturer named Quansheng. Supported models are the Quansheng UV-K5(8) and UV-K6. These are basically the same device which are branded slightly differently. Be sure they are the latest version, v3, with 2MB of storage. Older versions or variants of the unit are not supported.
Legend
Throughout this manual we use the following formatting to help distinguish various types of items:
- Key: Refers to a physical key on the keypad
- : Refers to one of the items in the menu system
- : Refers to one of the choices in a menu
- Term: Refers to a value, like a name, that you might enter
- 🔍: If you see a magnifying glass in the lower right corner of an image, it signifies that you can click the image to get a larger view.
This manual, like SPOT itself, is evolving and feedback is welcomed and appreciated.
Safety and Handling
- Use the receiver only in accordance with local laws and the rules of your study, agency, or project.
- Although SPOT is receive-focused, the hardware does contain a transmitter. Treat the antenna, battery, and charging hardware with the same care you would give any field radio.
- SPOT is not an emergency communications device.
- Use only batteries, chargers, and cables appropriate for the device.
- Keep the device dry, clean, and protected from impact.
- If the device behaves unexpectedly after programming or firmware changes, stop field use until settings and operation are verified.
- Take care when removing or replacing the antenna adapter. This should not need to be done in normal operation.
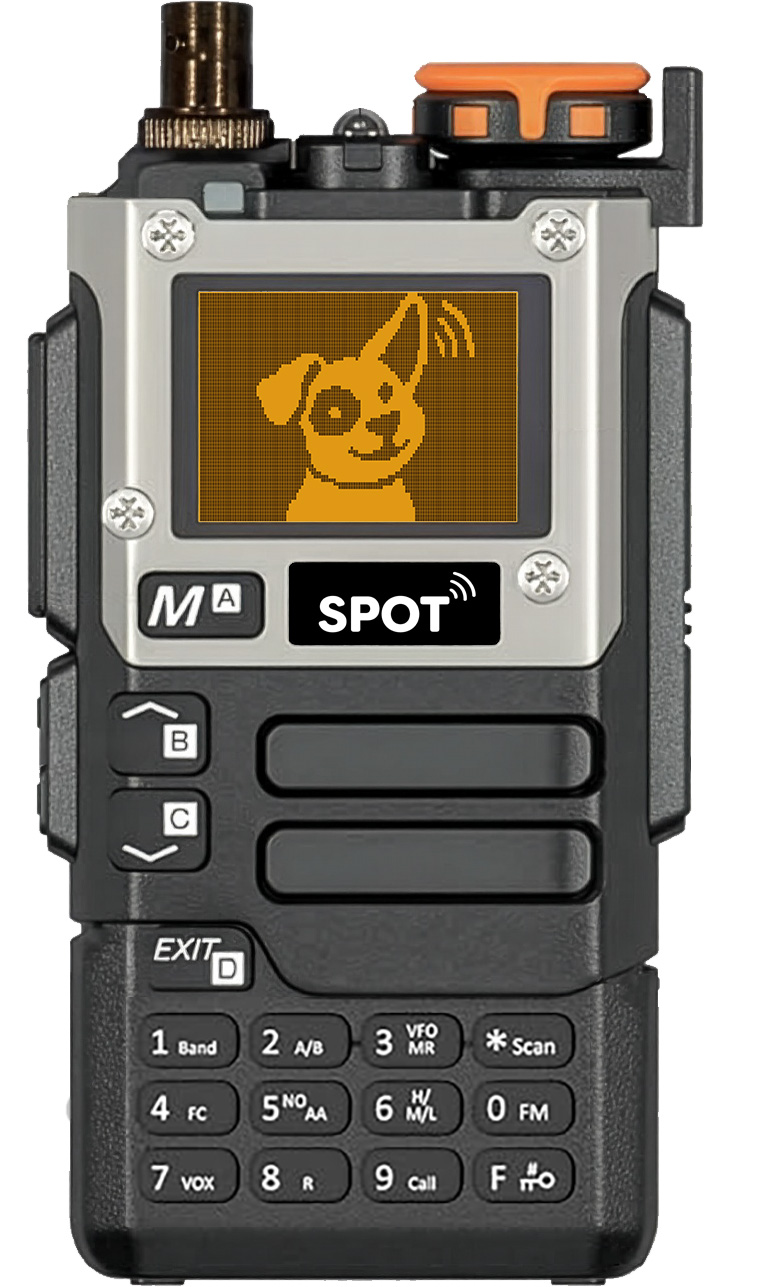
Physical Layout and Controls
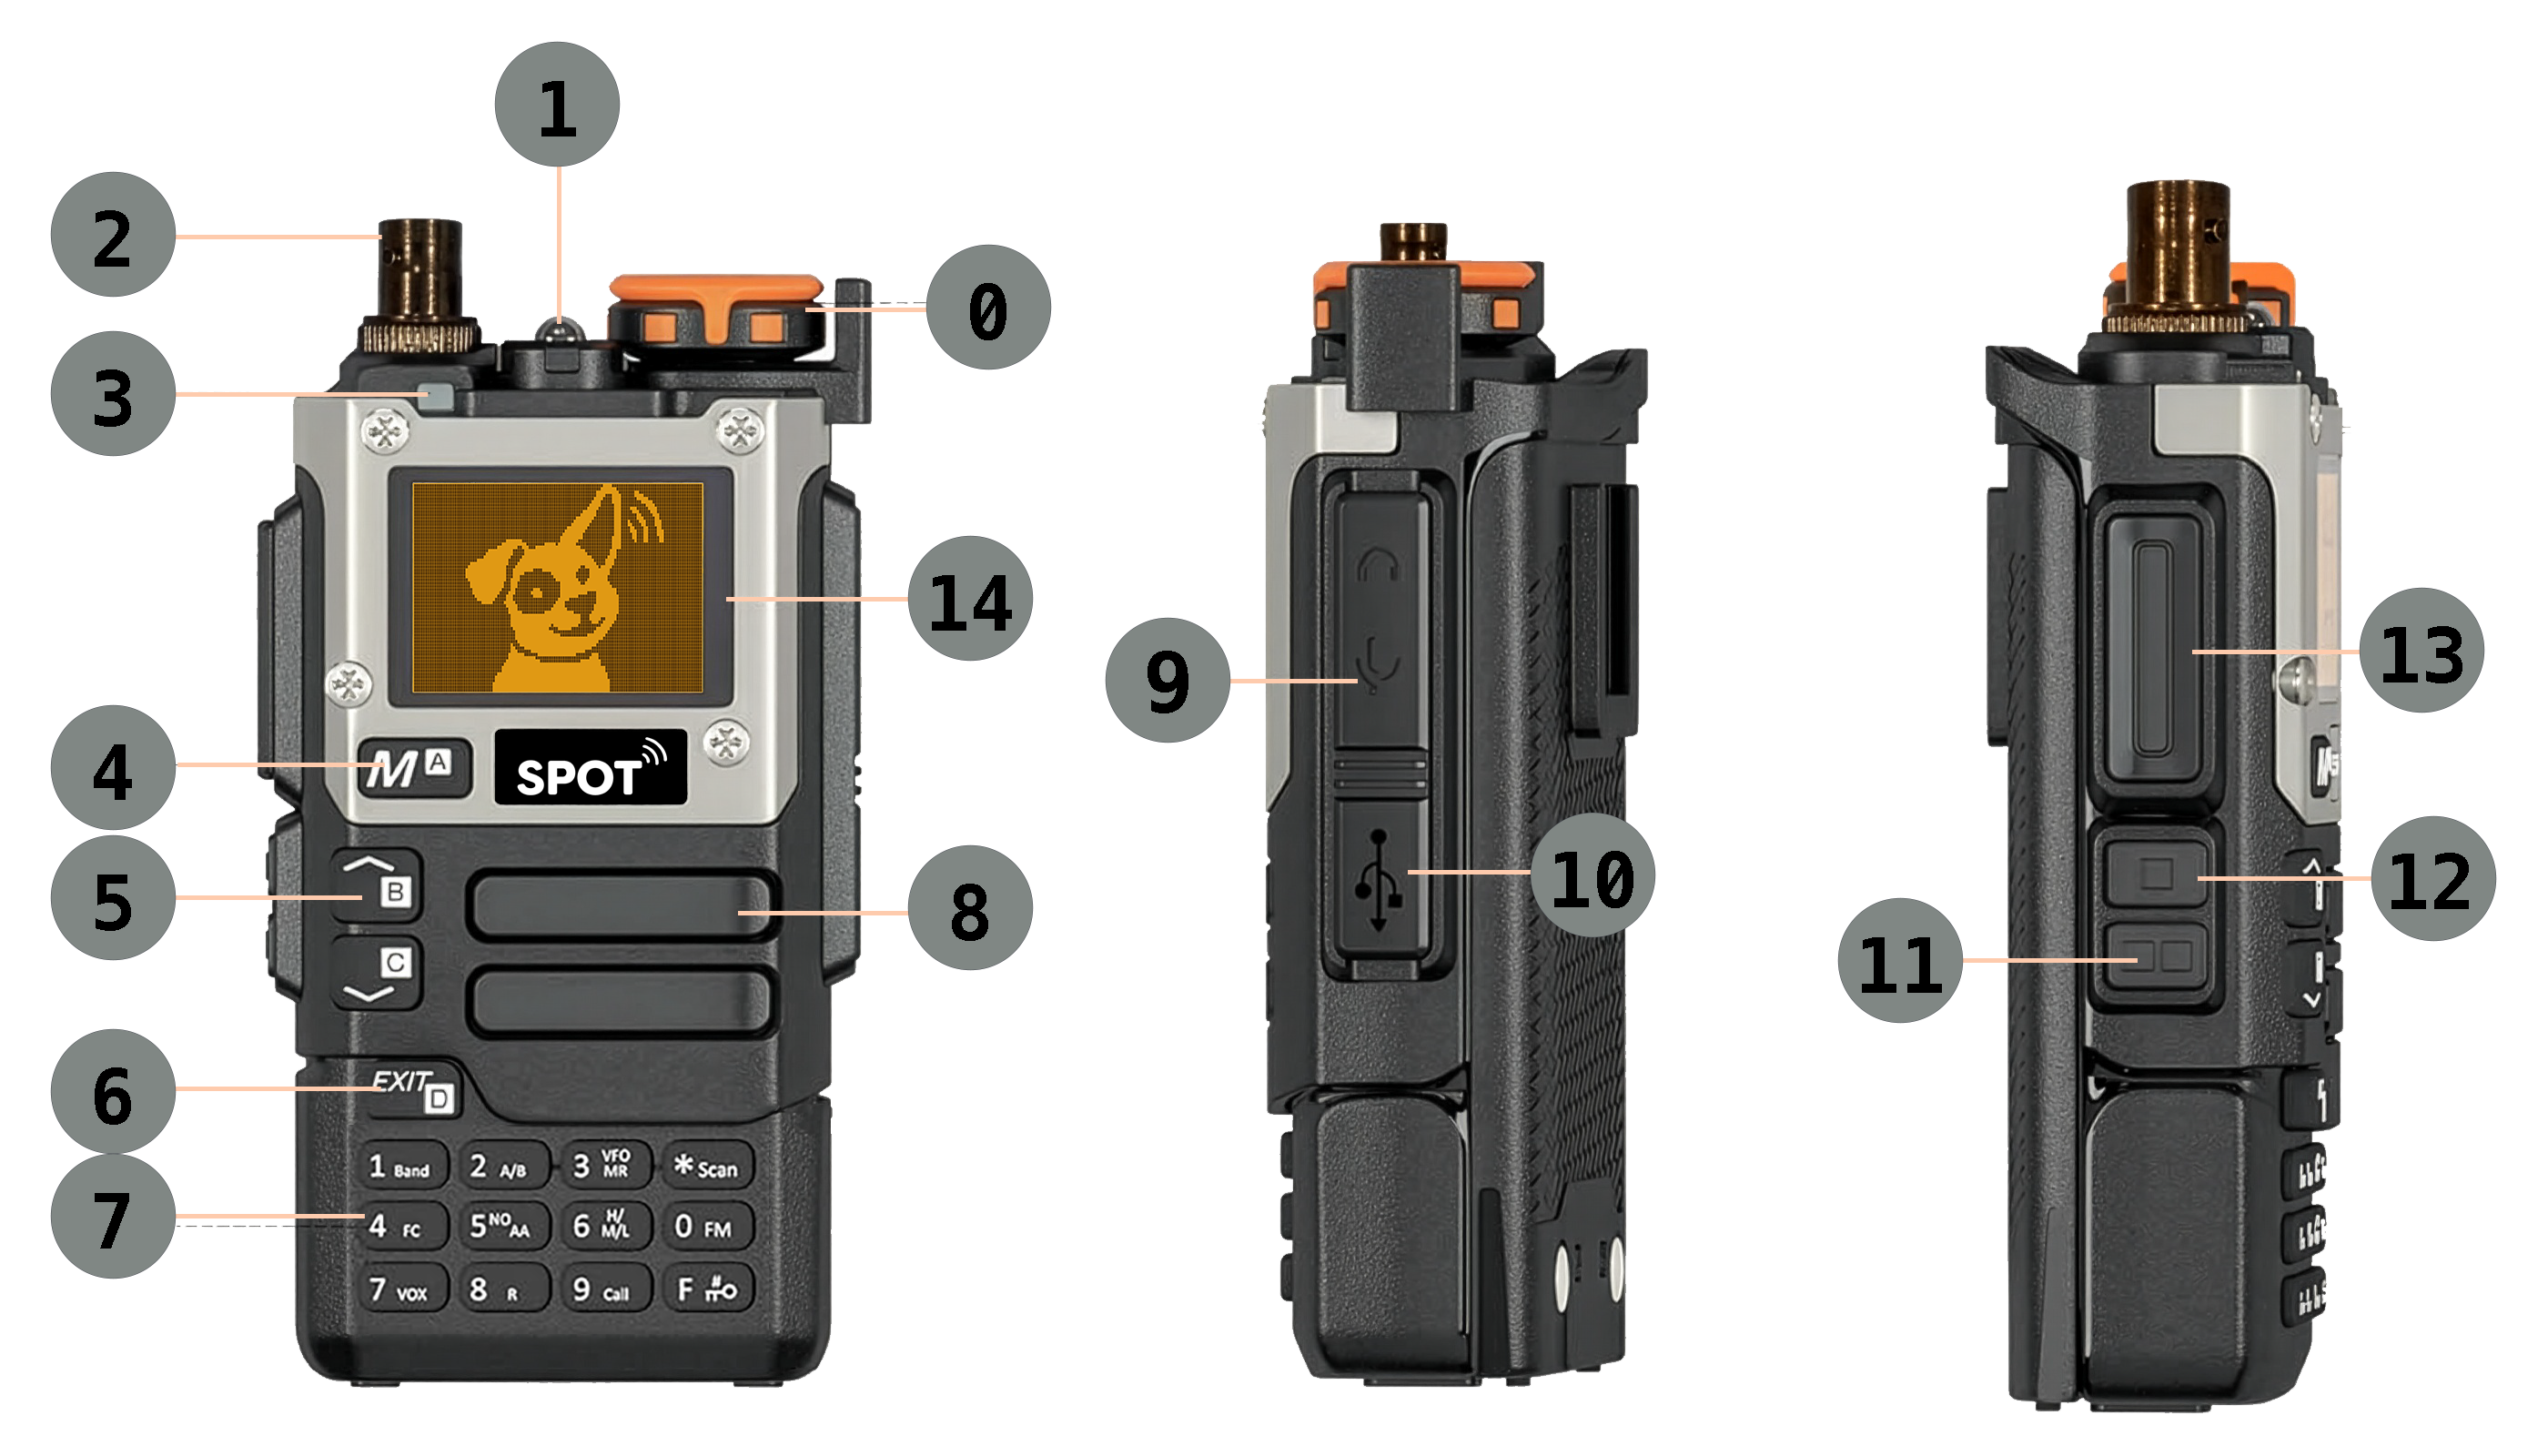
| Controls / Connectors / Indicators | ||
|---|---|---|
| ⓪ Power/Volume | ① Flashlight | ② Antenna Adapter |
| ③ Power/Charging Indicator | ④ Menu Button | ⑤ Up/Down Keys |
| ⑥ Exit | ⑦ Keypad | ⑧ Speaker |
| ⑨ Headphone Port | ⑩ Charging Port | ⑪ F2 Button |
| ⑫ F1 Button | ⑬ PTT Button | ⑭ Display |
A quick reference to each of these items is given below, and more detail can be found throughout the manual.
⓪ Power/Volume: Turn the knob to turn the power on/off and adjust the volume
① Flashlight: There is a small LED at the top of the unit that can be used as a flashlight. Enable the flashlight using the menu system, and toggle it on/off using F - 4.
② Antenna Adapter: Attachment point for BNC antenna cables.
③ Power/Charging Indicator: Displays green when power is on. Turns blue when charging via the USB port.
④ M (Menu): Pressing this button opens the menu system. While in the menu, it is used to select an item, enter edit mode, and confirm a new value.
⑤ ▲ / ▼: In memory mode these keys move through stored channels. In frequency or adjust mode they tune the displayed frequency by the current step size. In menus they move through menu items and menu values
⑥ EXIT: Used to stop or exit an operation such as a menu or a scan. It is also used to remove the most recently entered digit when entering a value. A long press clears the value being entered.
⑦ Keypad:
- 0 - 9: In memory mode, use the numeric keys to enter a
channel or tag number. You must to enter three digits for a channel. For example, enter 046, not just 46.
In frequency mode, use the numeric keys to enter a frequency. There is no need to enter a decimal point. In fact, there is no decimal point on the keyboard. For example, to enter the frequency 144.569 MHz, type 144569
- F (function) key: Certain actions can be invoked by first pressing the F key followed by another key. The manual will show this as a combination, such as F - 3.
- Locking: To avoid accidentally pressing keys, the receiver has a keyboard lock function which can be activated a long press of the F key. Long press again to deactivate the lock. All other key presses will be ignored.
⑧ Speaker: Used for audio output unless a headphone is plugged in.
⑨ Headphone Port: Use this port to attach the provided programming cable when programming the receiver from your computer. Use this port to attach a headphone, if desired, for field operation.
⑩ Charging Port: This USB-C port is used for charging only. it cannot be used to program the radio.
⑪ F2: Decreases the RF Gain. Press and hold to move down continuously
⑫ F1: Increases the RF Gain. Press and hold to move up continuously.
⑬ PTT Button: On a "walkie talkie" this is the button you press when you want to talk, so it is called the Push To Talk (PTT) button. Of course, we're not talking, we're just listening, so this button serves a different purpose. In normal operation, it toggles between memory mode and frequency mode. If a scan is in progress, pressing PTT stops the scan.
⑭ Display: Details on the types and format of information shown on the display are given below.
Getting Started
Before first use:
- Charge the battery and install it securely.
- Install the antenna adapter if it is not already in place.
- Attach an appropriate antenna for the frequencies you plan to monitor.
- Power the receiver on with the volume/power knob.
- Confirm that the display starts normally and the battery state looks adequate. Batteries are detachable and a spare battery can be swapped in while in the field.
- Verify that the stored channels and lists match your field plan.
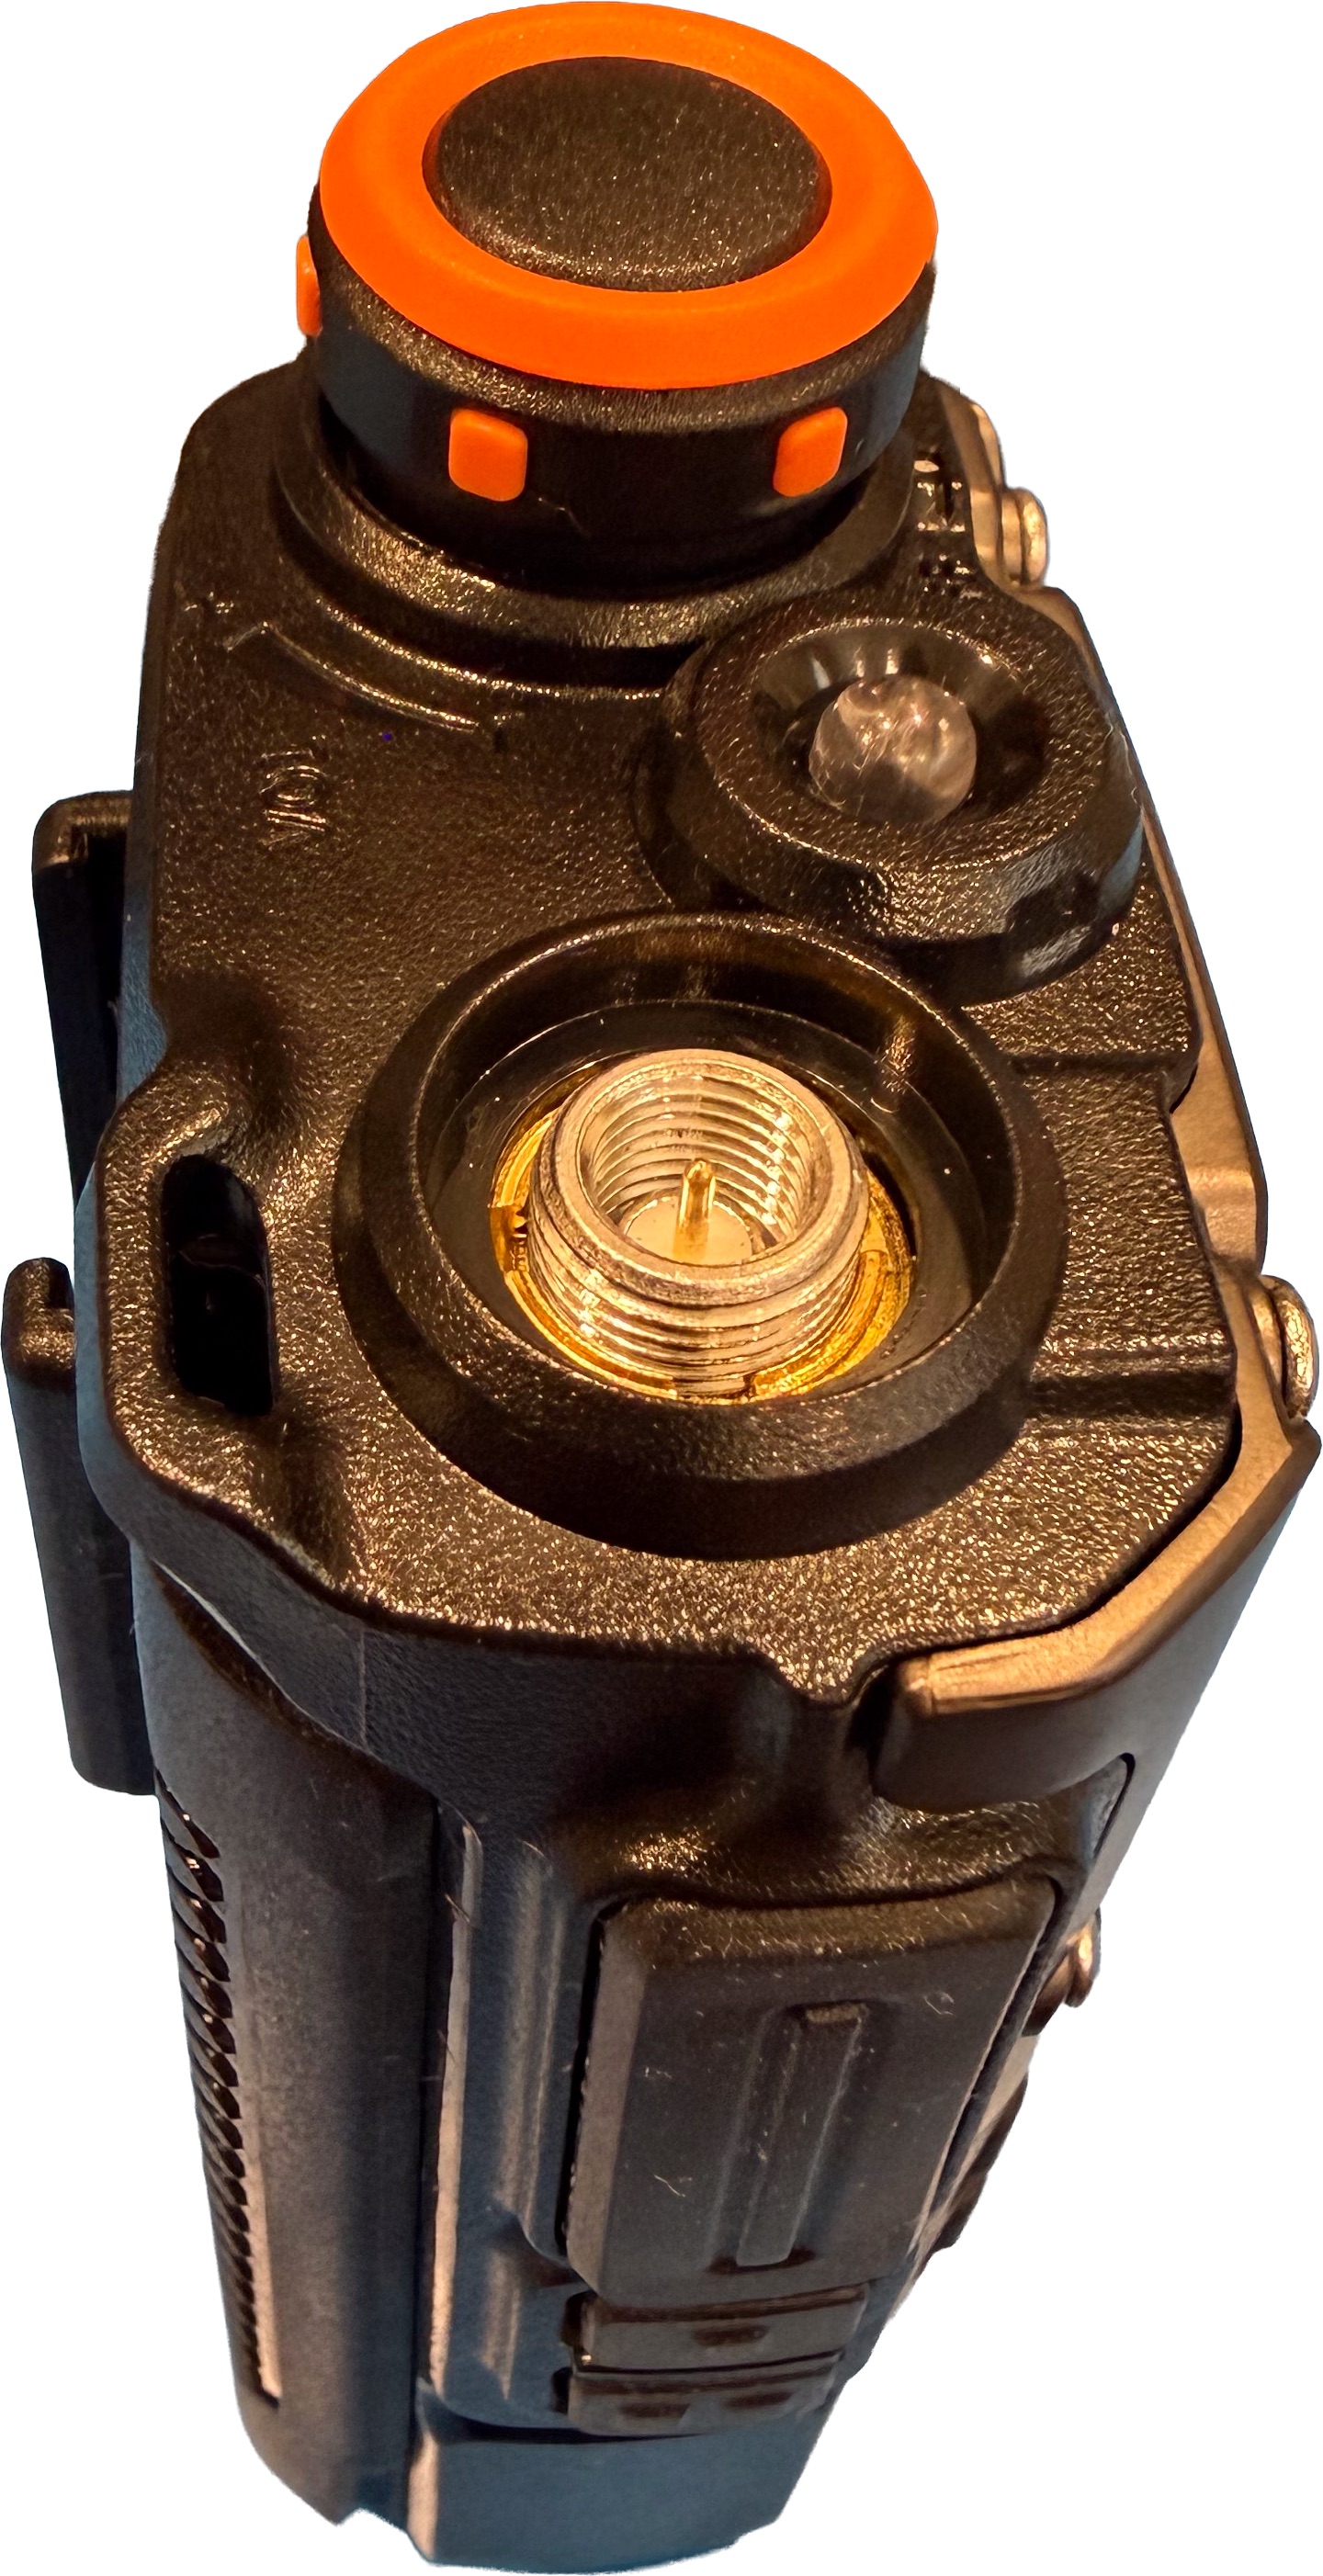
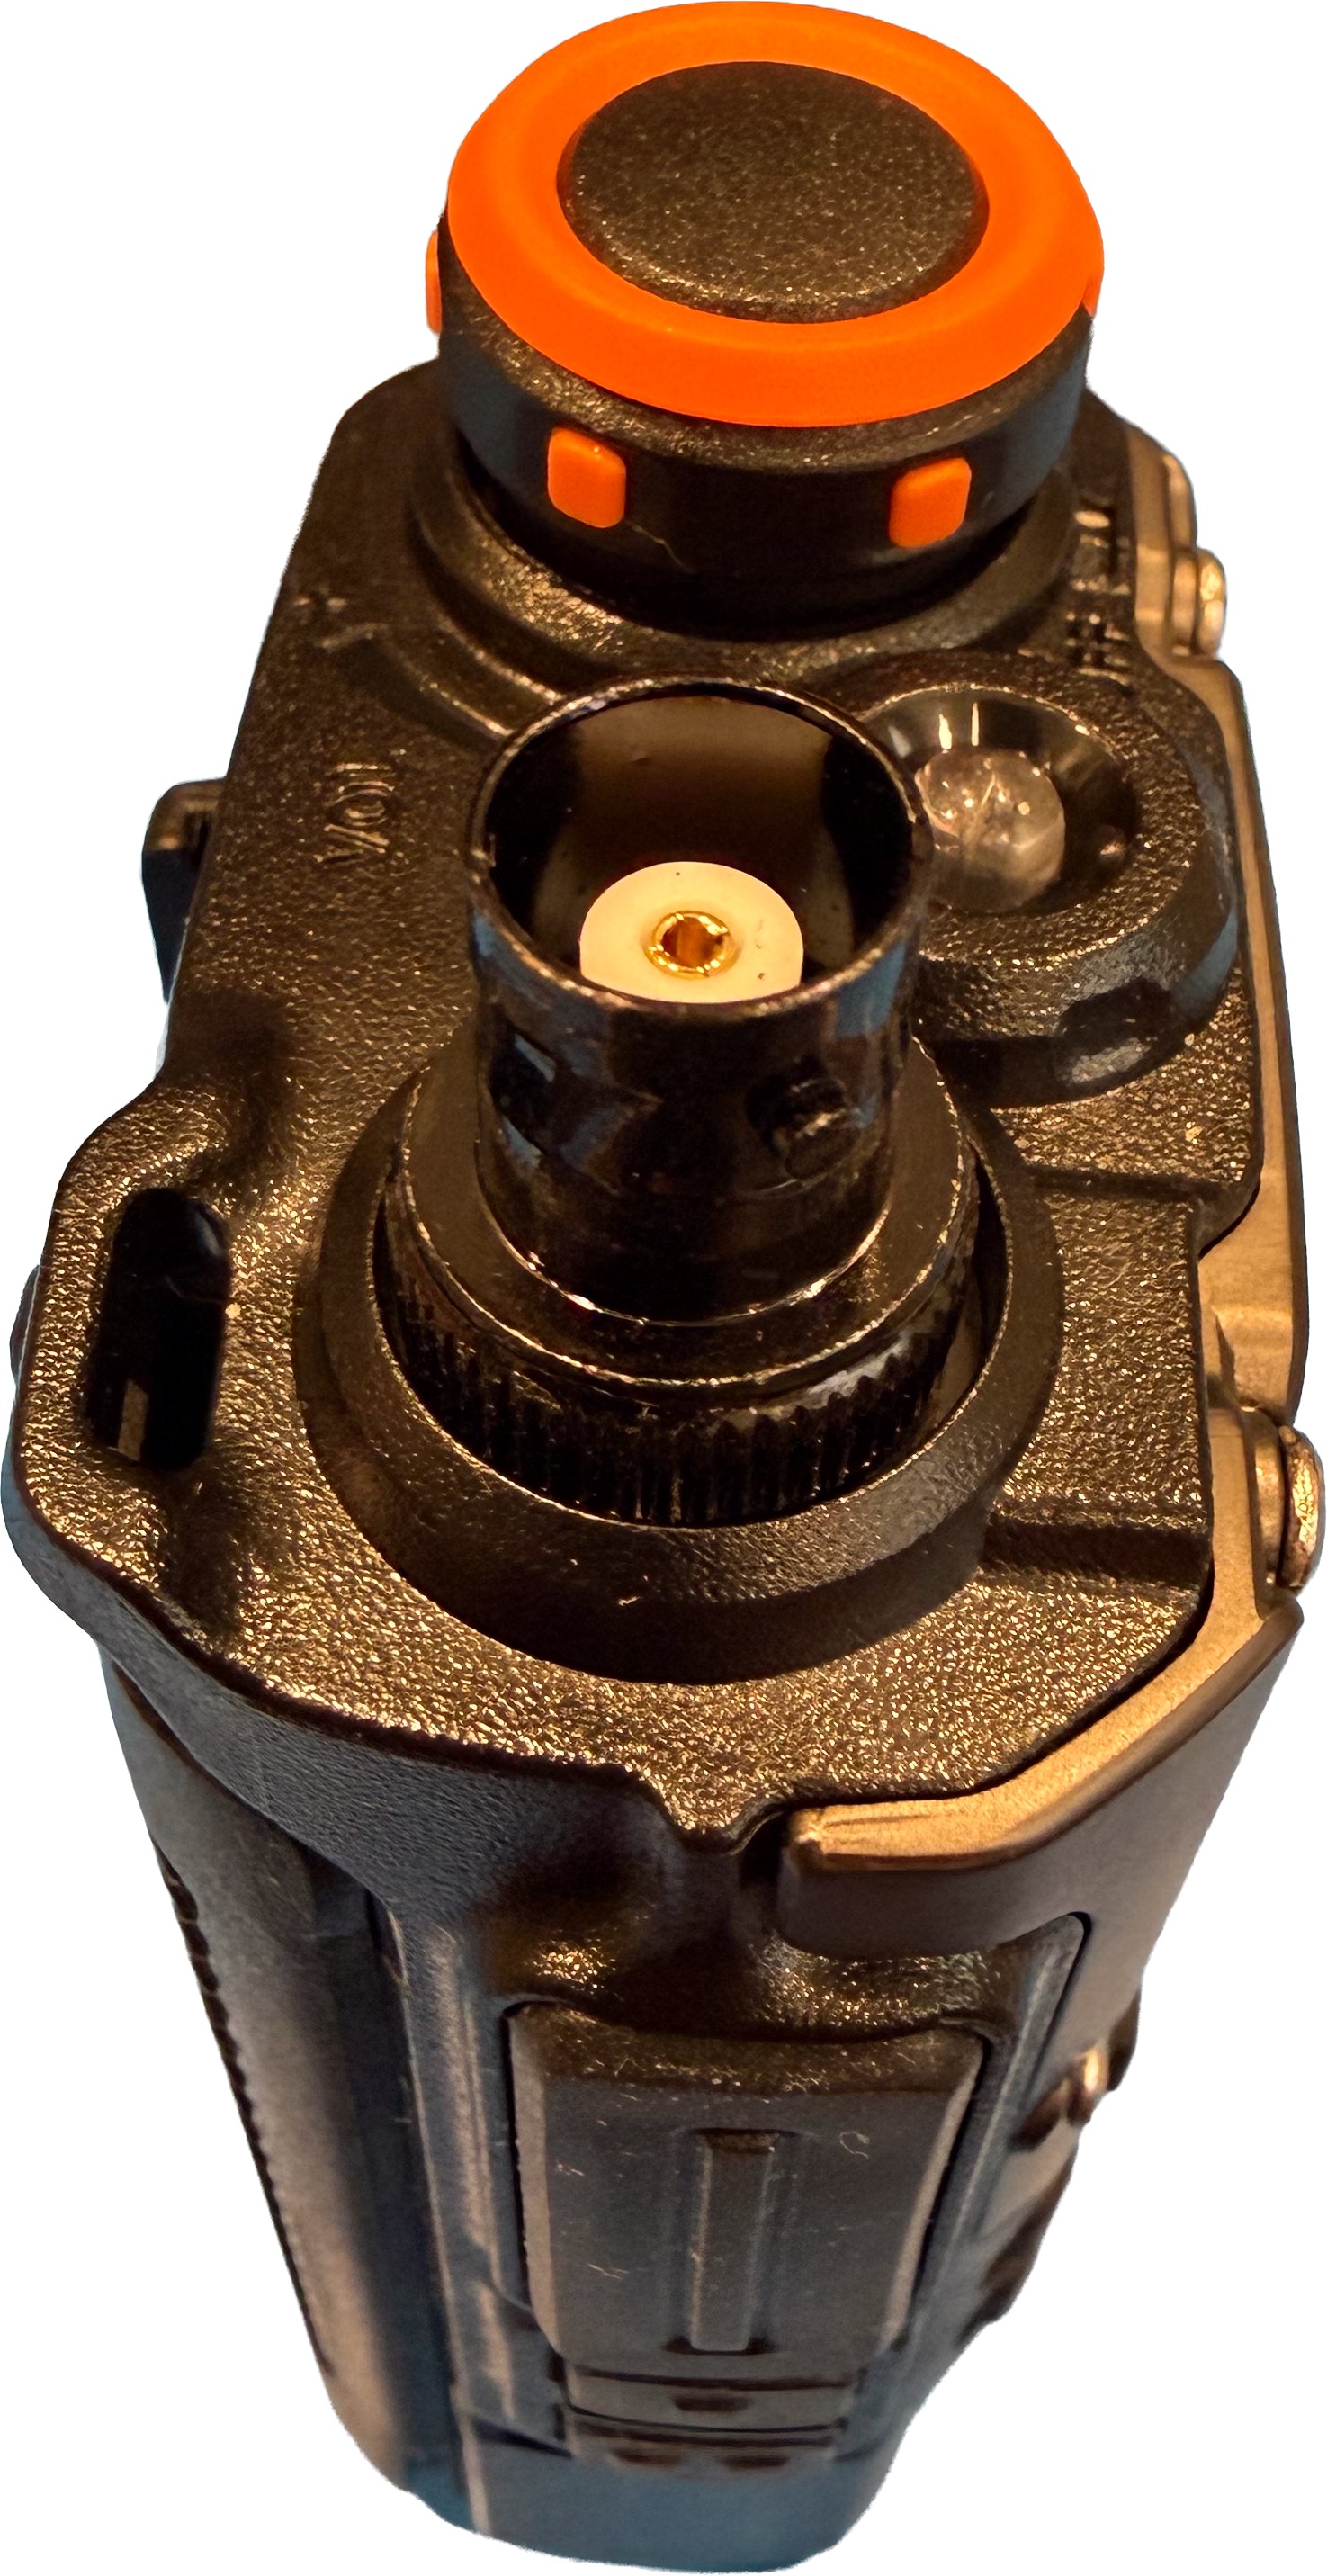
Attaching an antenna
The receiver has a male SMA connector for the antenna that is built into the body of the receiver (see the left image below). Most telemetry antennas use a BNC connector, so an adapter has been supplied with the receiver. Connect / disconnect the antenna from the adapter. Leave the adapter permanently attached to the receiver to reduce wear and tear on the SMA connector.
Principles of Operation
Wildlife telemetry tags generate periodic pulses, often referred to as "pings". The receiver's job is to listen for these pulses and create an audible ping sound through the speaker. When you have tuned into the exact frequency that the wildlife tag is transmitting, you will hear a distinct repeating tone (about 700 Hz). If you tune the receiver above or below the tag's actual frequency, the tone you hear will change and ultimately become inaudible.
There are two main modes of operation:
-
Memory Mode
- Memory Mode stores a list of frequencies associated with the wildlife being tracked. Users can cycle through memory channels manually, type in the number of a memory channel to jump to it directly, or have the receiver scan through a list of memory channels automatically.
- The receiver provides 200 memory channels - each can be configured to correspond to a transmitter frequency. The memory channels are numbered from 1 to 200. You may select a stored memory channel by typing in its channel number or by moving through the channels using the up and down arrows on the receiver.
- There is also a Tag mode that allows you to jump to a specific tag very quickly. That will be described later.
- Frequency Mode: Frequency mode allows a user to enter any frequency they'd like directly on the receiver keyboard. They can then easily tune to nearby frequencies to fine tune the reception to a particular transmitter that may have drifted from its nominal frequency. Frequency adjustments can also be made in memory mode if needed.
Lists
Because you will often want to focus on subsets of your telemetry tags, SPOT allows you to organize your memory channels into Lists. For example, you might have lists corresponding to geographic areas, specific animals of interest, or other criteria. Lists let you focus your attention on different sets of tags at different times. We'll discuss Lists in more detail below.
Understanding RF Gain
RF gain controls how much the receiver amplifies the incoming signal before trying to make sense of it. You can think of it as adjusting how sensitive the receiver is. With the RF gain turned up high, the receiver is listening very carefully and can hear very weak signals from far away. With it turned down, the receiver ignores weaker signals and only pays attention to stronger ones.
When you are trying to locate a distant tag, the signal from the tag may be very weak, so you would normally turn the RF gain up to make sure you can hear it at all. As the tag gets closer, the signal becomes stronger. If you leave the RF gain turned all the way up, the receiver may respond strongly no matter which direction you point your antenna, making it hard to tell where the tag actually is.
Turning the RF gain down as the tag gets nearer helps solve this problem. By making the receiver less sensitive, only the strongest direction will still produce a signal. This makes it easier to point your directional antenna and determine where the tag is located. In other words, high gain helps you detect a signal in the first place, and lower gain helps you determine its location more accurately.
RF gain also helps when there are many signals or sources of interference nearby. In an area with strong transmitters, electrical noise, or multiple telemetry tags, a receiver with the RF gain set too high can become overloaded and confusing. Strong signals may drown out weaker ones or make the receiver behave erratically. Reducing the RF gain can make the receiver behave more predictably and cleanly, allowing the signal you care about to stand out.
Interplay with Volume
Gain and volume volume control seem similar because turning either one down can make the sound quieter; but they work in very different ways. Turning up the gain is like having a more sensitive microphone. Turning up the volume is like having a louder speaker. You can turn the volume up all you want, but if the microphone isn't picking anything up, all you'll hear is noise. Similarly, if you make your microphone too sensitive, it will hear everything from every direction, even if you're trying to focus on one thing.
Imagine you are tracking a tag and the signal is coming in much too strongly. If you turn down the volume, the signal will sound quieter, but the receiver is still just as overloaded and may still respond equally in every direction. You have not improved your ability to locate the tag. Turning down the RF gain, on the other hand, makes the receiver less sensitive, so only the strongest direction still produces a signal. A common approach is to set the volume to a comfortable listening level, then use the RF gain to adjust how much signal the receiver responds in order to better localize the tag.
Screen Layout
The telemetry main screen is compact, but carries a lot of information. The exact content of the screen varies by mode. For example, during an automated scan, an indicator will show that the scan is in progress. Some screen elements are the same regardless of mode; for example, the top line containing the RF Gain setting and the battery level.
The images below show the screen as it appears in several of these modes. The details of the elements will be explained in more detail in the relevant sections of the manual.
The first image shows SPOT in Frequency mode:
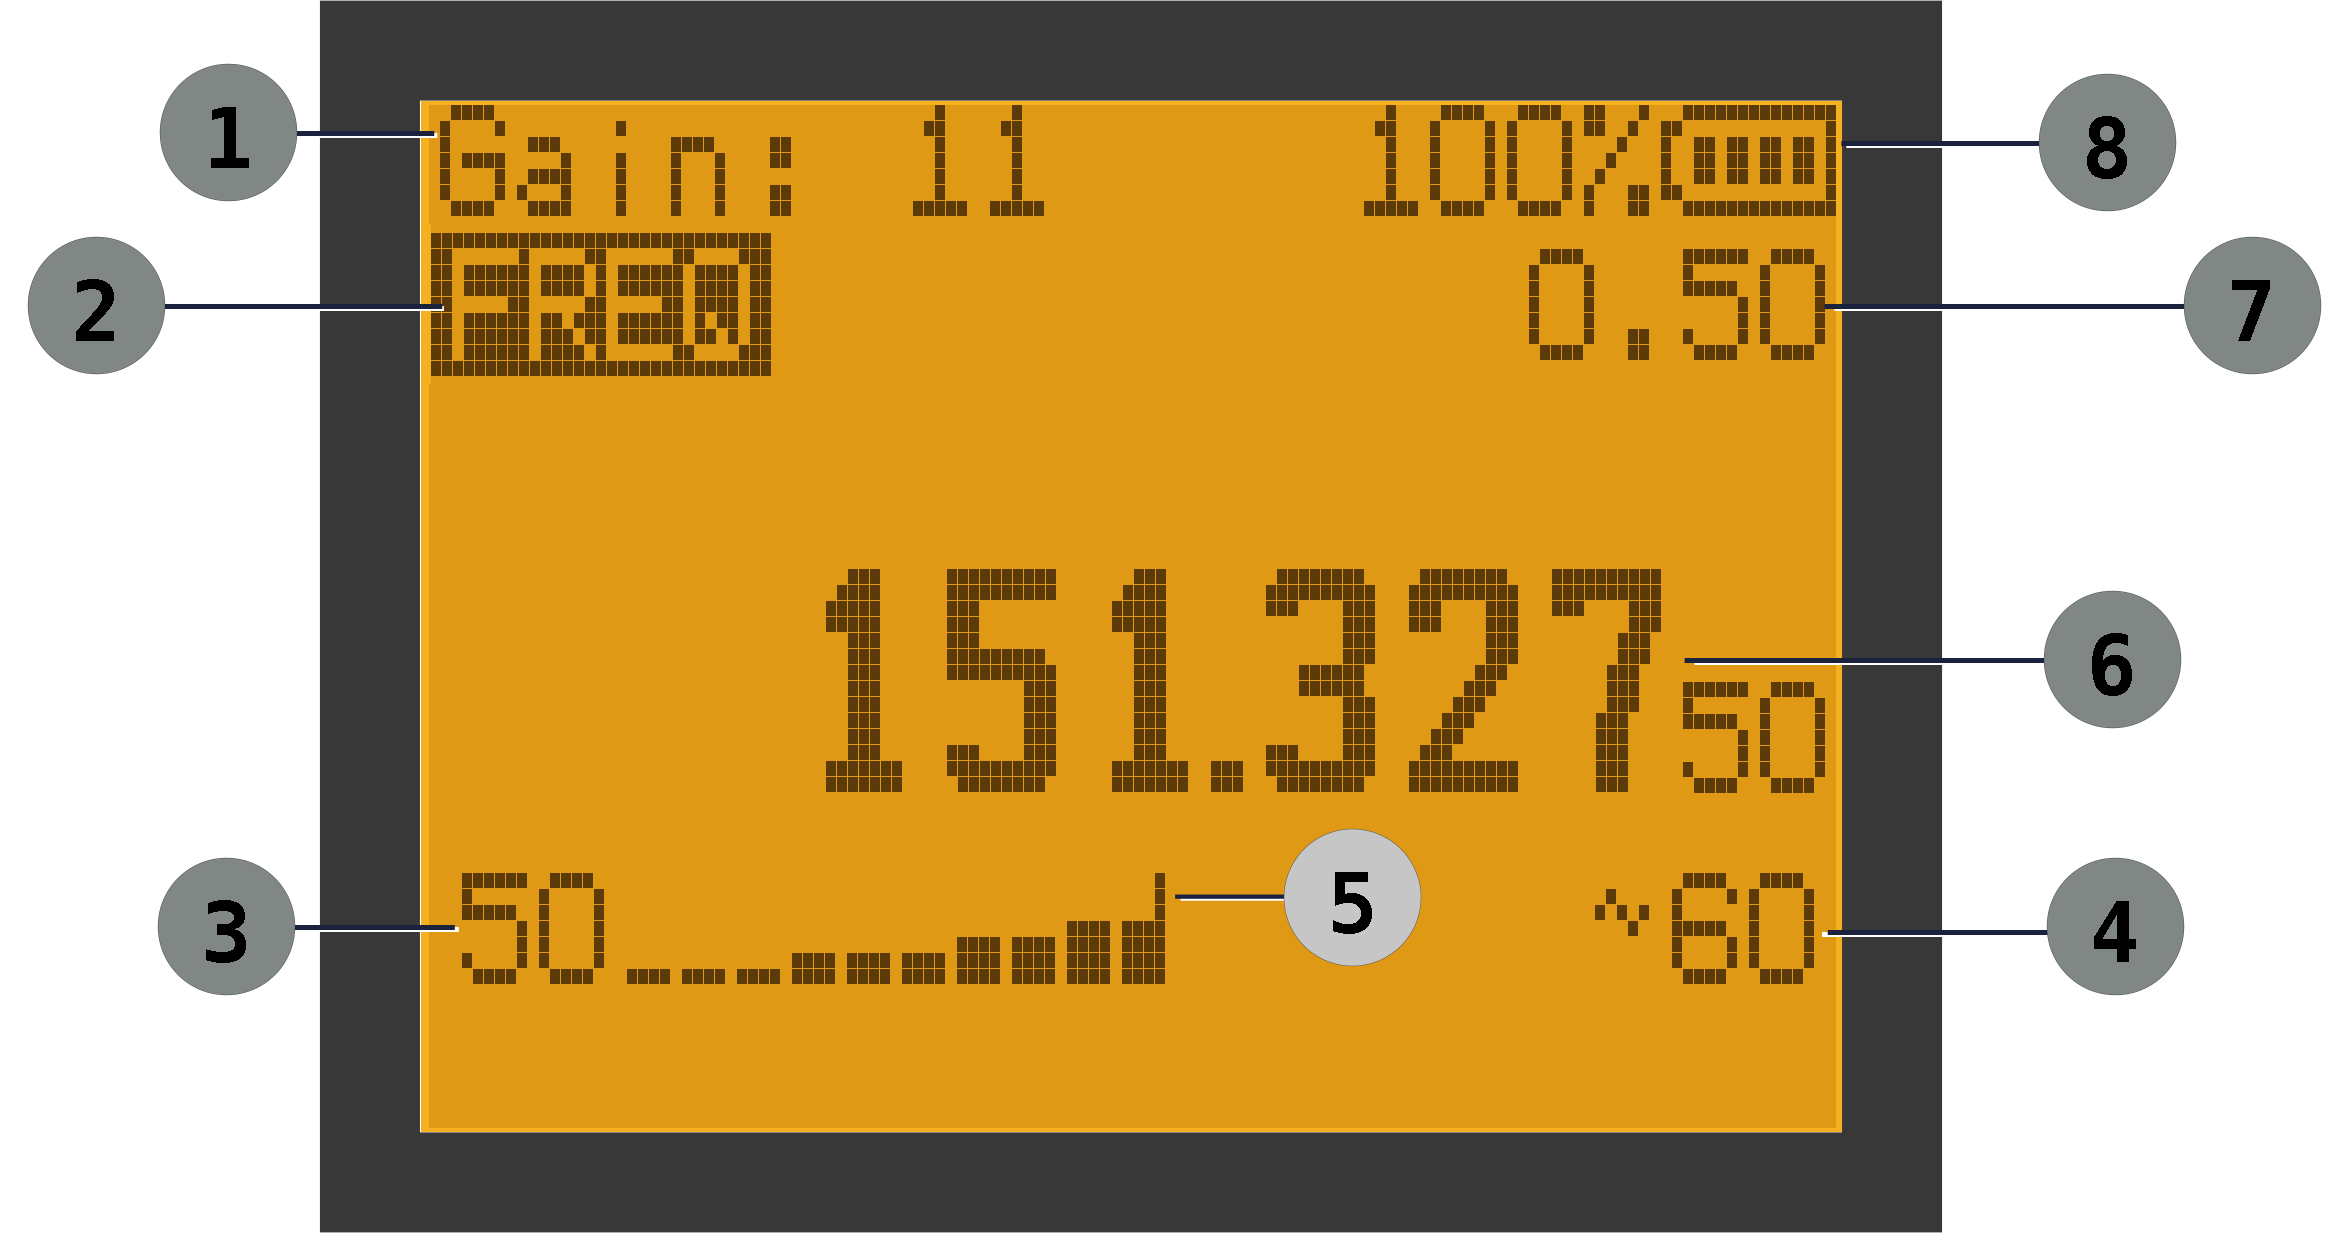
| Main Screen Elements: Frequency Mode | ||
|---|---|---|
| ① RF Gain (0-24) | ② Frequency Mode | ③ Signal Power |
| ④ Beats Per Minute | ⑤ Peak Level Indicator | ⑥ Frequency |
| ⑦ Tuning Step | ⑧ Battery level | |
When the receiver is in Memory mode, much of the screen is the same, but there are some additional items. Note that the BPM (Beats Per Minute) indicator is only shown if a signal is detected for the selected frequency. The screenshot below shows the case where the signal is no longer detected. Also note that the peak level indicator shows that there was a stronger signal recently, but the current signal is lower.
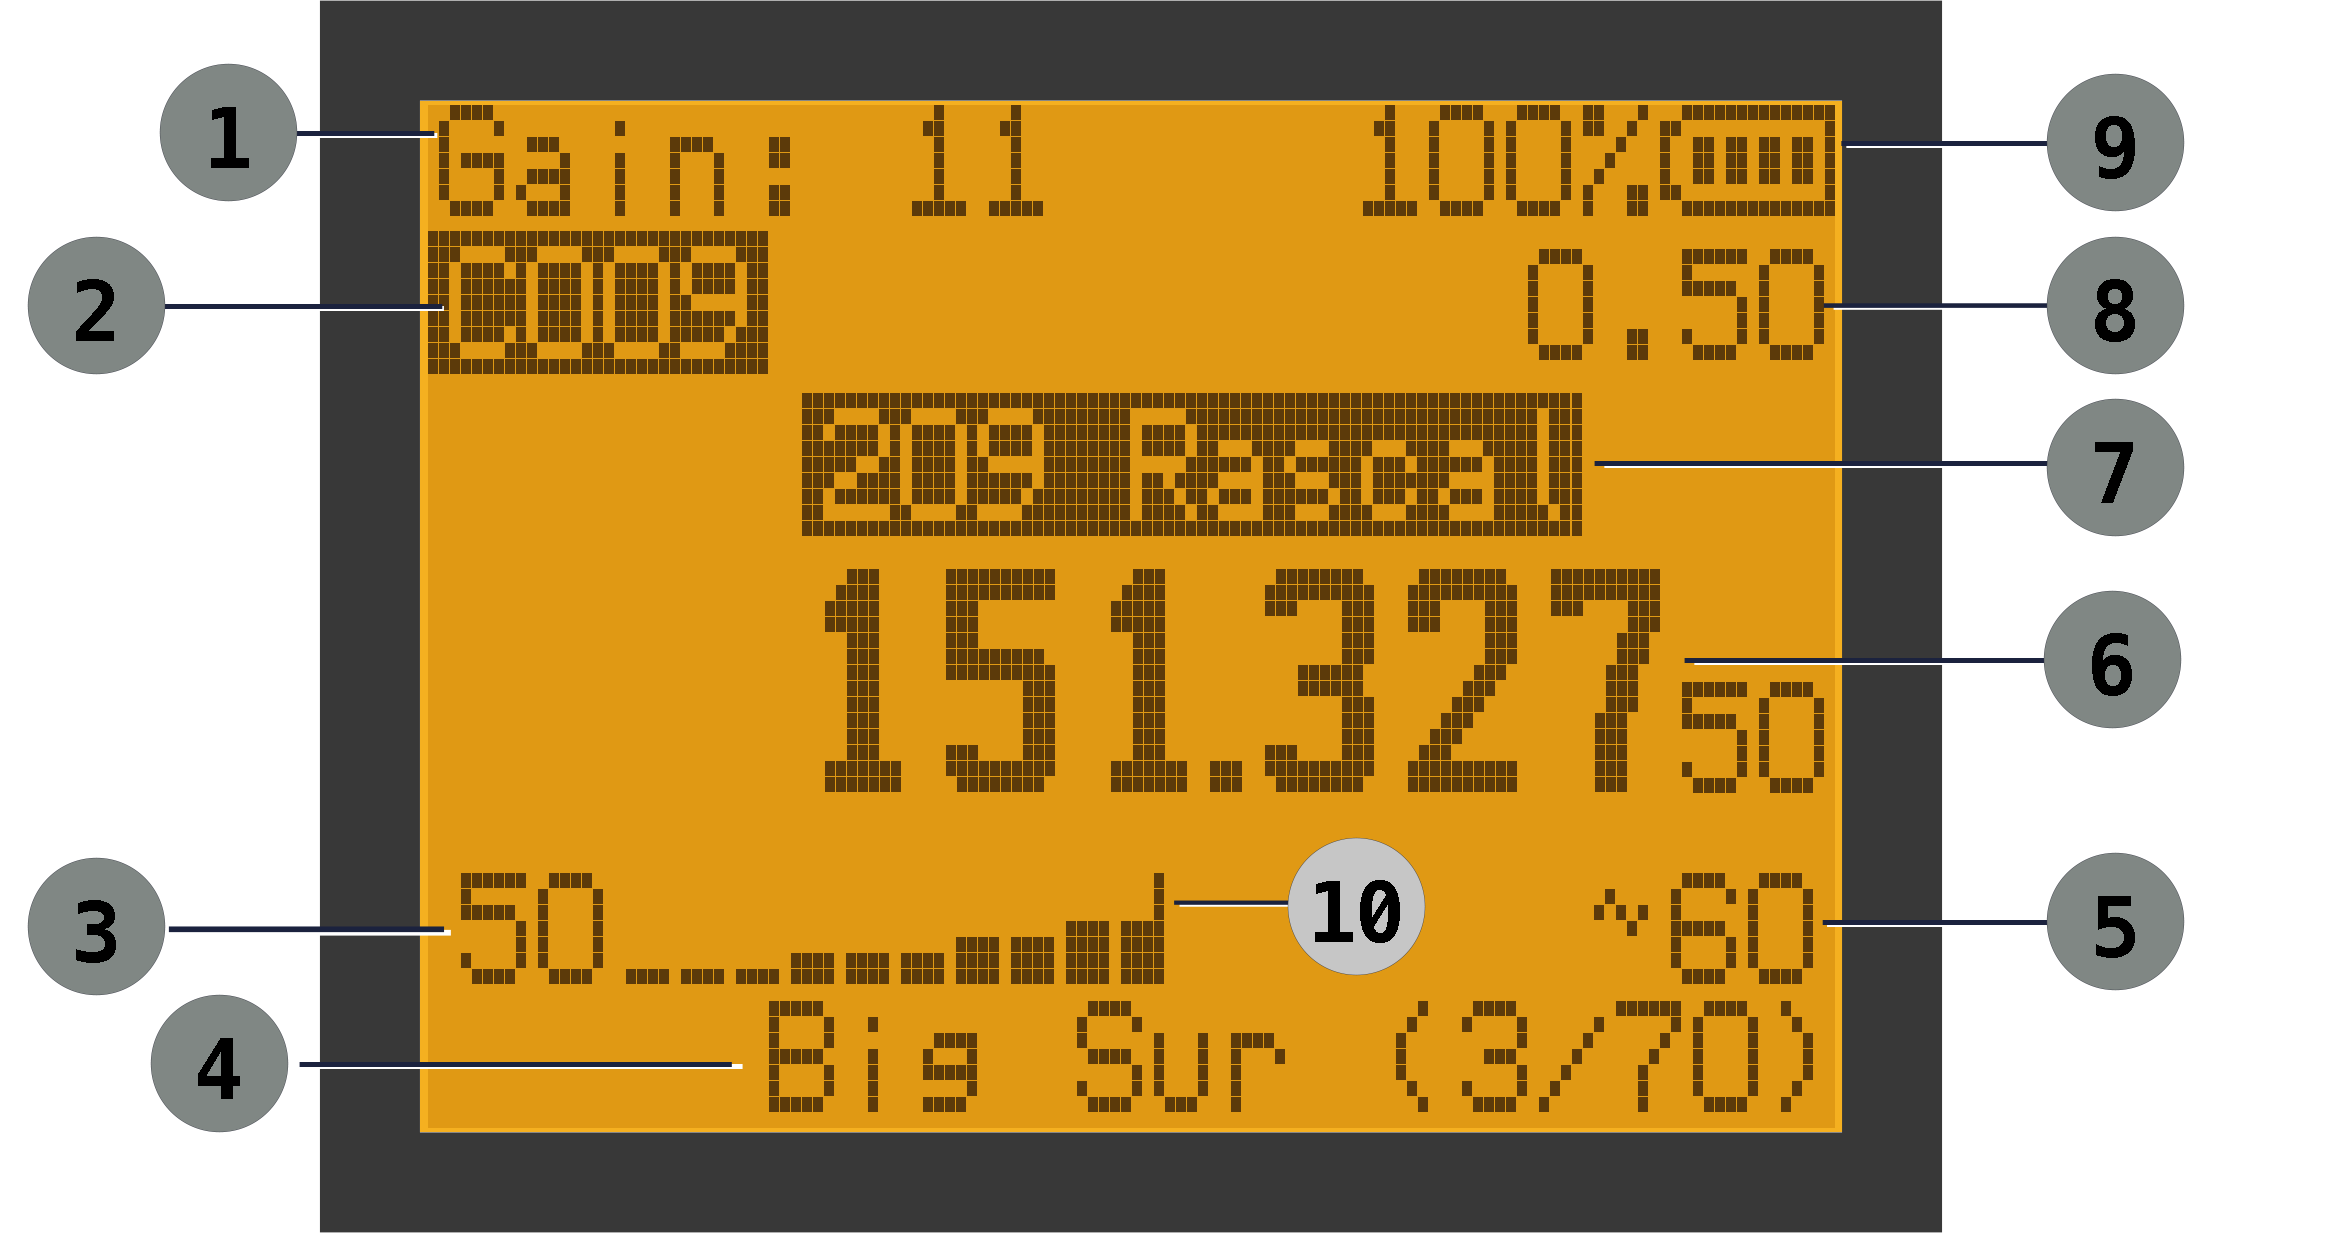
| Main Screen Elements: Memory Mode | ||
|---|---|---|
| ① RF Gain (0-24) | ② Channel | ③ Signal Power |
| ④ List Indicator | ⑤ Beats Per Minute | ⑥ Frequency |
| ⑦ Channel Name | ⑧ Tuning Step | ⑨ Battery level |
| ⑩ Peak Level Indicator | ||
The OVR Indicator

When tuned to a channel in Memory mode or Frequency mode, it is possible that you will see an OVR indicator in place of the Beats Per Minute indicator. This means the receiver is constantly receiving a signal. If you're hearing consistent pings but are seeing the indicator, it usually means that the gain is too high. If you're not hearing pings, but see the indicator, it usually means there is strong interference on the frequency.
In Tag mode, the screen is very similar, but instead of displaying a channel number, we display the tag number. The word "Tag" is also displayed to indicate that we are in Tag mode.
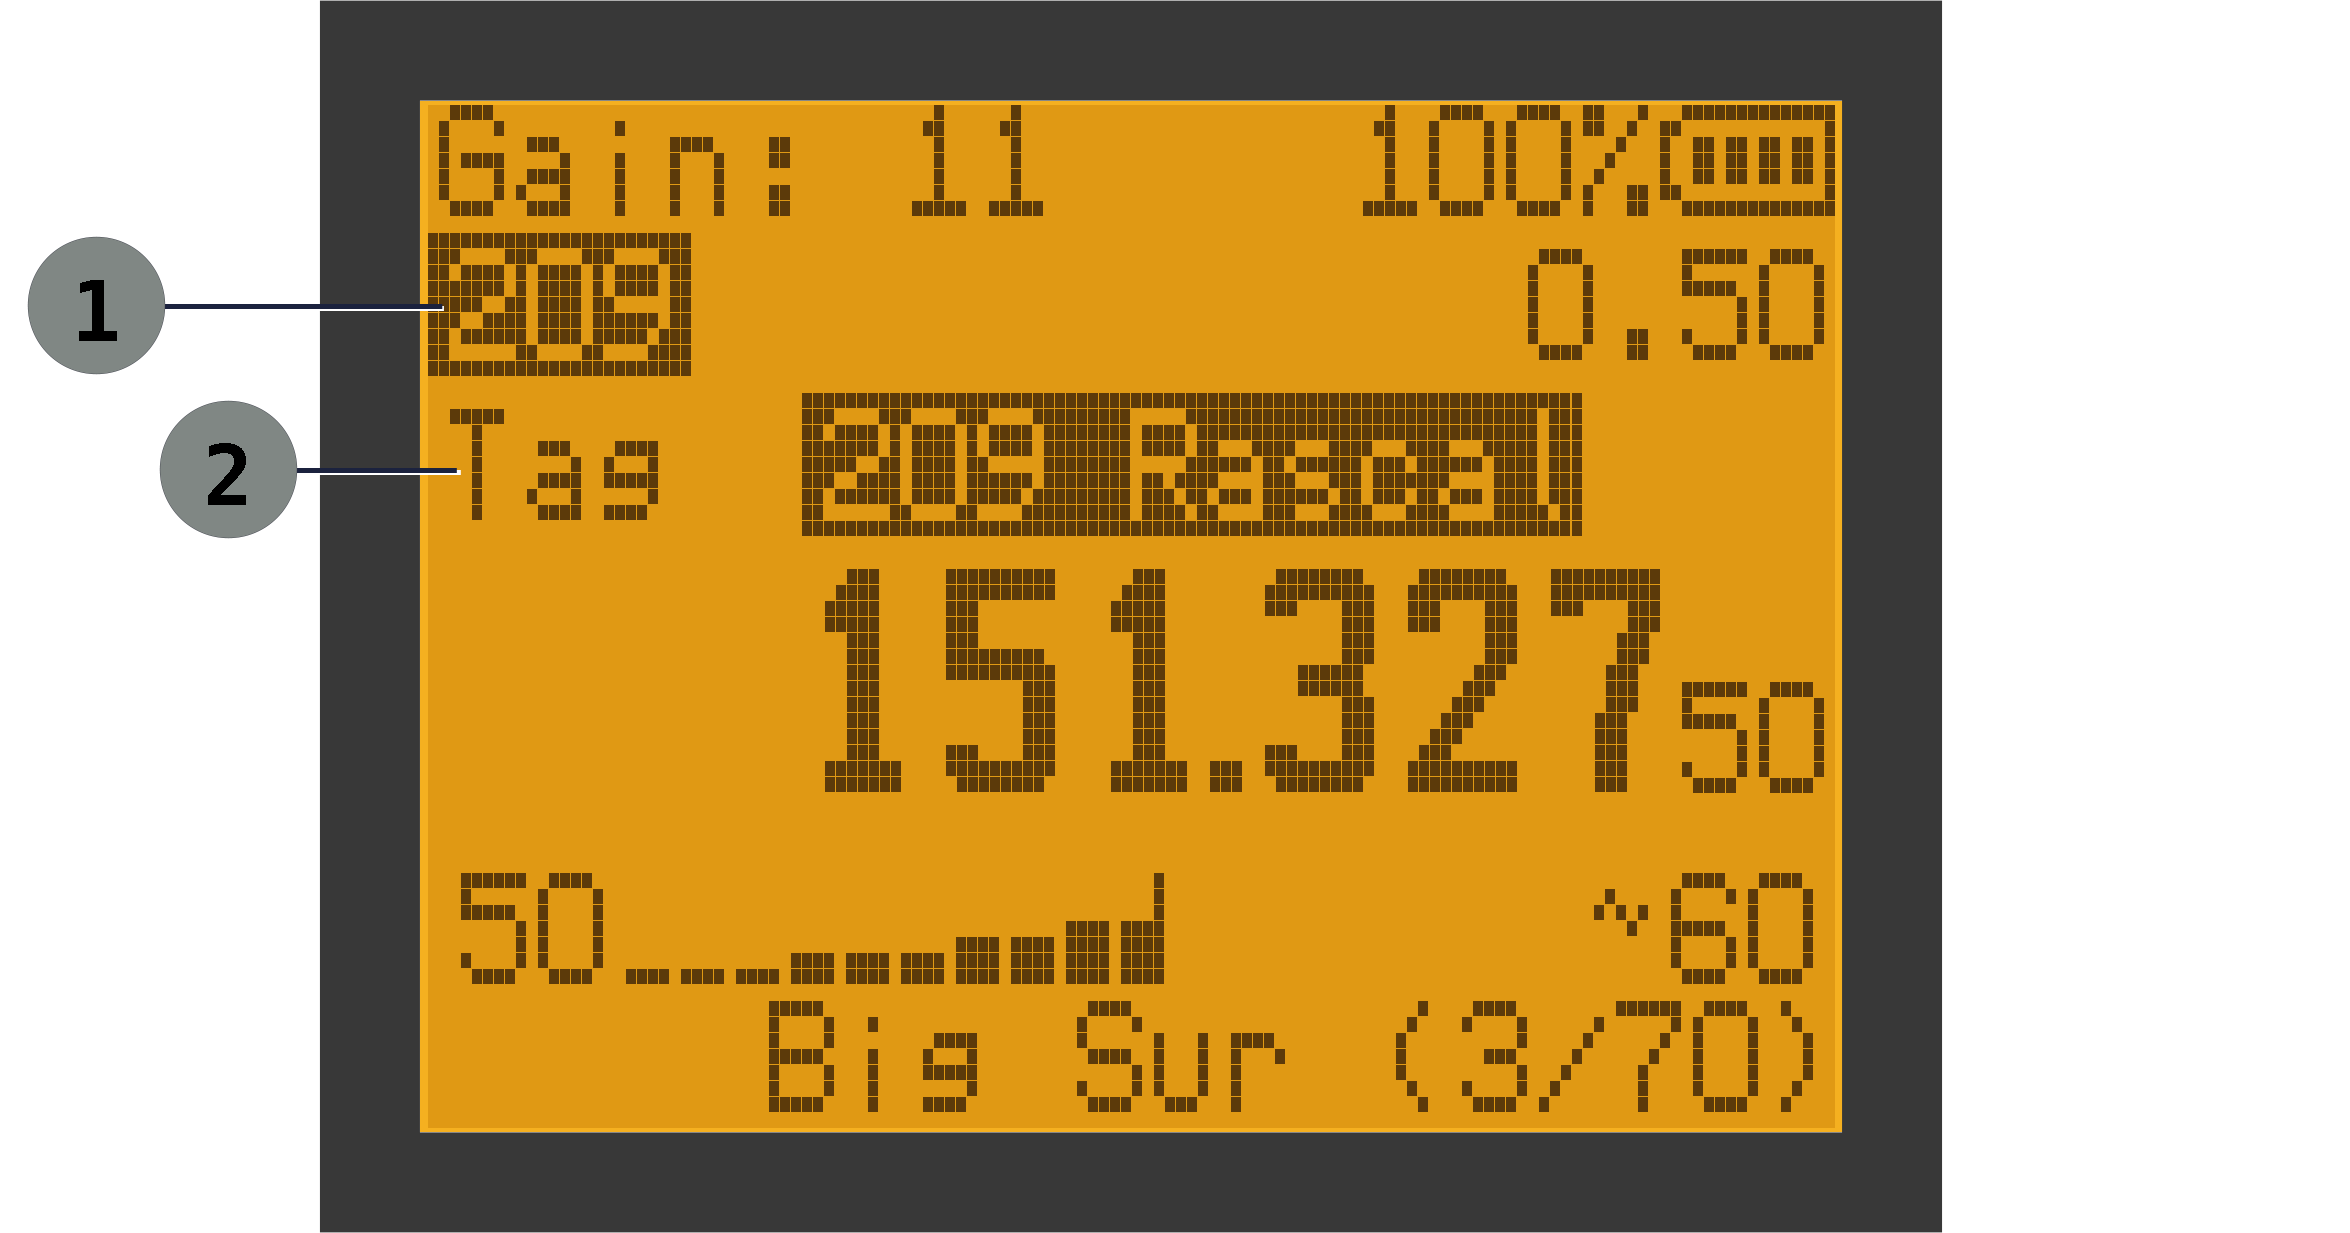
| Main Screen Elements: Tag Mode Mode | ||
|---|---|---|
| ① Tag Number | ② Tag Mode Indicator | |
We display the word Scan to indicate when we are in Scan mode. The List Indicator will update automatically as the scan progresses.
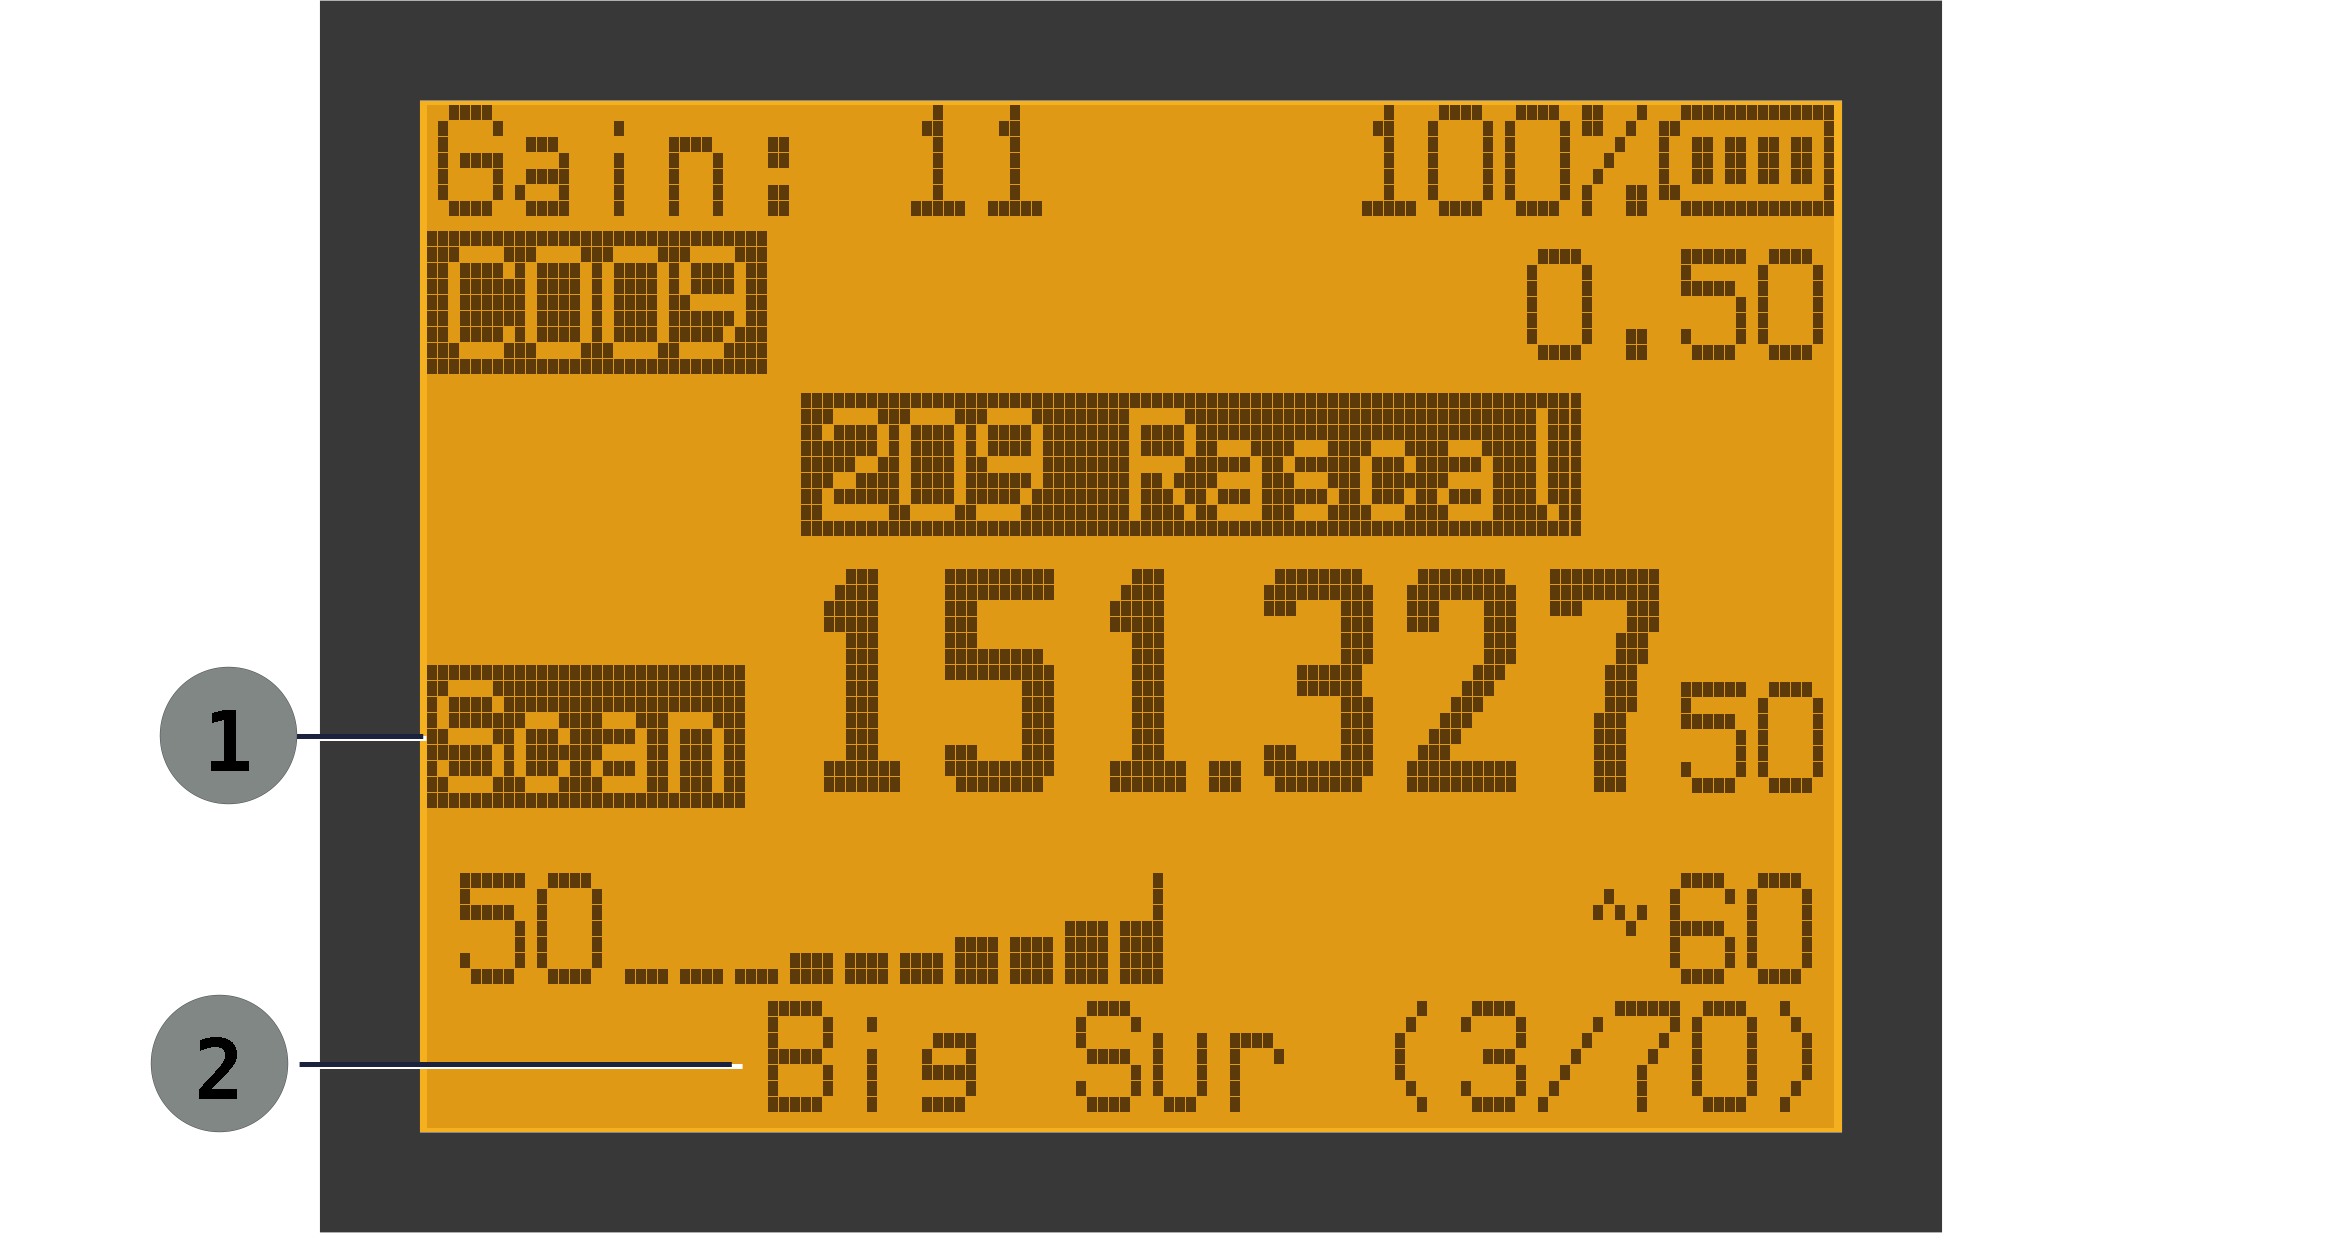
| Main Screen Elements: Scan Mode | ||
|---|---|---|
| ① Scan Indicator | ② List Indicator | |
The Adjust indicator shows that the frequency can be adjusted using the ▲ / ▼ keys.
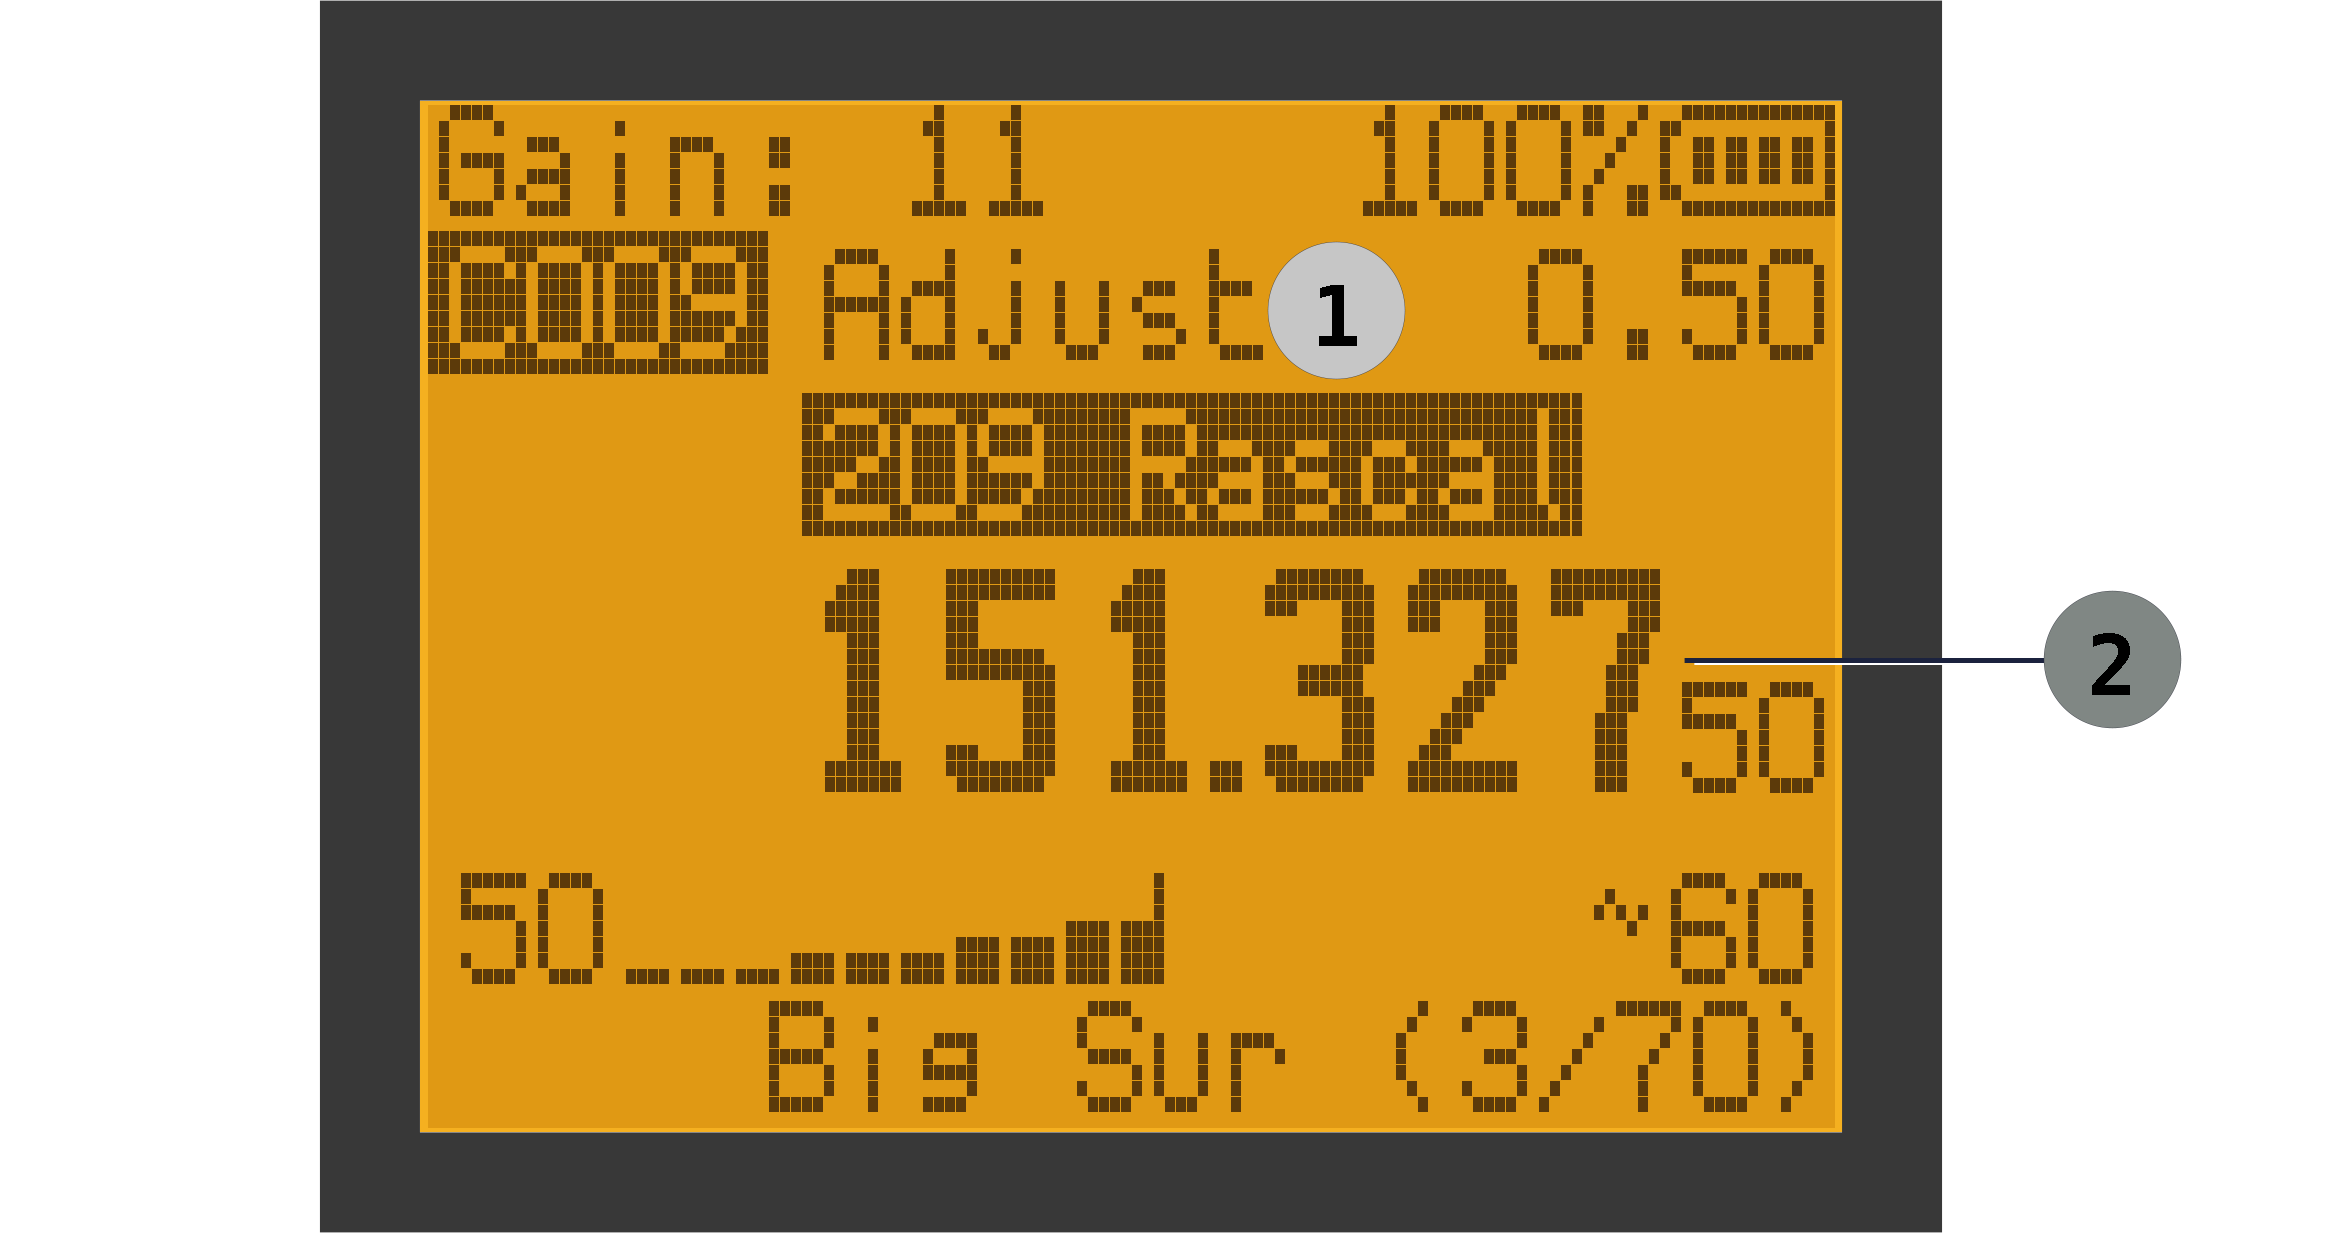
| Main Screen Elements: Adjust Mode | ||
|---|---|---|
| ① Adjust Mode Indicator | ② Frequency | |
When entering numbers (e.g. a frequency in frequency mode, a channel number in memory mode, or a tag number in Tag mode) the screen will show the in-progress value as it is being typed.
Basic Operation
This section describes the normal day-to-day operations of the SPOT receiver.
The focus here is on the basic operator workflow:
- select a stored channel or enter a frequency
- listen for a tag
- fine-tune by ear
- save useful frequencies for later use
Powering On
Turn the receiver on with the power/volume control.
After startup:
- confirm the receiver powers up normally
- check the battery status on the display
- confirm the receiver is on the expected memory channel or frequency
Double check the battery level before going into the field. Charge or replace the battery if needed.
Selecting a Memory Channel
Memory channels are the fastest way to get to a known tag frequency. If you aren't already in memory mode, enter it using the PTT button (or F - 3).
To move sequentially through channels use the ▲ and ▼ keys. to jump directly to a specific channel, enter the channel number directly from the keypad. You can either type the channel number followed by the M key, or type a full 3 digit channel number. For example, for channel 3, enter either: 3 M or 0 0 3.
If you are working from a prepared channel list, memory mode should usually be your starting point.
Navigating by Tag
Telemetry tags often have associated numbers which are displayed on the tagged animal for visual identification (see image below). Biologists and operators often know these numbers very well and use them as a primary way of referring to the animals. Tag numbers are usually not sequential and are often up to 4 digits, so they are not a good match to channel numbers (1-200). SPOT facilitates easy navigation to a particular tag number, regardless of its channel number, using Tag mode.

If you have named your channels with Tag numbers, you can navigate to a particular tag easily by entering its tag number, rather than a channel number. For example, if you have channel names that start with a tag number; e.g. "209 Rascal", then you can navigate to it directly by entering 2 0 9 M.
To use Tag mode:
- Switch to memory mode if needed using PTT (or F-3).
- Set (Tag Mode) to , or use the shortcut F - 9.
- Type the tag number using 0 - 9 (1 to 4 digits). Then press M to jump to that tag.
- Note that if you enter 4 digits, you don't have to enter press M. The input will be accepted automatically.
Note: If no key is pressed for a few seconds while entering digits, entry times out and is canceled. You can also cancel by pressing EXIT.
If a matching tag is found, the receiver jumps to that memory channel immediately. If no match is found, the receiver emits an error beep and stays on the current channel.
In Tag mode, the spot on the display where the channel number is normally shown will instead display the tag number. If a channel name does not begin with a valid tag number, the display falls back to the normal channel label (for example C077).
Naming your channels:
- the channel name must begin with digits to be navigable by tag
- the tag number may be 1 to 4 digits
- any non-digit character ends the tag number (for example, 209Rascal is treated as tag 209)
- leading zeros are ignored for matching (0123 matches tag 123)
- if duplicate tag numbers exist, the receiver jumps to the first matching channel
Flipping Between Channels (Ping-Ponging)
Sometimes you may wish to quickly flip between monitoring two tags. For example, two tagged birds may be in your vicinity. If they were right next to each other in memory, you could use the ▲ / ▼ keys to ping-pong between them, but that rarely happens.
Instead, you can use the 2 A/B key. It will ping-pong between the current channel and whatever the last channel was. Let's say that our two birds have tags 209 and 1182. You could tune to the first using Tag mode (enter 209). Then enter 1182 to switch to the channel with that tag number. Now, just press F - 2 A/B to ping-pong between them. You can also just long-press 2 A/B, which is easier for one-handed operation.
You don't have to use Tag mode to take advantage of this feature. SPOT will ping-pong between the most recent two channels regardless of how you entered them.
Adjusting RF Gain
RF gain is one of the main controls you will use during normal operation. We discuss it in more detail in the Understanding RF Gain section.
Higher gain helps reveal weak signals. Lower gain helps manage strong nearby signals and makes final direction finding easier.
Basic guidance:
- start with a moderate setting
- raise it if the tag is weak or distant
- lower it if the signal is extremely strong or broad
RF gain is often adjusted several times during one hunt. It is normal to use more gain while finding a tag and less gain while closing in on it.
Moving Between Memory Use and Frequency Use
Both memory mode and frequency mode are useful during a hunt.
In practice:
- use memory mode for fast recall of known tags
- use frequency mode for manual tuning
If you start from a stored channel and want to fine-tune around it, use the Adjust functionality.
Entering a Tag Frequency
If the tag is not already stored in memory, use frequency mode to work directly with the frequency.
Basic frequency workflow:
- Switch to frequency mode if needed.
- Enter the desired frequency from the keypad, or tune to it manually.
- Listen long enough to determine whether a tag is present.
Use this approach when:
- testing a new frequency
- checking a temporary assignment
- working from field notes rather than a preloaded memory list
Recommended pattern:
- Select the stored channel for the tag.
- Listen for the signal.
- If needed, copy to frequency mode.
- Fine-tune around the expected frequency.
Listening to a Known Tag
Once the expected channel or frequency is selected, listen for a repeating telemetry pulse.
A valid tag usually presents as:
- a short repeating ping
- a regular pulse pattern
- a tone that changes pitch slightly as you tune around the signal
When listening:
- pause long enough to hear more than one pulse
- avoid changing frequency too quickly
- compare nearby tuning positions if the signal is weak
At first, focus on answering two questions:
- Is the signal present?
- Does it repeat in a regular pattern?
If the answer to both is yes, you can move on to fine tuning and directional work.
Fine Tuning By Ear
Fine tuning is a normal part of telemetry reception which is sometimes needed to refine your receiver's match to the transmitter:
- Tune a little above and below the expected frequency.
- Listen for how the pitch changes.
-
Move back to the point where the signal sounds most useful and
consistent.
Note that the ping may be audible up to 6kHz away from the nominal tag frequency. It will be quieter and the pitch will be quite different, but you may still hear it.
A slow, patient tuning style works best:
- make small adjustments
- listen after each step
- stop once the signal is easy to follow
Adjusting a Memory Channel
You can fine-tune a stored memory channel directly using Adjust mode.
Enter Adjust mode with F - 8. The word Adjust will appear above the channel name.
In Adjust mode:
- use ▲ / ▼ to adjust the frequency.
- press F - 8 again to save your change, or...
- press EXIT to discard your change
The tuning increment is controlled by the current channel's value (the step shown on the main display). For example, if is , each Adjust step is 500 Hz.
Saving a Useful Frequency
If you find a frequency you want to keep, save it to memory.
Typical reasons to save a frequency:
- you confirmed a tag in the field
- you refined a stored frequency and want to keep the result
- you want to organize the tag into a list later
Basic save workflow:
- Tune to the desired frequency.
- Open the menu.
- Use to choose the destination channel.
- Save the channel.
- Use later if you want to give it a useful label.
Lists
Since you can have up to 200 memory channels, you may not want to focus on all of them, all the time. For example, your tags may be spread through a large geographic area, and you may want to focus on one or two specific areas. You might also have channels that correspond to animals of specific interest (perhaps they haven't been spotted for quite some time).
To help in situations like these, SPOT allows you to put channels into named lists, like Region 1 or Missing. Then you can focus on just one or more of these lists (the "active" lists). When you've selected one or more lists to be active, you can scan through each of the channels either manually (using the ▲ / ▼ keys), or automatically using the scan function.
You may have up to 16 lists in addition to the built-in list named ALL. The latter contains every channel in memory.
To recap, we have:
- Channel: A named frequency corresponding to a telemetry transmitter (tag). SPOT can store up to 200 channels. A channel may be in 0 or more lists.
- List: A named group of channels. You may define up to 16 lists. Each list can contain any or all of the 200 channels.
- Active Lists: A set of lists whose channels are currently of interest. They can be scanned either manually or automatically.
Let's look at a concrete example. You might have the following channels programmed into your receiver:
| # | Name | Frequency | Lists |
|---|---|---|---|
| 1 | 209 Rascal | Region1, Important | |
| 2 | Bluey | 155.30100 | Region1 |
| 3 | Tomboy | 155.40100 | Kit Peak |
| 4 | Rocky | 155.45100 | |
| ... | ... | ... | ... |
| 87 | Echo | 155.35000 | Region1, Important |
| ... | ... | ... | ... |
| 150 | Blanco | 155.45000 | Missing, Important, Red Cnyn |
This shows that channel 1 is named 209 Rascal, it is at a frequency of 155.00100 MHz, and it is a member of two lists: Region1 and Important. Channel 4, Rocky, is not a part of any lists, and channel 150, Blanco, is a member of 3 lists: Missing, Important, Red Cnyn.
Now let's look at an example set of lists:
| # | Name | Active |
|---|---|---|
| 1 | Region1 | |
| 2 | Red Cnyn | ✅ |
| 3 | Kit Peak | |
| 4 | Luna St | |
| 5 | Important | ✅ |
| ... | ... | ... |
| 14 | L14 | |
| 15 | L15 | |
| 16 | Ad Hoc |
In this example we have defined 5 of the 16 available lists (the last list is named Ad Hoc by default). You can also see that some of them are marked active and others are not. Only channels in the active lists will be included as you move through the channels in memory.
Let's say that the list named Red Cnyn contains 12 channels corresponding to animals that are typically seen in that area, and the Important list contains 5 channels corresponding to animals that you always want to search for. By making both lists as Active, all 17 entries (and only those entries) will be included as you automatically or manually move through the channels.
Choosing Active Lists
To select the lists you'd like to focus on, use the menu item. You can select one or more lists. You may also select ALL. If you do so, any previously selected lists will be deselected since ALL includes all memory channels. Similarly, if ALL is currently selected and then you select another list (e.g. Region 1), ALL will be deselected.
The bottom line of the display always shows the current list and the progress through that list. For example: Important (7/9), means we are currently focused on channels in the list named Important, and we're on channel 7 of 9 in that list.
The "Ad Hoc" List
There is a power-user convenience called Ad Hoc mode which makes it easy to create a list on the fly. You never need to use this feature, but it can be handy. It is discussed in the appendix.
List Names and Membership
By default, your 16 available lists will be named L1 through L16. Those aren't very memorable, so you can give them more useful names using the menu item. Each name can be up to 10 characters.
Each channel can be part of zero or more lists. To select which lists the current channel is member of, use the menu item. It shows all the lists and uses asterisks next to the lists which contain the channel. Use ▲ / ▼ to move between lists, press M to toggle membership, and press EXIT when finished.
Scanning
The receiver can automatically scan through channels for you. This is the Scan function. ⚠ You must be in Memory mode to begin scanning. If the receiver is not in Memory mode already, you can switch to it by pressing the PTT button, or F - 3.
To start scanning, press the Scan button. Only channels that belong to the active lists are scanned. Of course, if the active list is set to ALL, then all channels will be scanned. When a scan is in progress, the word Scan will be displayed on the screen.
Dwell Time
The length of time the receiver will stay tuned to a channel before moving to the next is called the Dwell Time, and it is controlled with the menu option. You have choices ranging from 1 to 30 seconds. When the receiver detects a signal while scanning, it can either stop the scan or just continue as usual after the dwell time has elapsed. This behavior is controlled by the menu item. The choices are or .
If you are in a noisy RF environment (one with other stray radio signals), then a scan may stop even though there is no telemetry signal present. SPOT tries to distinguish real signals from background noise, but it can be fooled. If a scan stops prematurely, hit Scan again to resume the scan. You may also switch to to avoid false positives.
If you wish to move to the next channel immediately, press Scan. if you wish to move to the next list immediately, press F - Scan.
Stopping a scan
Pressing the PTT button during a scan will halt the scan on the current channel. If you hit Scan again, the scan will resume from that channel. In this way you can use the PTT button as a sort of "pause" function.
On the other hand, if you press the EXIT button, the scan will stop and the receiver will revert back to the channel that was in use when the scan started.
Of course, the scan will stop itself if you are in mode and a signal is detected.
Signal Hunting Workflow
This section describes a practical workflow for finding and following a telemetry tag in the field.
The receiver is designed to help the operator hear a pulsed wildlife tag as an audible tone, then use pitch, signal level, and directional technique to home in on the source.
Starting From a Known Tag Frequency
Begin with the tag's known nominal frequency.
- If the tag has already been programmed into a memory channel, select that channel.
- If the tag is not already stored, enter the frequency in frequency mode or tune to it manually.
- Use Adjust mode to fine tune the frequency of necessary.
Recommended starting setup:
- begin with a moderate RF gain setting
- use a squelch setting low enough that a weak tag can still be heard
- listen for several pulse periods before deciding a frequency is quiet
Recognizing the Telemetry Ping
A wildlife telemetry tag usually presents as a short repeating tone or ping.
Unlike a voice transmission, the sound is brief and repetitive. Depending on signal strength and tuning, it may sound:
- sharp and clean
- soft and faint
- slightly raspy or noisy
- higher or lower in pitch as you tune
When first listening for a tag:
- pause long enough to hear multiple pulse cycles
- avoid moving the tuning too quickly
- compare what you hear across a few pings rather than reacting to a single brief sound
A valid signal typically repeats at a regular interval. Once SPOT has detected a repeating signal it will display a BPM indicator at the bottom of the screen. BPM stands for beats per minute - in other words, how often the ping is being heard. For example, 60 BPM is 60 beats per minute, or 1 beat per second. If the signal is lost, the BPM indicator will no longer be displayed.
You can enable/disable this indicator using the menu item.
Using RF Gain to Manage Strong Nearby Signals
RF gain is especially important once you get close to a transmitter.
At long range, higher gain helps you hear weak tags. At short range, too much gain can make the signal sound overly strong, broad, or difficult to judge.
Reduce RF gain when:
- the signal is extremely strong
- multiple nearby reflections make the signal hard to interpret
- small antenna movements do not seem to change the signal much
- the receiver feels overloaded or wide
Increase RF gain when:
- the tag is weak or intermittent
- you are searching a larger area
- you are not yet confident you are hearing the tag at all
A useful field technique is:
- Start with moderate gain.
- Raise gain to detect the signal.
- Lower gain gradually as you approach the source.
Using the Meter and Peak Hold to Improve Direction Finding
The signal meter gives visual support for what you are hearing.
Use the audible ping as the primary clue, and use the meter and peak-hold behavior to confirm trends.
The meter is most useful when:
- sweeping a directional antenna across an arc
- comparing one direction against another
- checking whether a repositioning step improved or worsened the signal
Peak hold can help when signals are brief. It keeps the strongest recent reading visible long enough to compare directions more easily.
A simple workflow is:
- Point the antenna in one direction and listen for several pulses.
- Watch the meter and peak indication.
- Rotate or reposition slightly.
- Compare both the sound and the indicated peak.
- Keep moving toward the direction that gives the strongest, clearest response.
Do not rely on the meter alone. Reflections, terrain, and antenna angle can all affect the reading.
Practical Scan, Stop, and Skip Workflow In The Field
Scanning is most useful when you are checking multiple known tags rather than searching blindly across an arbitrary range.
Recommended workflow:
- Put the relevant tags into memory channels.
- Assign those channels to relevant lists.
- Start scan on the desired list(s).
- When the receiver stops on a hit, listen long enough to confirm it is a real tag.
- If the hit matters, stop and work that signal.
- If it is irrelevant, weak, or not the target of interest, resume scanning and continue.
Use OnHit and ScanDw to match your work style:
- STOP is best when every hit should be examined
- DWELL is best when you want the receiver to keep cycling automatically
Suggested Hunting Pattern
For a straightforward field search, this pattern works well:
- Start at the known tag frequency.
- Listen for a regular pulse.
- Optionally Fine-tune the frequency slightly while listening for the best-sounding ping.
- Adjust RF gain so the signal remains interpretable.
- Use antenna movement/orientation, the meter, and peak hold to compare directions.
- Reposition and repeat until the source area becomes clear.
As you get closer:
- lower the gain
- slow your movements
- take more directional comparisons
- trust repeated trends more than a single strong peak
Common Mistakes
- tuning too quickly past a weak signal
- using too much RF gain near a strong transmitter
- relying on one pulse instead of listening for a repeating pattern
- using the meter without also paying attention to the sound
- leaving the antenna in only one orientation
- staying in scan mode after the target has already been identified
Menu Options
The menus are grouped into related items as shown below.
Menu Navigation
- Press M to open the menu.
- Use ▲ / ▼ to move through menu items.
- Press M again to edit the selected item.
- Use ▲ / ▼ to change the value.
- Press M to save the new value.
- Press EXIT to leave the current item or leave the menu.
- Once you've entered the menu system, you can type the number of the menu item you're interested in to get there quickly.
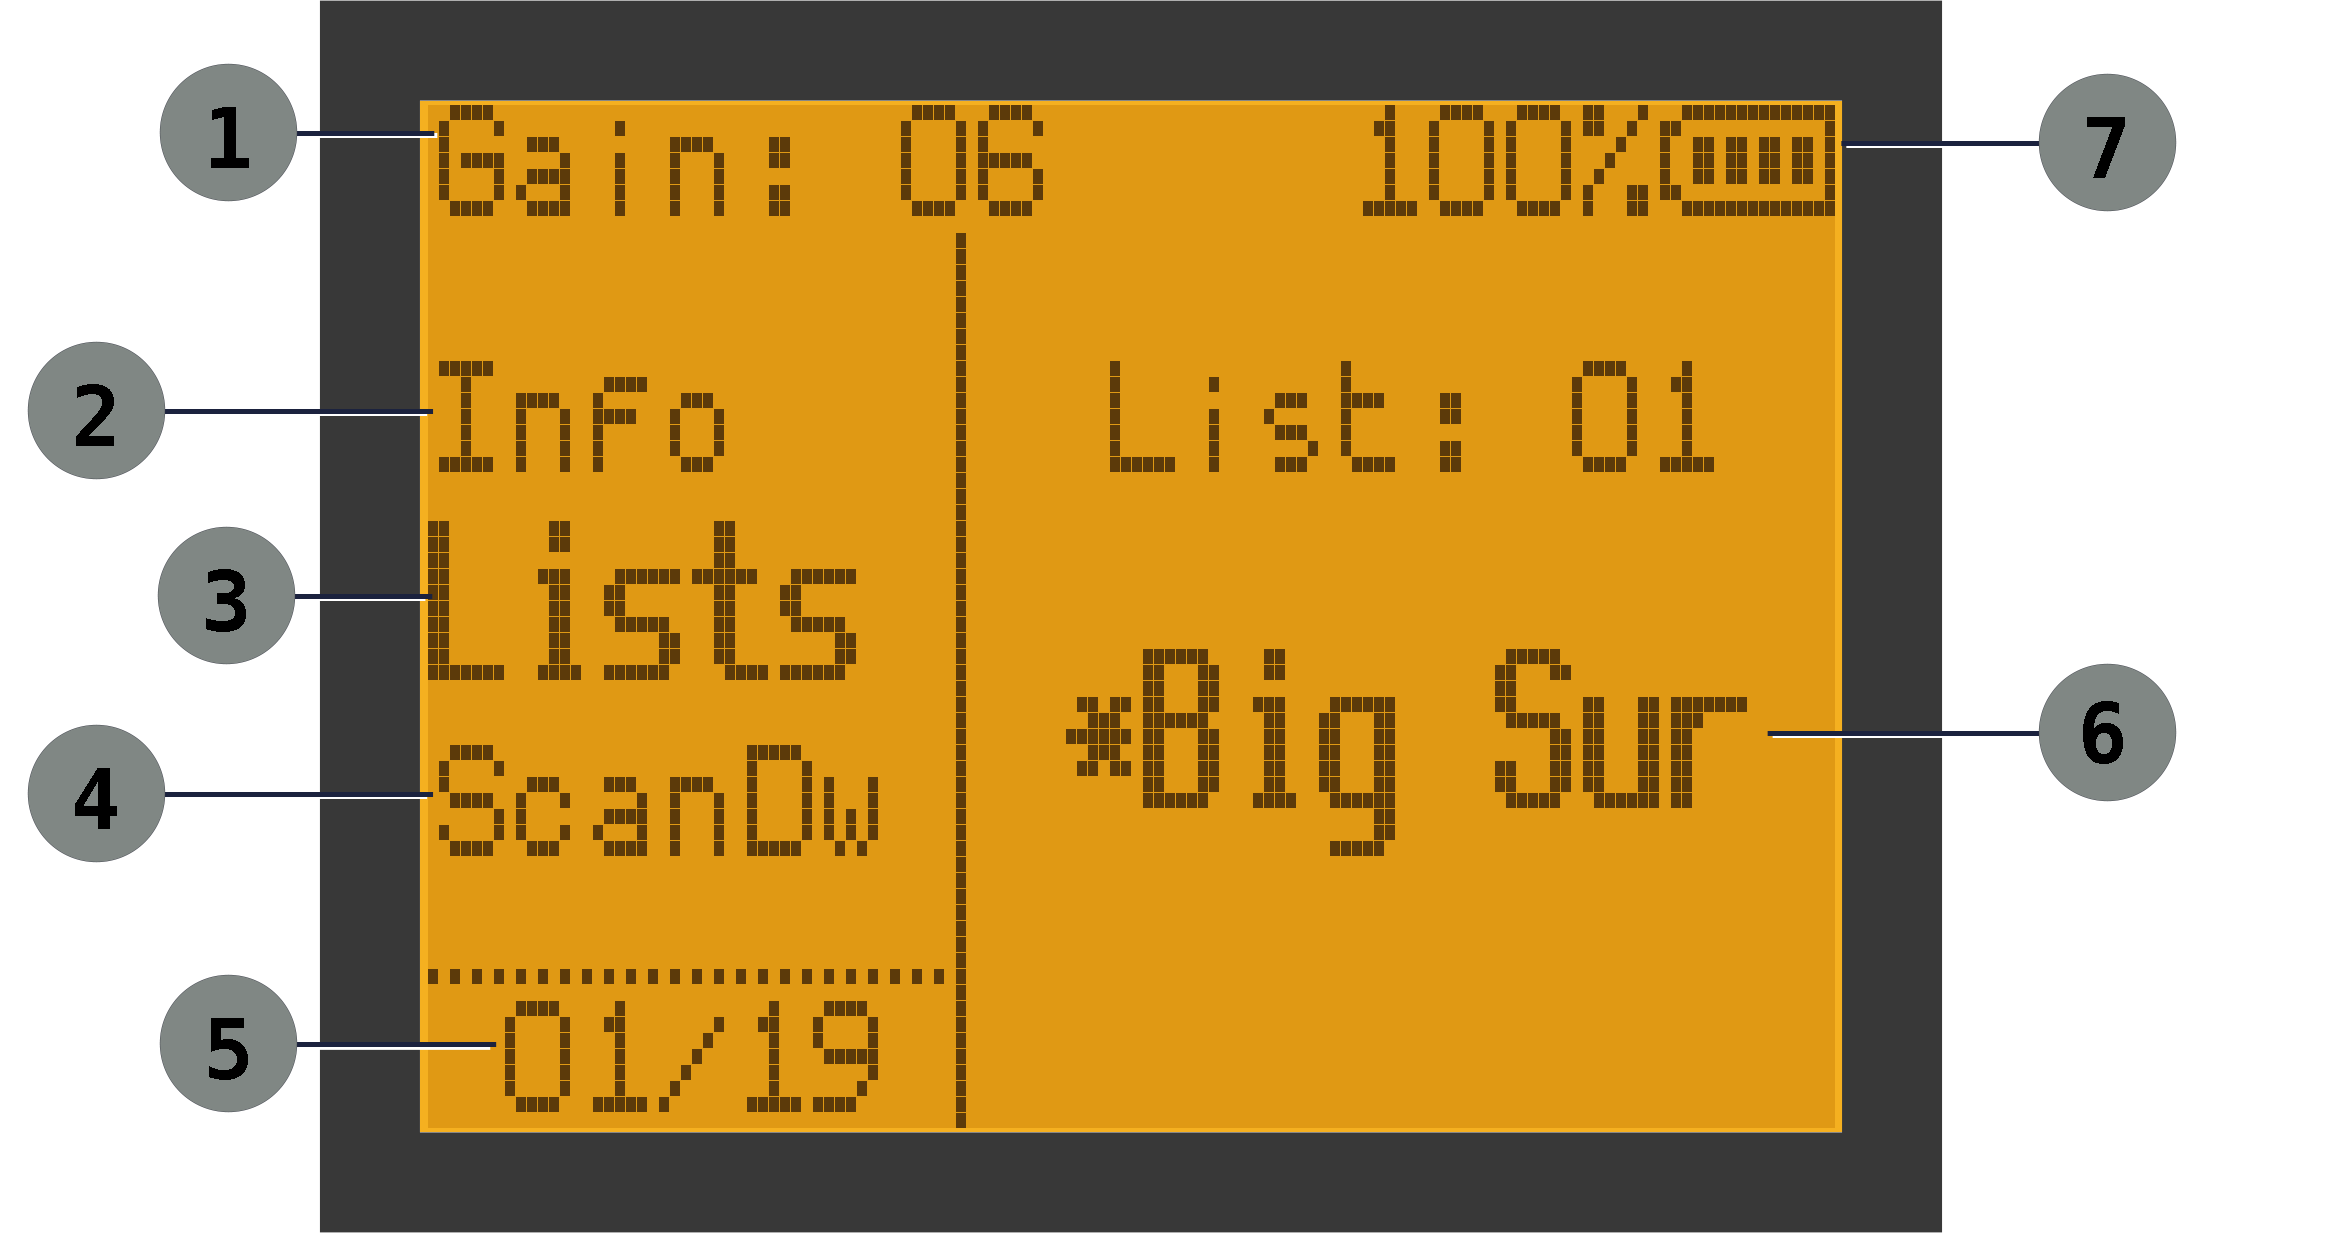
An example menu screen is shown below. In this case it is the menu that allows you to choose which lists are selected to be scanned.
| Menu Screen Sample | ||
|---|---|---|
| ① RF Gain (0-24) | ② Previous Menu Item | ③ Active Menu Item |
| ④ Next Menu Item | ⑤ Menu Item number | ⑥ Menu Value |
| ⑦ Battery level | ||
List of Menu Items
- : Selects which lists are active. Use M to toggle a given list on/off. At least one list is always active.
- : Sets scan dwell timing. Available values: , , , , , , , , and seconds.
- : Controls whether scanning stops or dwells after a hit.
- : Edits scan-list membership for the current memory channel. Use M to toggle the highlighted list on/off for that channel.
- : Edits list names (up to 10 characters per list). Quick-toggle shortcut for list membership: F - 7, then use the list-selection shortcut for the desired list.
- : Saves the currently tuned setup (including frequency and channel settings) into a memory channel. By default, this uses the currently selected channel. You may choose a different channel by entering its 3-digit number or by using ▲ / ▼. Once the destination channel is selected, press M to arm the save action (SURE?), then press M again to confirm and overwrite that channel.
- : Edits the name of a selected memory channel (up to 10 characters). By default, this will set/change the name of the currently selected channel. However, you may choose a different channel by entering its 3 digit channel number or use ▲ / ▼. Once you have selected the channel, hit the M to confirm your selection. Use the ▲ / ▼ keys to scroll through a list of characters. Use the M to advance to the next position. Repeat the process until you have entered all the character positions (you may leave positions blank).
- : Deletes a memory channel. By default, this uses the currently selected channel. You may choose a different channel by entering its 3-digit number or by using ▲ / ▼. Once the channel is selected, press M to arm the delete action (SURE?), then press M again to confirm deletion.
- : Sets how long the backlight stays on.
- : Enables or disables the dedicated flashlight shortcut (F-4).
- : Enables or disables menu/key beeps.
- : Sets receiver gain. This setting is preserved even if you turn the receiver off.
- : Sets the tuning step used for frequency changes, including Adjust mode. Changes take effect immediately; to store the step to a memory channel, use .
- : The peak indicator shows the highest level that the signal has reached recently. How recently is set by the peak-hold time. Available values: , , , , , , and .
- : Sets what the receiver displays when it powers on. Choices are:
- : Shows the SPOT logo
- : Displays a welcome message and shows the version of the firmware running on the receiver
- : Displays battery voltage information
- : Jumps directly into the normal receiver display
- : Displays basic firmware and battery information. Use the ▲ / ▼ buttons to show additional pages of information.
Programming
It is possible to program your radio completely from the menu system. It is, however, a laborious process, particularly if you have many memory channels. The better option is to use a companion application and create all the settings on your computer and transfer them to the receiver using a USB cable. Both options are outlined below.
SPOT Menus
You can program the radio entirely from the on-device menu system, but it won't be fun. We suggest using SPOT Tools (see below). However, there may be times in the field where you want to make a change; e.g. adding a channel. You can do this by setting the frequency and step while in frequency mode. Then use the and menu items. You can also add it to Lists of your choosing using the menu item.
Alternatively, you ca start with an existing channel from memory mode, copy it to frequency mode, then make whatever alterations you would like. To do this, press F - 1 while you have the source channel selected in memory mode.
SPOT Tools
SPOT Tools is an application that allows you to do all of the receiver setup on your computer, then transfer it to the receiver with the click of a button. This includes creating channels, putting them in lists, setting receiver options, etc. It even allows you to update the firmware on your receiver when newer versions become available. It can also read the settings from a receiver. This makes it easy to clone the settings from one receiver to another, or have a master setup that can be easily programmed into many receivers.
SPOT Tools is the preferred and recommended way of programming your receiver. It has its own manual, so we won't go into more depth here.
Battery, Charging, Power
Overview and Installation
The receiver uses rechargeable 7.4 Volt batteries. The most common battery has a 1600 mAh capacity, but a larger 2200 mAh version is available. The capacity determines how long your receiver will operate on one charge. The standard battery should provide about 12 hours of operation.
The receiver reports battery information both on the main status line and in the Info menu. You can also choose to show the voltage on the startup screen. While the nominal battery voltage is 7.4V, a fully charged battery will read closer to 8.4V.
Installation: To install the battery, align the battery pack with the grooves on the top of the rear compartment on the receiver. Push the battery upward and push the bottom of the battery into place. You'll hear a click when the battery is seated. . Slide the battery upwards until it clicks into place. To remove the battery, press in on the release button at the bottom of the battery and pull the bottom outward. It will then slide out of the receiver.
Charging
- Desktop charger: Your unit is provided with a desktop charger that plugs into a normal AC outlet. You can slide a battery into the charger, or insert your receiver with battery still attached. It will recharge the battery in about 4 hours according to the manufacturer. There is an LED on the charger that will display red while charging and green when charging is complete (or no battery is inserted).
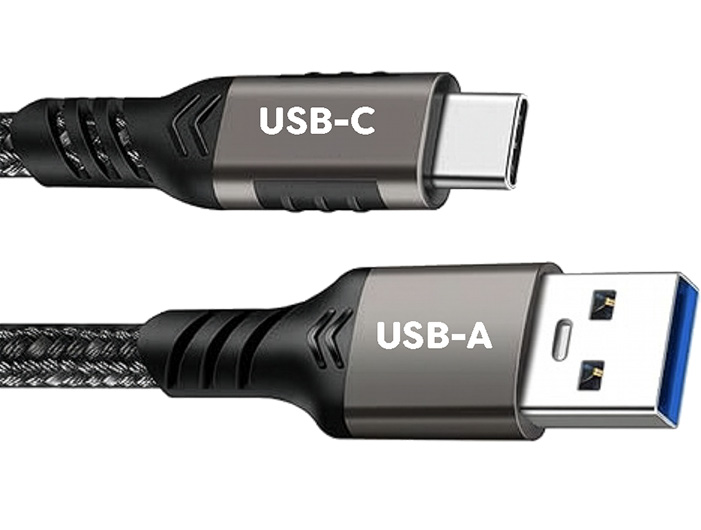
- USB Charging: You can also charge your battery using a USB cable, but according to the manufacturer, it will only partially charge your battery, and the desktop charger is preferred. To charge with USB, plug one end of the cable into a power source such as a charger or computer USB port. Plug the other end (USB-C) into the receiver by flipping up the bottom side of the rubber flap on the right side of the radio to expose the USB port.
When charging begins, the receiver's power light will turn blue. When charging is close to complete, you may see the blue light flash. The light will remain blue until charging completes. At that point you can remove the USB cable and flip down the rubber boot to keep the port covered.
Charging may require a USB-A to USB-C cable, rather than USB-C to USB-C. If the blue charging indicator does not appear, try a different cable.
After-market Batteries
There are after-market batteries available with larger capacities. We have not tested, and cannot vouch for, any particular after-market battery. If you do use one, it may provide a separate USB-C charging port on the battery itself. If so, please charge the battery using that port.
Also note that the battery level displayed by SPOT Tools may not be accurate for batteries with capacities other than 1600 mAh or 2200 mAh. Future versions of SPOT and SPOT Tools may provide settings for larger batteries and make the display more accurate.
Operational guidance
- Check the battery level before going into the field
- Use moderate backlight settings to conserve battery
- If a low battery warnings appear, finish critical work and recharge as soon as practical
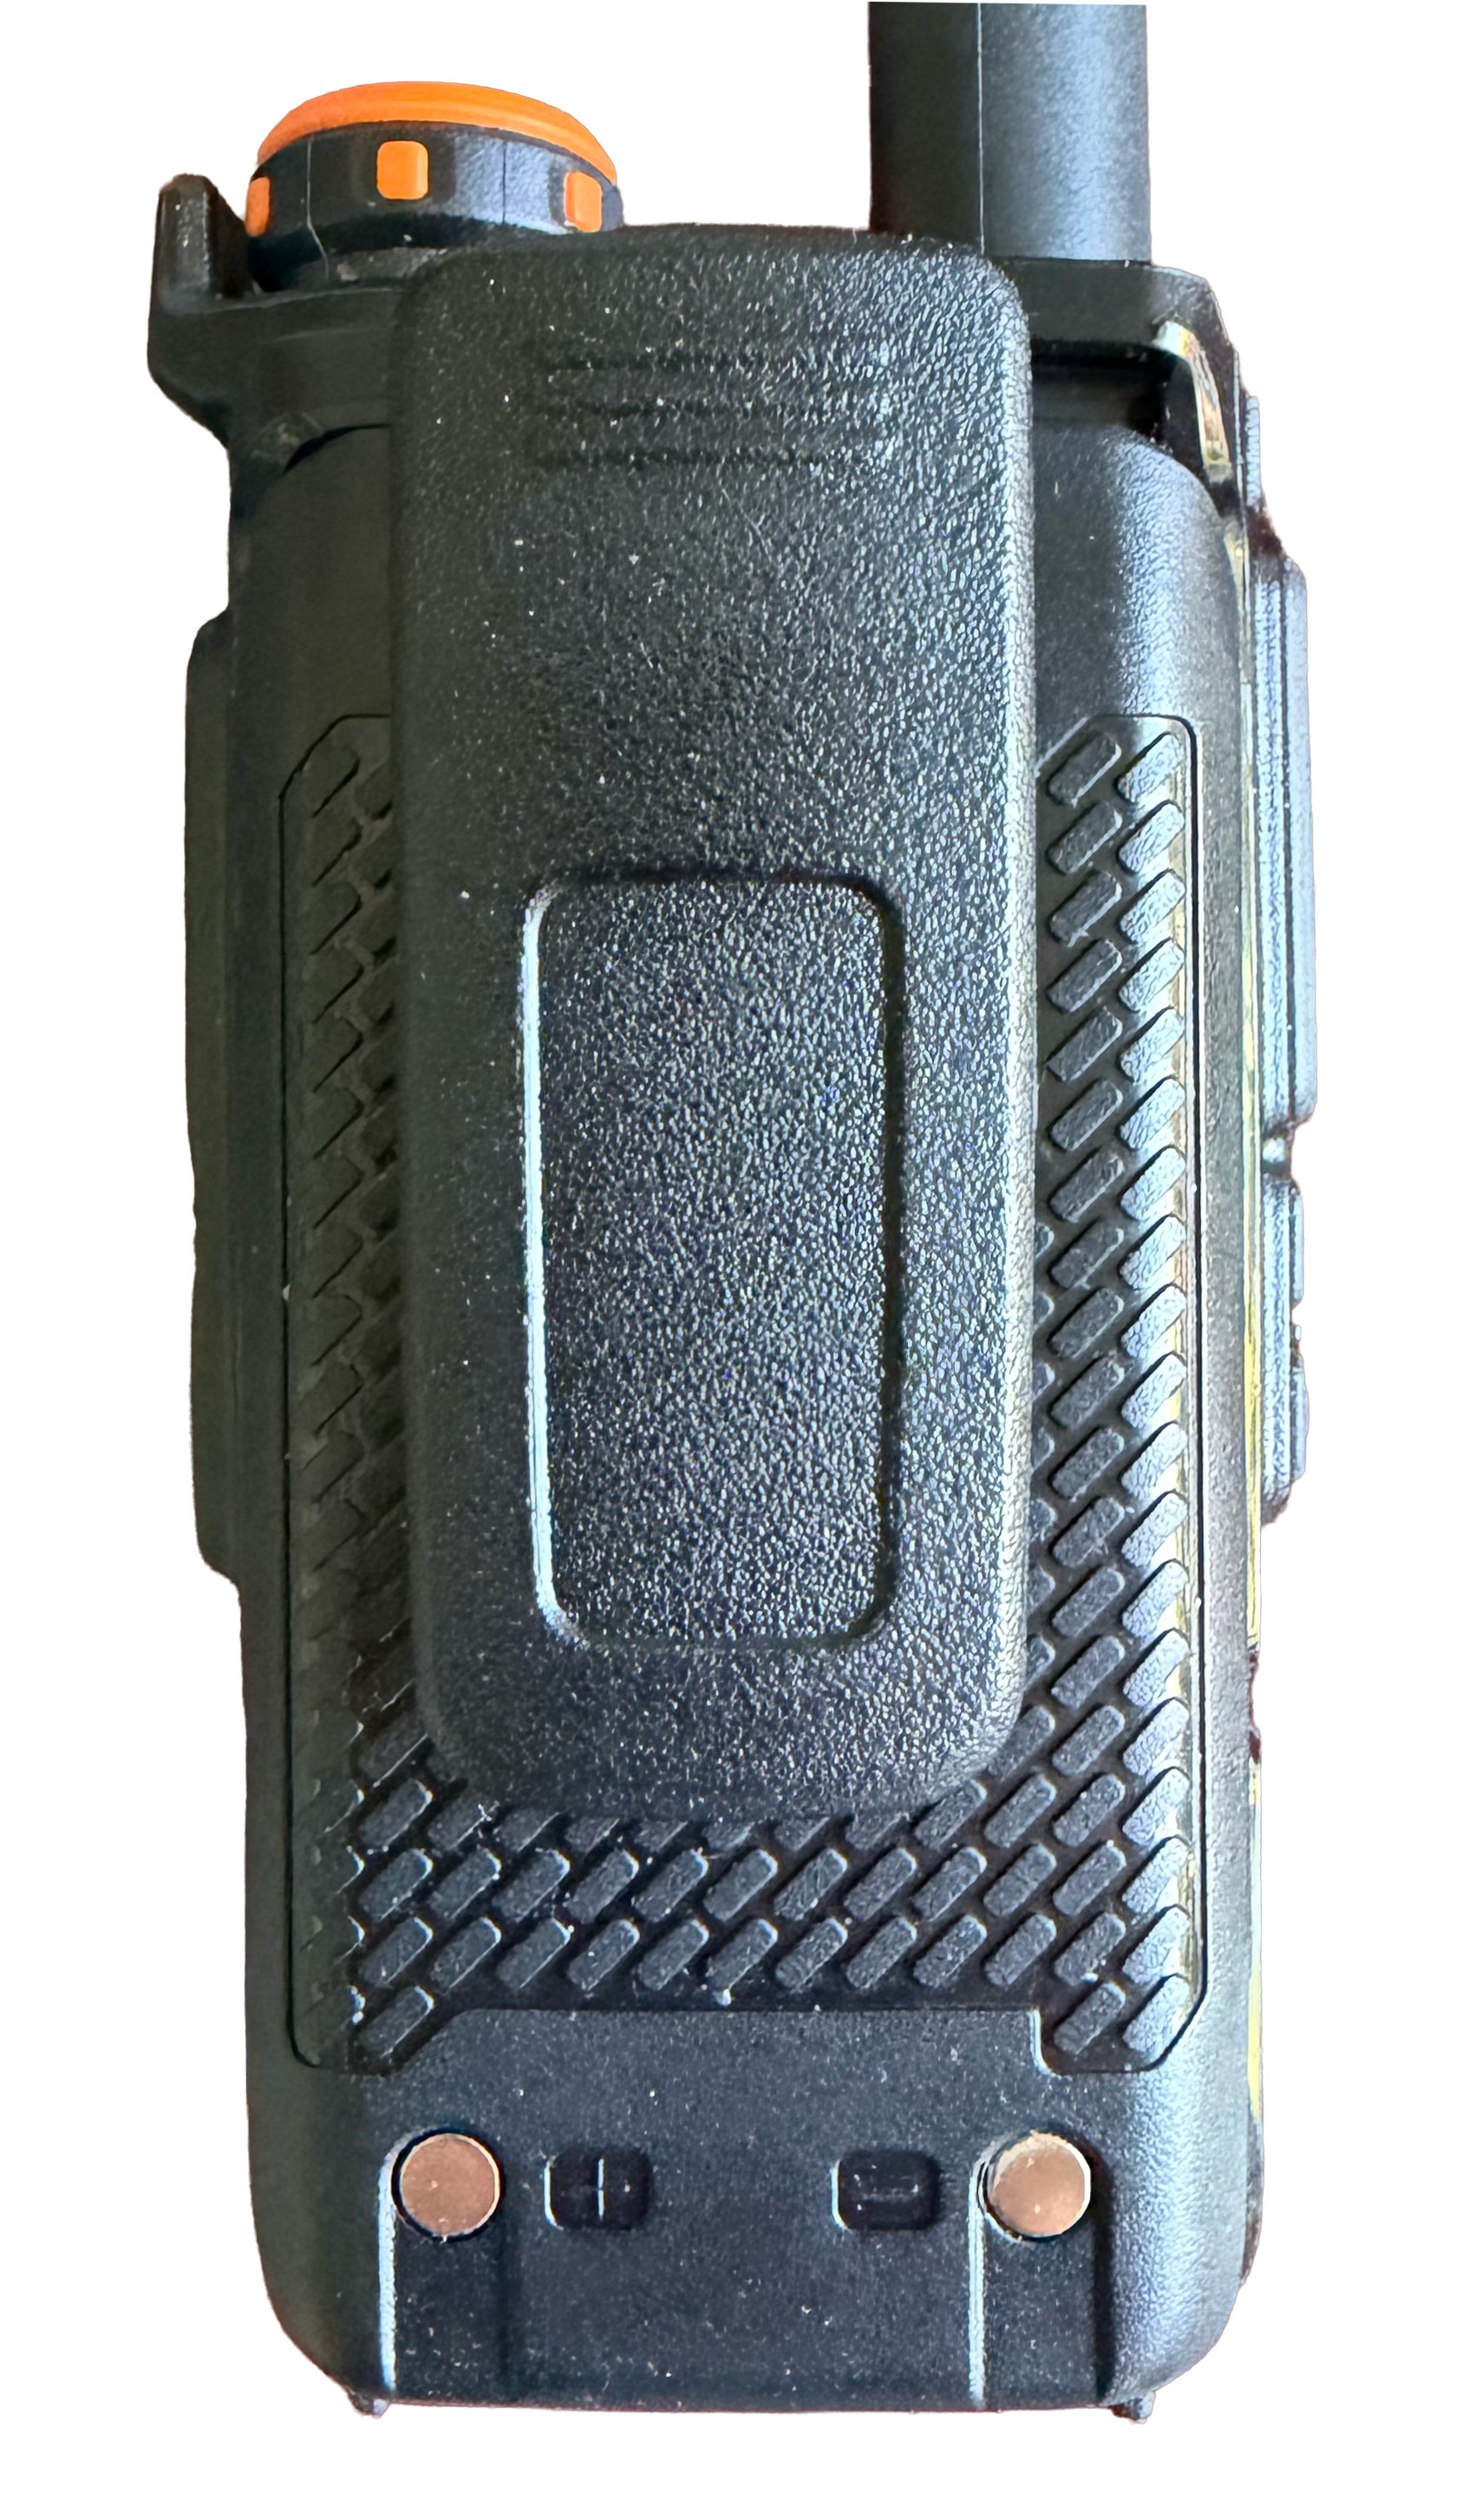
- Note that on the back of the battery, towards the bottom, there are two metal contacts (see image) which are used during charging. When the receiver is stored in your pocket, bag, or backpack, please be sure that the contacts won't simultaneously come in contact with a piece of metal, like car keys. That can short out the battery.
Troubleshooting
No Signal Heard
- confirm you are on the correct memory channel or frequency
- confirm the antenna is connected
- raise RF gain
- listen long enough for several expected pulse intervals
- ensure nothing is plugged into the headphone port
- advanced: lower squelch
Tone Pitch Seems Wrong
- check that you are near the correct nominal frequency
- tune slightly above and below the expected frequency
Signal Is Present but Weak or Broad
- adjust RF gain
- fine-tune around the expected frequency
- compare several nearby tuning positions instead of relying on one step
Scan Does Not Stop As Expected
- check Lists (ALL or one or more specific lists)
- if using specific lists, verify the active selection in Lists
- check channel membership via LstMem
- verify OnHit
- verify ScanDw if using DWELL
- remember that this firmware scans memory channels, not arbitrary frequency ranges
Settings Seem Different After Programming
- Your programming tool may have "sanitized" a value that was not valid, and changed it to a default value that is acceptable.
Reference
Default Key Behavior
- PTT: toggle between memory/frequency mode. During an active scan, pressing PTT pauses the scan.
- F1: increase RF gain. Press and hold to move up continuously.
- F2: decrease RF gain. Press and hold to move down continuously.
- F - 1: copy current memory channel's frequency and step into frequency mode. †
- F - 2: ping-pong between the most recent two channels. †
- F - 3: Toggle between memory mode and frequency mode.
- F - 4: toggle flashlight when FlEn is set to
- F - 7, then 1 to 0: toggle current channel membership in lists 1 to 10. †
- F - 8: enter Adjust mode for the current memory channel; use F - 8 again to save the adjustment or EXIT to go back to the original frequency. †
†: while in memory mode
Menu Item Numbers and Grouping
Enter the menu system by pressing the M button. Once you're in the menu system, you can jump directly to a desired menu item by entering its number.
Ad Hoc Mode
Even when you've carefully prepared your lists in advance, there may be times when you just want to make a list on the spot. For example, you may find yourself in a location where certain birds are known to hang out. You'd like to be able to easily scan for just these few tags. You could use the menu system to populate an unused list with those birds, but you might find it too cumbersome.
Ad Hoc Mode addresses this by making it very easy to specify a short list of channels or tags, and start using that list immediately as if you had set it up in advance. The idea is: press a key to enter Ad Hoc Mode, type channel or tag numbers, use the list, exit Ad Hoc Mode. Let's look at an example where we are in Tag mode and want to focus on tags 209, 334, and 1186. Here's what we'd do:
- Long press 5 to enter Ad Hoc Mode
- Enter the tags:
- 2 0 9 M
- 3 3 4 M
- 1 1 8 6
- Use the list. Navigate as usual with the ▲ / ▼ keys and/ or use the Scan function.
- Long press 5 to exit Ad Hoc Mode
That's it. When you exit, you'll be right back where you left off before you entered - same active lists, same active channel.
Some additional notes:
- While in Ad Hoc Mode, the list name (Ad Hoc by default) will be highlighted. That's a quick way to know that you're in Ad Hoc Mode.
- If you want to clear out your ad hoc list and start with adding new channels/tags, just long-press EXIT while in Ad Hoc Mode and you'll be back to an empty list and ready to start adding a new set of entries.
- We automatically use List 16 for the ad hoc list. You can change its name if you'd like. You can also use it as a normal list even when you're not in Ad Hoc Mode. This makes it easy to create a an ad hoc list quickly and add it to a pre-existing list by selecting the pre-exisitng list and the ad-hoc list as active.
Known Issues
There is an audible "pop" when the automated scan function advances to the next channel. The scan will proceed as usual.