
Welcome
Welcome to SPOT Tools - a companion application that allows you to program all aspects of the SPOT telemetry receiver. To best understand how this tool works, you'll need to be familiar with concepts like Channels, Lists, and various receiver modes. If you haven't done so already, please review the SPOT user manual. It goes through all of those topics and more.
Once you've programmed your receiver, SPOT Tools allows you to save all your settings to a file and share them with others. Or, your organization may provide the most up-to-date files to you. SPOT Tools will load that information into the receiver for you.
SPOT Tools can also be used to update the firmware on your receiver (the firmware is the software that runs on your receiver). This keeps your receiver up to date with the most recent improvements and fixes.
ConventionsThroughout the manual we'll use the following formatting conventions to help identify elements of the interface, or specific terms related to the receiver or tracking process:
- : The label of a button
- : The value of a dropdown list or other entry field.
- Term: Other UI elements or a term of interest
Computer: File names, computer commands- 🔍: If you see a magnifying glass in the lower right corner of an image, it signifies that you can click the image to get a larger view.
System Requirements
SPOT Tools runs on your desktop or laptop computer and uses a USB cable to connect to your receiver. SPOT Tools doesn't need an internet connection to run, so it can be used offline in the field if needed.
Supported Operating Systems
- macOS: current Apple Silicon or Intel systems.
- Windows: Windows 10 or newer (64-bit).
- Linux: modern 64-bit desktop distributions.
Hardware and Connectivity
- One available USB port on your computer.
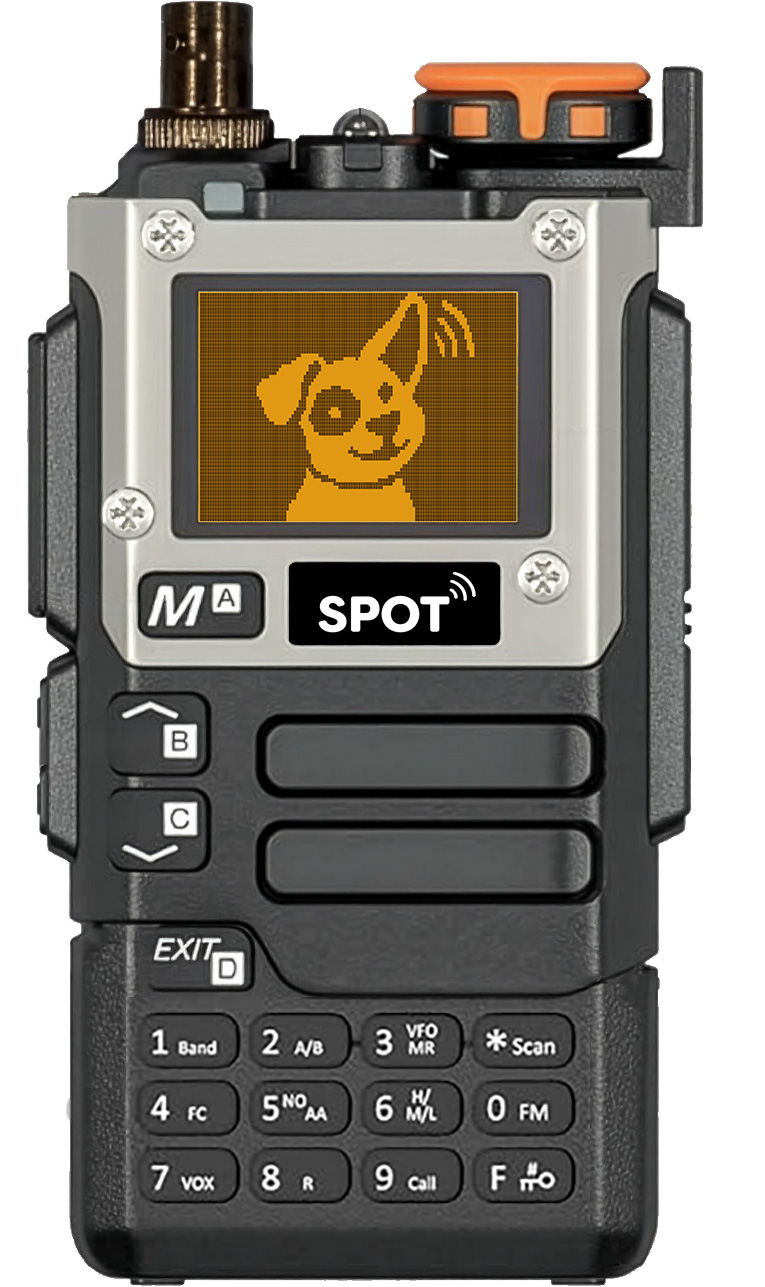
- A SPOT receiver with sufficient battery charge.
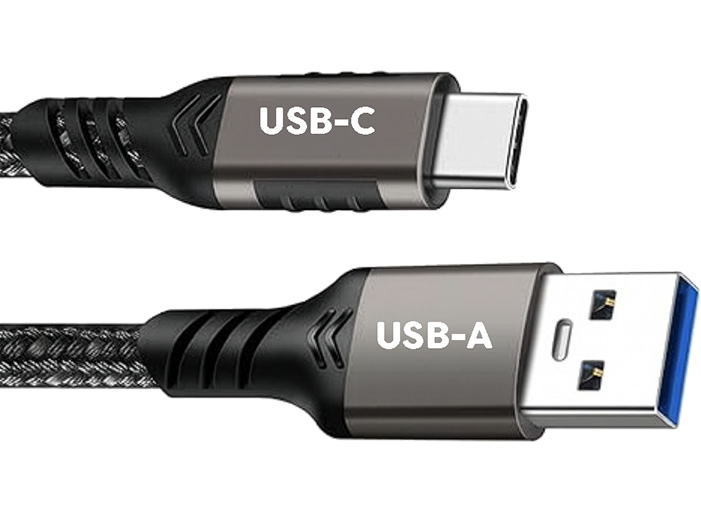
- A USB-C data cable. You may use a cable with a USB-A connector at one end and USB-C at the other, or USB-C at both ends. Refer to the image for details.
- Recommended display size: at least 1280×800 for comfortable channel table editing.
Drivers and Permissions
- On some systems, USB serial adapter drivers may be required (commonly CH340 or CP210x family adapters).
-
On Linux, your user account typically must have serial-port access
(for example via the
dialoutgroup). - If the receiver is not detected, check cable seating, adapter drivers, and operating-system serial permissions first.
- No internet connection is required for normal use.
Installation and Launch
Install
- Download the latest release package for your platform.
- Install and launch SPOT Tools.
- macOS: To launch the app the first time, right click and choose Open instead of just double clicking.
- Windows: On first launch, SmartScreen may warn. If needed, choose More info then Run anyway.
-
Linux: AppImage and
.debpackages are available.
Platform-Specific First-Time Setup
-
Linux serial permissions: if connect fails with
permission errors (for example
/dev/ttyUSB0), add your user to thedialoutgroup, then log out and back in (or reboot) before retrying:
sudo usermod -aG dialout $USER.
First Launch
Every time SPOT Tools launches it reads a default receiver configuration and your personal application settings:
- The initial receiver configuration contains generic default settings. If your organization configured SPOT Tools for you, they may have customized the defaults to match organizational guidelines.
- Your personal applications settings will be described in more detail below and don't affect the operation of the receiver. They only affect the operation of the app.
The first time you launch the app, it is best to test that you can make a connection to your receiver. To do so:
- Connect the USB cable from your computer to your receiver. Be sure the receiver-end is fully seated into the receiver. It may seem like it is all the way in, but it actually requires some force to make it seat fully.
- Turn on the receiver and press the button. You should see several indications that the connection succeeded, including a message in the status area.
- Optionally, press the to ensure that the receiver is communicating properly.
Interface Overview
The main window (see image below) has three main areas:
- Top Action Bar
- Status Area
- Tabs: Receiver, Channels, Settings
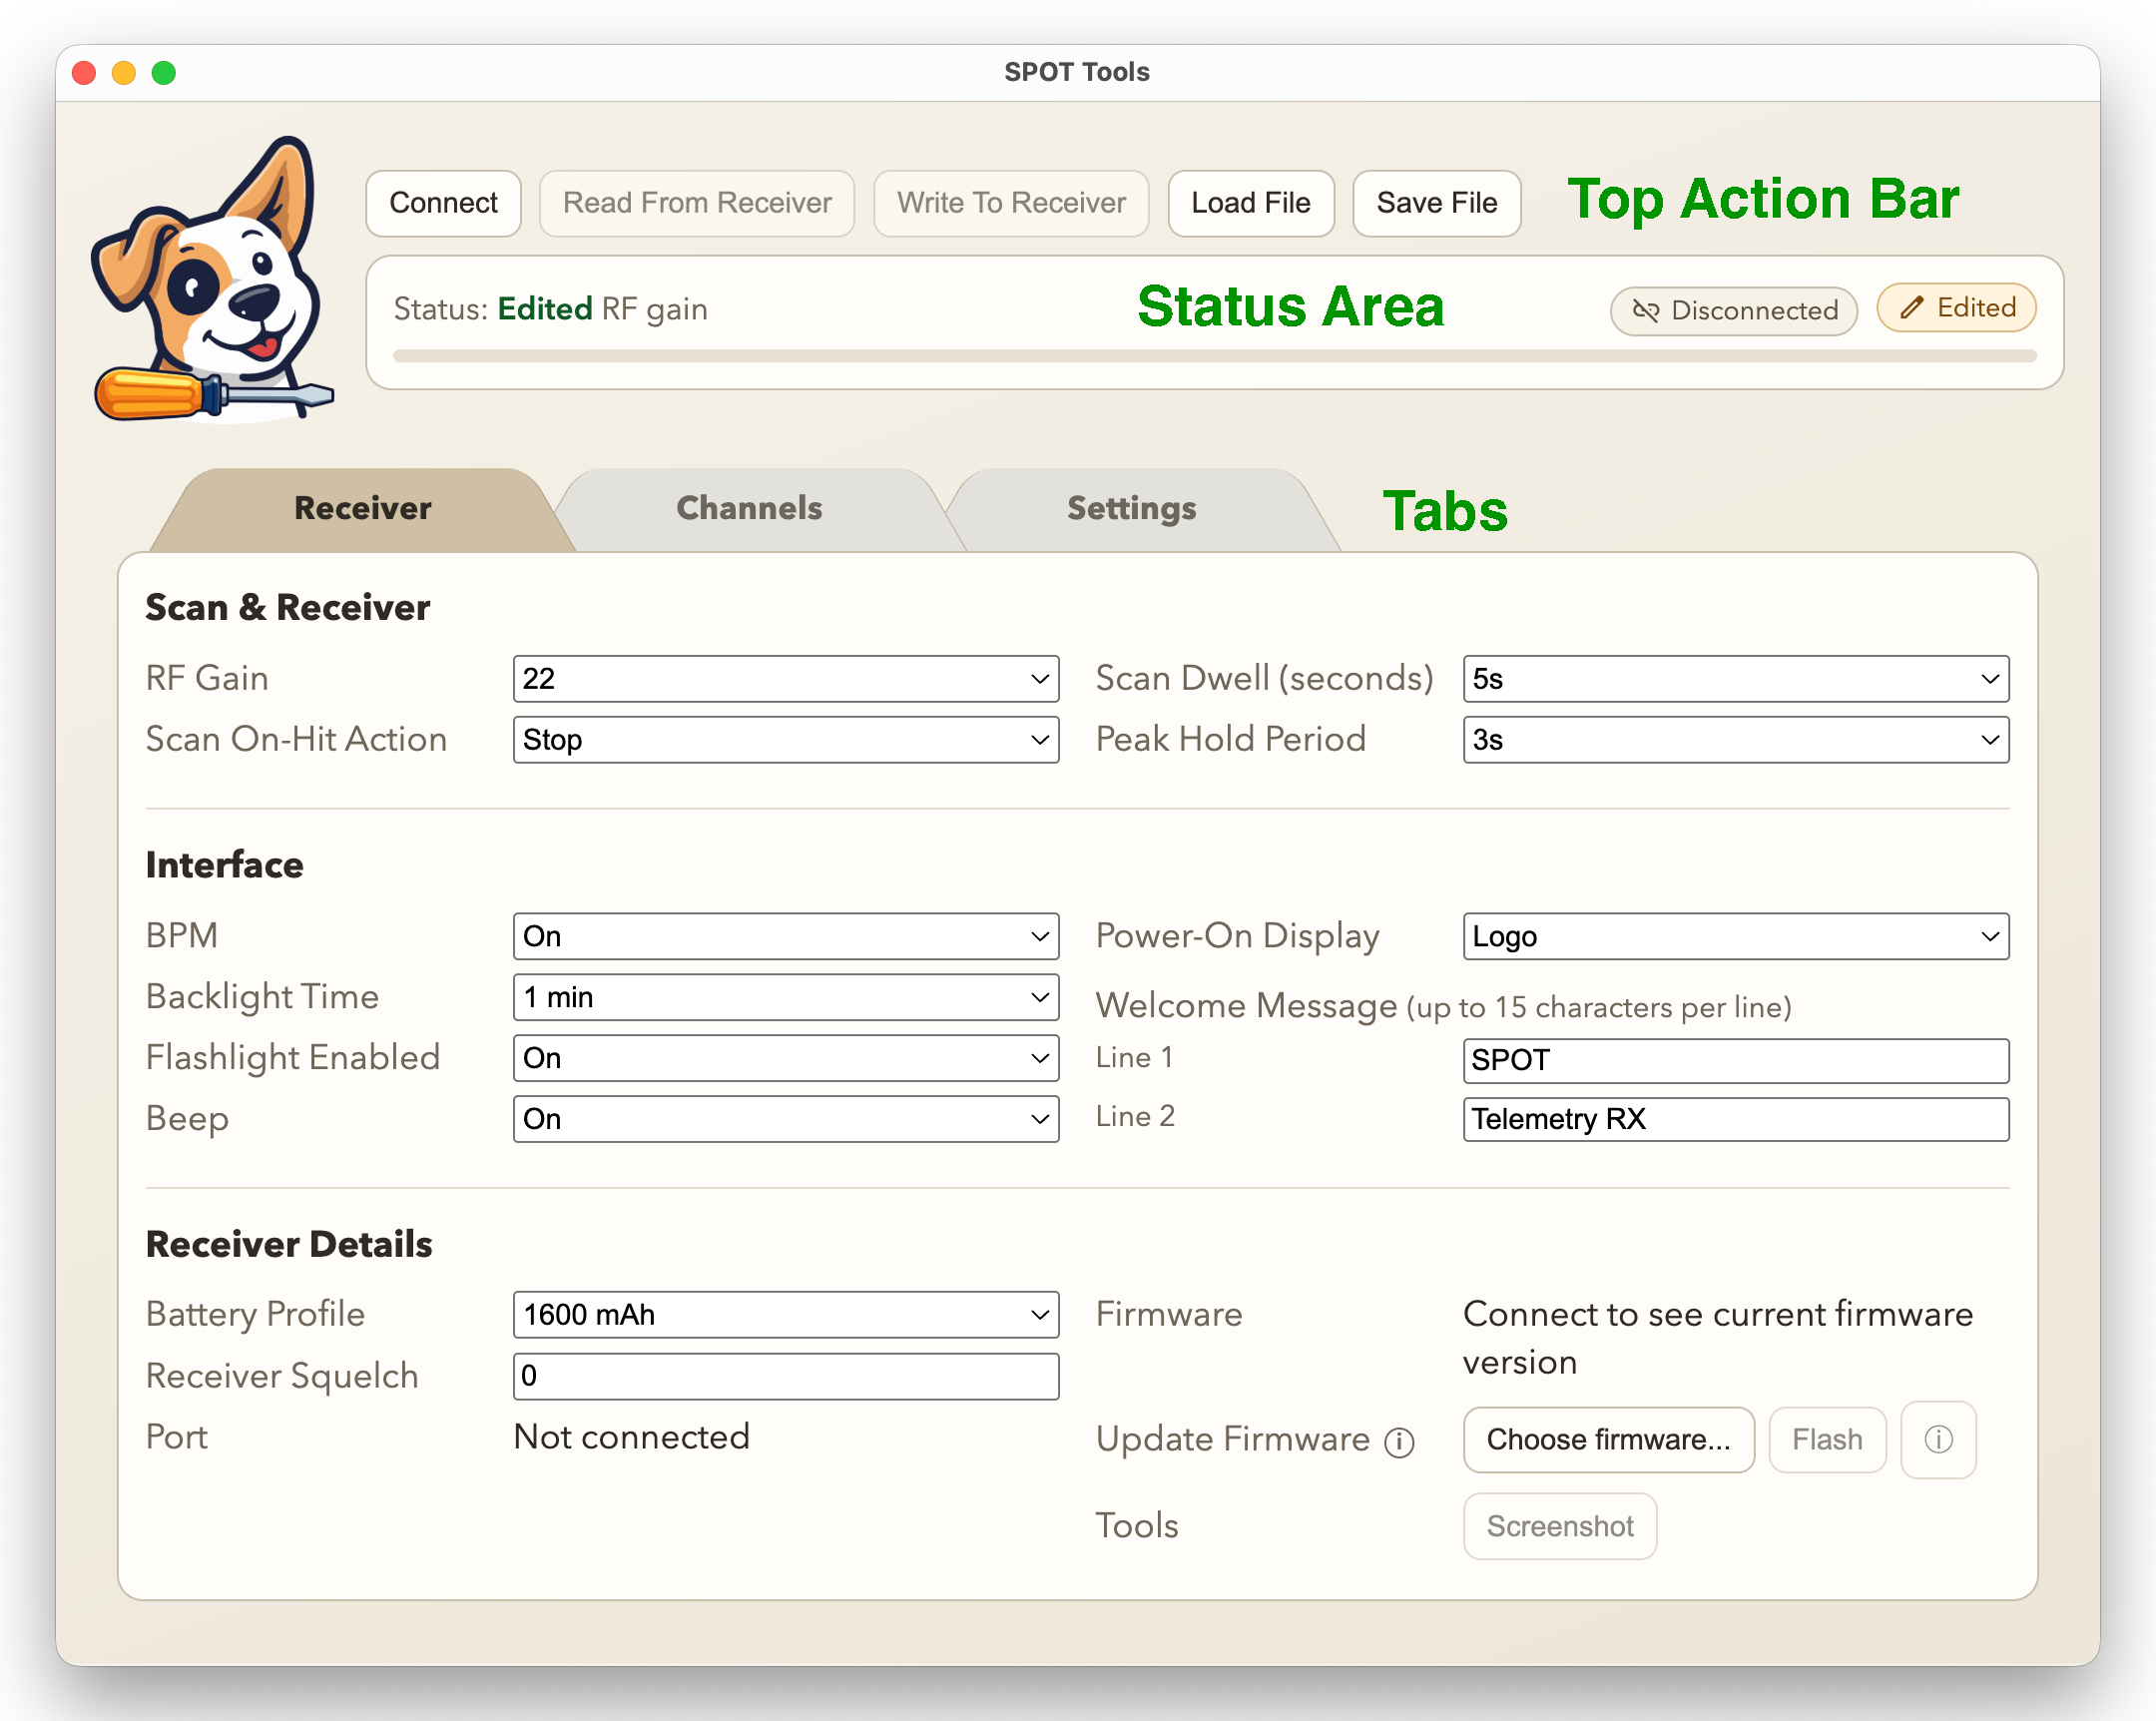
Top Action Bar
This area contains the buttons that you'll use to perform actions:
- / : Use this button to create a connection to the receiver using the USB cable.
- : Reads the settings from the receiver into the app.
- : Save the settings from the app into the receiver.
- : Load a file with receiver programming into the app.
- : Save the current programming info from the app to a file.
Status and Progress
Keep an eye on this area as you are using the application. It is visible from every tab.
- Status: Textual feedback about tasks that are in progress and their outcomes.
- Progress Bar: A traditional progress bar for lengthy operations.
- Connected/Disconnected: Indicates whether we are connected to the receiver.
- Clean/Edited: Indicates whether any receiver or channels settings have been edited.
Tabs
SPOT Tools has three main tabs that are described in more detail in their own sections. View a tab by selecting its corresponding button: Receiver, Channels, or Settings. The tabs consume the majority of the window
- : View and change settings related to the overall behavior of the receiver.
- : View, define, and edit channels and lists.
- : View and change settings for the app itself, not the receiver.
Top Action Bar
The buttons in the Top Action Bar launch the main actions performed by the app such as writing updated information to your receiver. This section describes each of the controls, and later sections describe where and how they should be used.
Connecting to the Receiver
- Attach the programming cable to the computer and receiver. Be sure the cable is fully seated on the receiver side. It may seem like the connector is seated, but if you are having trouble, more force may be required to make it click fully into place.
- Power on the receiver as usual.
- Click .
-
Select the serial port in the connection dialog. If you are not sure which port to select, you can:
- unplug the cable from your computer (not from the receiver)
- check which ports are available in the dropdown list
- cancel the dialog
- plug the cable back in and click again
- choose the new option that just appeared in the list of ports
If a previously selected port is still available, it is offered first for your convenience. You can still choose a different port if appropriate.
Connection StatusThe state of the connection is displayed in several places in the interface:
- The button will change to
- The Connected/Disconnected indicator at the right of the status area will update
- The status line will display a "Connected" message after a successful connection, and an error message if a connection attempt failed
Reading from and Writing to the receiver
After connecting to your receiver, you can read the content of the receiver into the app, or write the values from the app (receiver settings, channels, and lists) into the receiver. When you read from the receiver, you overwrite the data that is already loaded into the app. When you write to the receiver, you overwrite the current settings stored in the receiver.
Before reading or writing, you must connect to your radio following the instructions above. Once you are connected, simply click either the or the button. The status bar will show the progress and give a status message when the operation is complete.
When writing to the receiver, you'll first see a status message saying that the update is being planned. You'll also see status updates as the data is being written. After the write is complete, you'll be asked to approve a restart of the receiver. Please do so.
NOTE: When the receiver restarts, it validates everything you wrote. If you changed many channels, this will take time and your screen may be blank for up to a minute. Please don't turn the unit off. Wait for the normal start screen then proceed as usual.
Loading from and Saving to Files
You can save all the data in the app (receiver settings, channels, and lists) into a file, and you can load the app data from a file. Note that reading from a file does not copy the loaded information to the receiver - it just loads it into the app.
-
: load a saved SPOT Tools file, Excel (
.xlsx), or Telonics TR-8 (.tr8) file. The app will determine the type of file when you choose it. - : opens a format chooser and allows you to choose whether to save a SPOT Tools file or an Excel file. It will then write current application data to the file name and location you select.
About Files
SPOT Tools has its own file format
that it uses to capture all of the information stored in your
receiver, but it can also read and write Excel files. That allows
you to do all of your updates in Excel if you prefer, then load the
information into the app.
SPOT Tools can also read Telonics
.tr8 files. This can be useful if your organization
publishes its data in that format.
| Type | Extension | Capability | Notes |
|---|---|---|---|
| SPOT Tools | .json |
Full Read/Write | The native file format |
| Excel ⓘ | .xlsx |
Full Read/Write | Fully compatible format |
| Telonics ⓘ | .tr8 |
Partial Read | Channels and lists only |
Core Workflow
Your receiver stores two categories of information: ① the memory channels that correspond to telemetry tags, and ② information about the overall receiver settings (for example, the initial RF Gain setting). All of this information can be read from the receiver and saved into a file, and, conversely, read from a file and written to the receiver.
But how do you get the information on the receiver in the first place? If you're starting with a blank receiver, you've got three options:
- You can painstakingly program all of this information into the receiver by hand using the menus on the receiver.
- You can enter it using the SPOT Tools UI. That's much, much easier.
- Someone, like your organization, can give you a file that already has all of this information in it. That's the easiest route.
Your workflow will depend on which of these situations you're in. We'll look at each in turn below.
Organization-Supplied Programming Information
In this case you'll either be sent a file, or given a place to download it. Once you have a file, follow these steps:
-
(Optional) save the current contents of your receiver.
- and .
- a SPOT Tools file as a backup before overwriting it.
- and select your up-to-date file.
- Make any desired customizations using the Receiver and Channels tabs.
- (if not already connected) and to update your receiver.
- (Optional) After the receiver reboots, reconnect and optionally to verify.
Programming the Receiver Yourself
You can use SPOT Tools to enter and update all of your receiver information. This is a bigger job when you are starting from scratch, but from that point forward, you can just make changes to your existing setup. The workflow is given below.
Initial Programming
- Receiver Tab: Update the default receiver settings to your liking.
- Channels Tab: Enter the channels for each of your telemetry tags. Create lists using the button. Assign channels to lists as appropriate.
- and to update your receiver.
- a SPOT Tools file that you can update in the future.
Updates
Option 1: You made changes on your receiver that you wish to preserve
- and to bring your receiver settings into the app.
- Update any channels, lists, or receiver settings you wish.
- to send your changes to the receiver.
- (Optional) a SPOT Tools file containing your latest settings.
Option 2: You want to make edits to your saved file
- and select your latest SPOT Tools file.
- Update any channels, lists, or receiver settings you wish.
- and to update your receiver.
- the new settings to a file.
Channels Tab
The Channels tab allows you to view and edit memory channels, including names, frequencies, and list membership. It also allows you to create and name lists. This tab is where most of your time in the app will be spent.
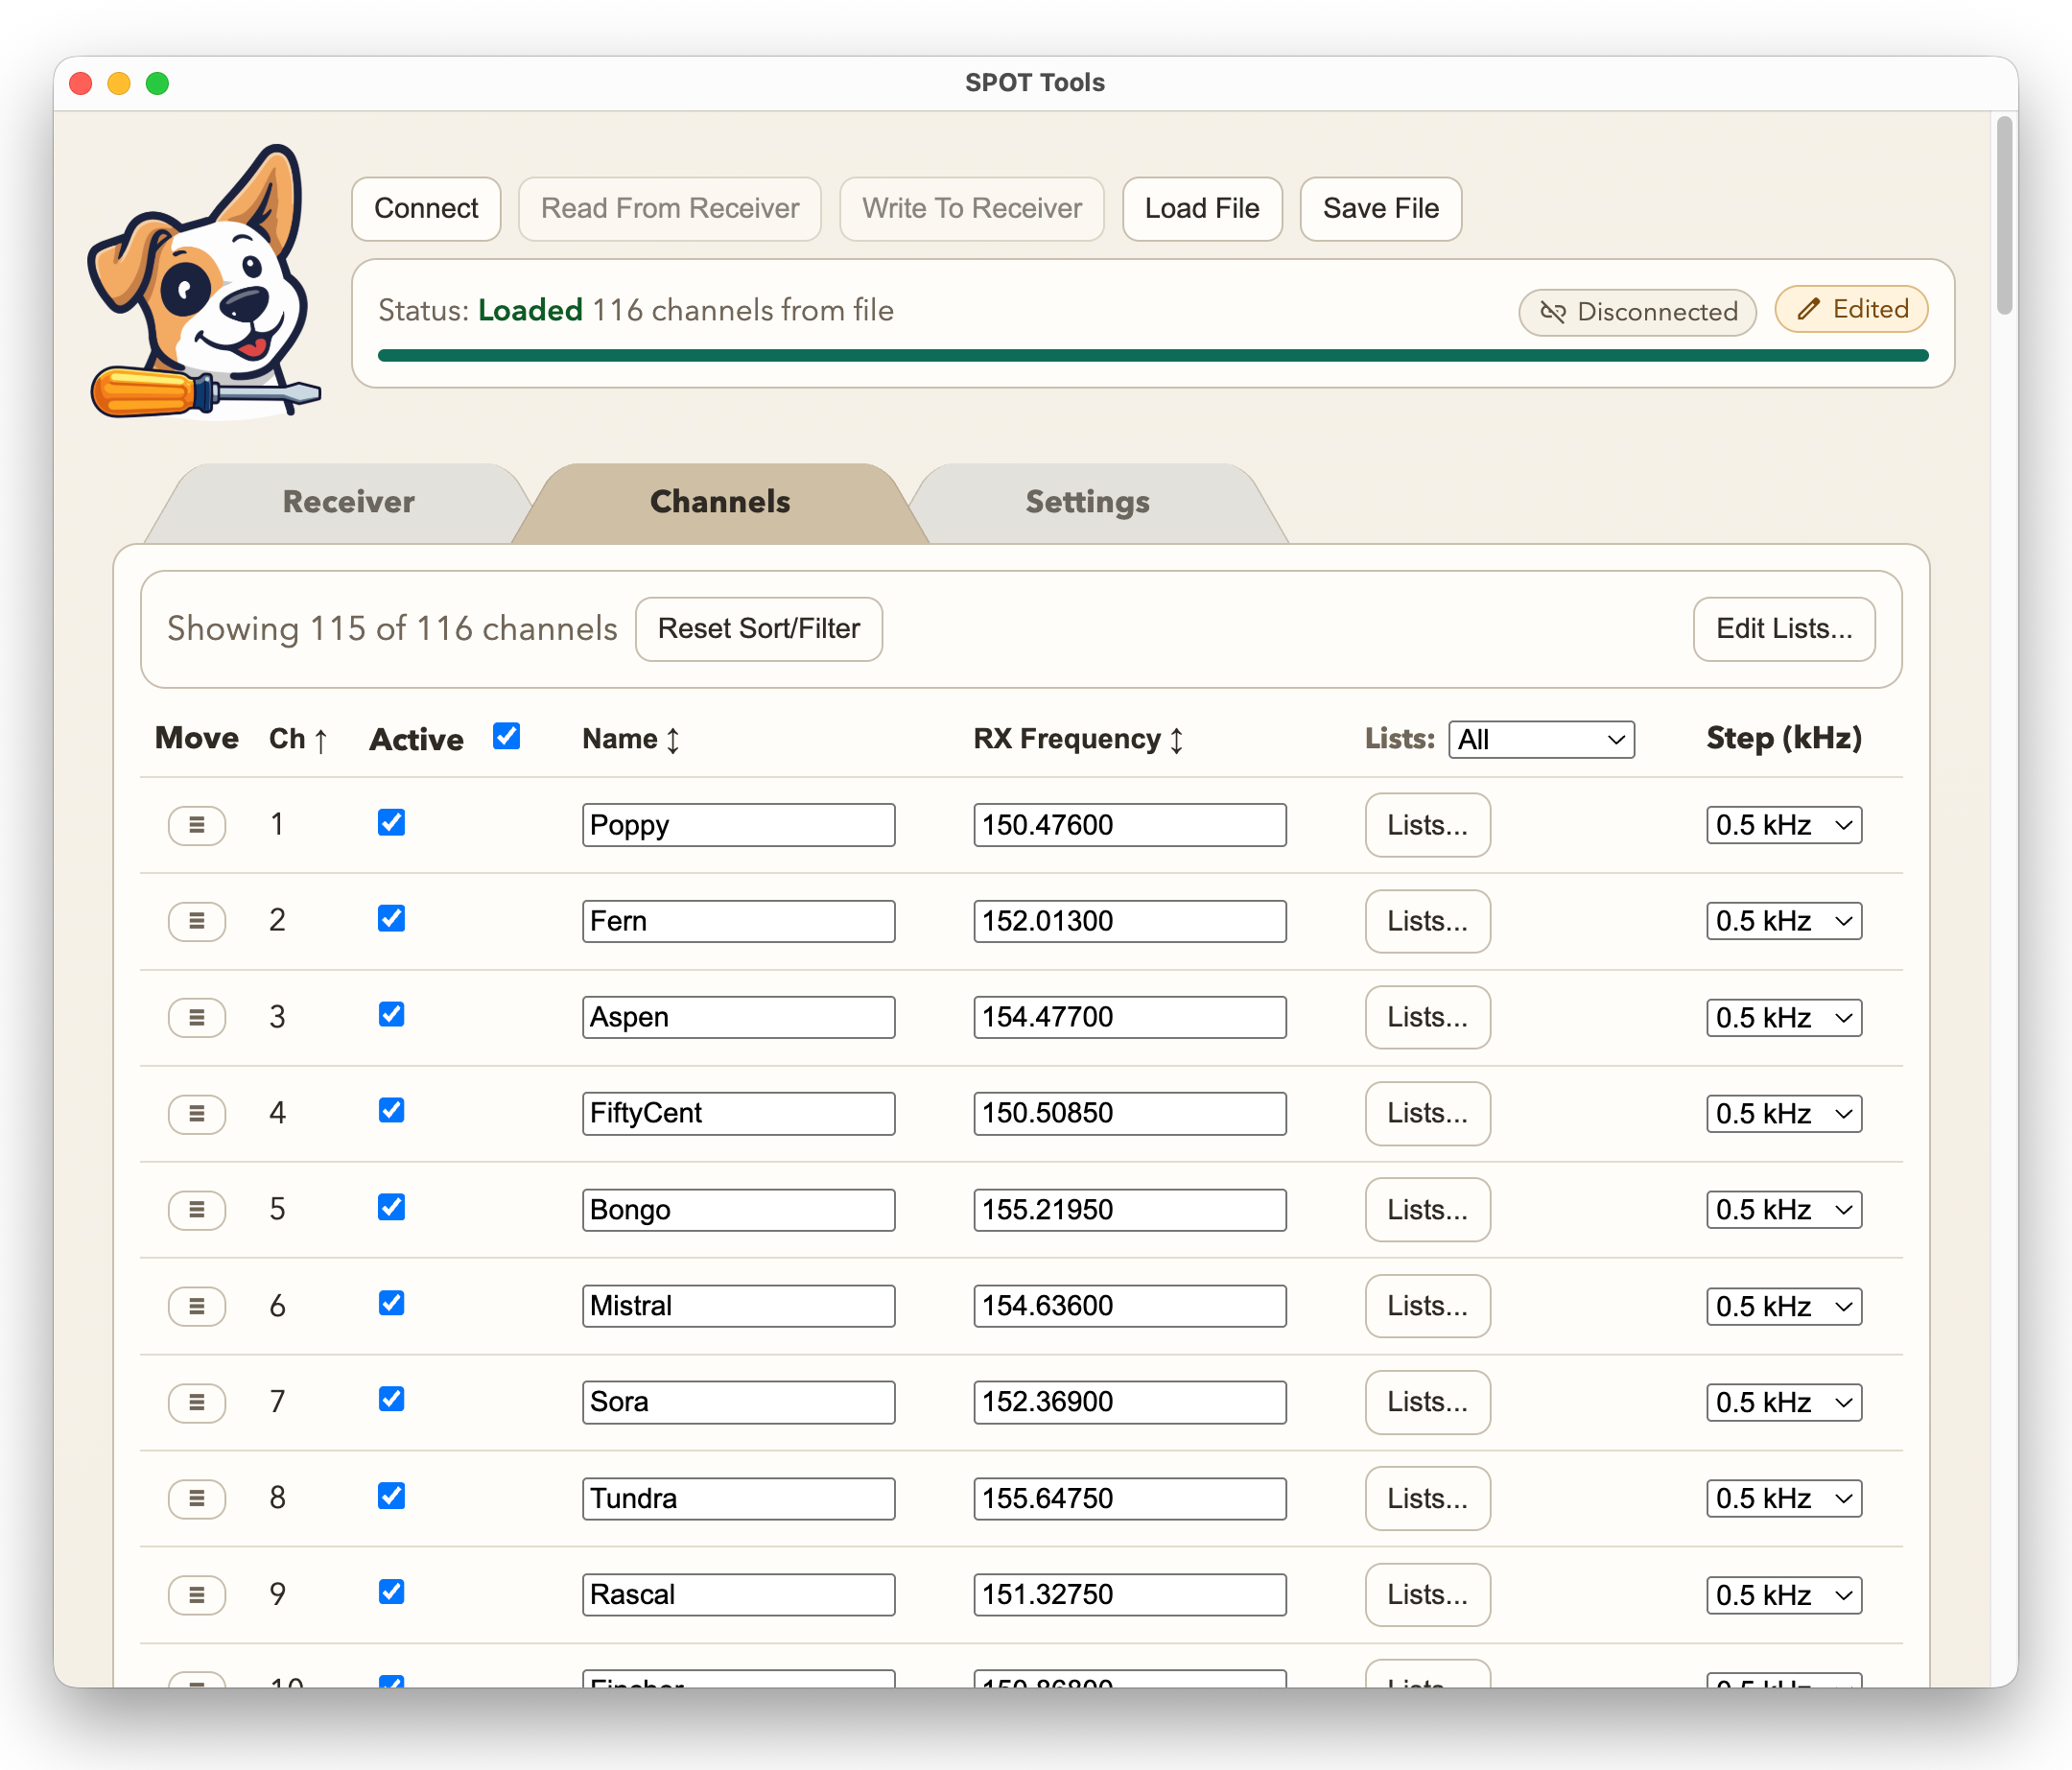
Channel Table Overview
The main element in this tab is the channels table. It is an ordered list of the memory channels that can be programmed into your receiver. Each row corresponds to a tag and contains:
- Drag Handle: Use this handle to select a row and drag it to a new place in the list of channels (reorder channels).
- Channel Number: The channel number on the receiver. This corresponds to the channels position in this table.
- Active Toggle: Is the channel active in the receiver?
- Channel Name: 10 character alphanumeric channel name
- Channel Frequency: Frequency of the channel in MHz
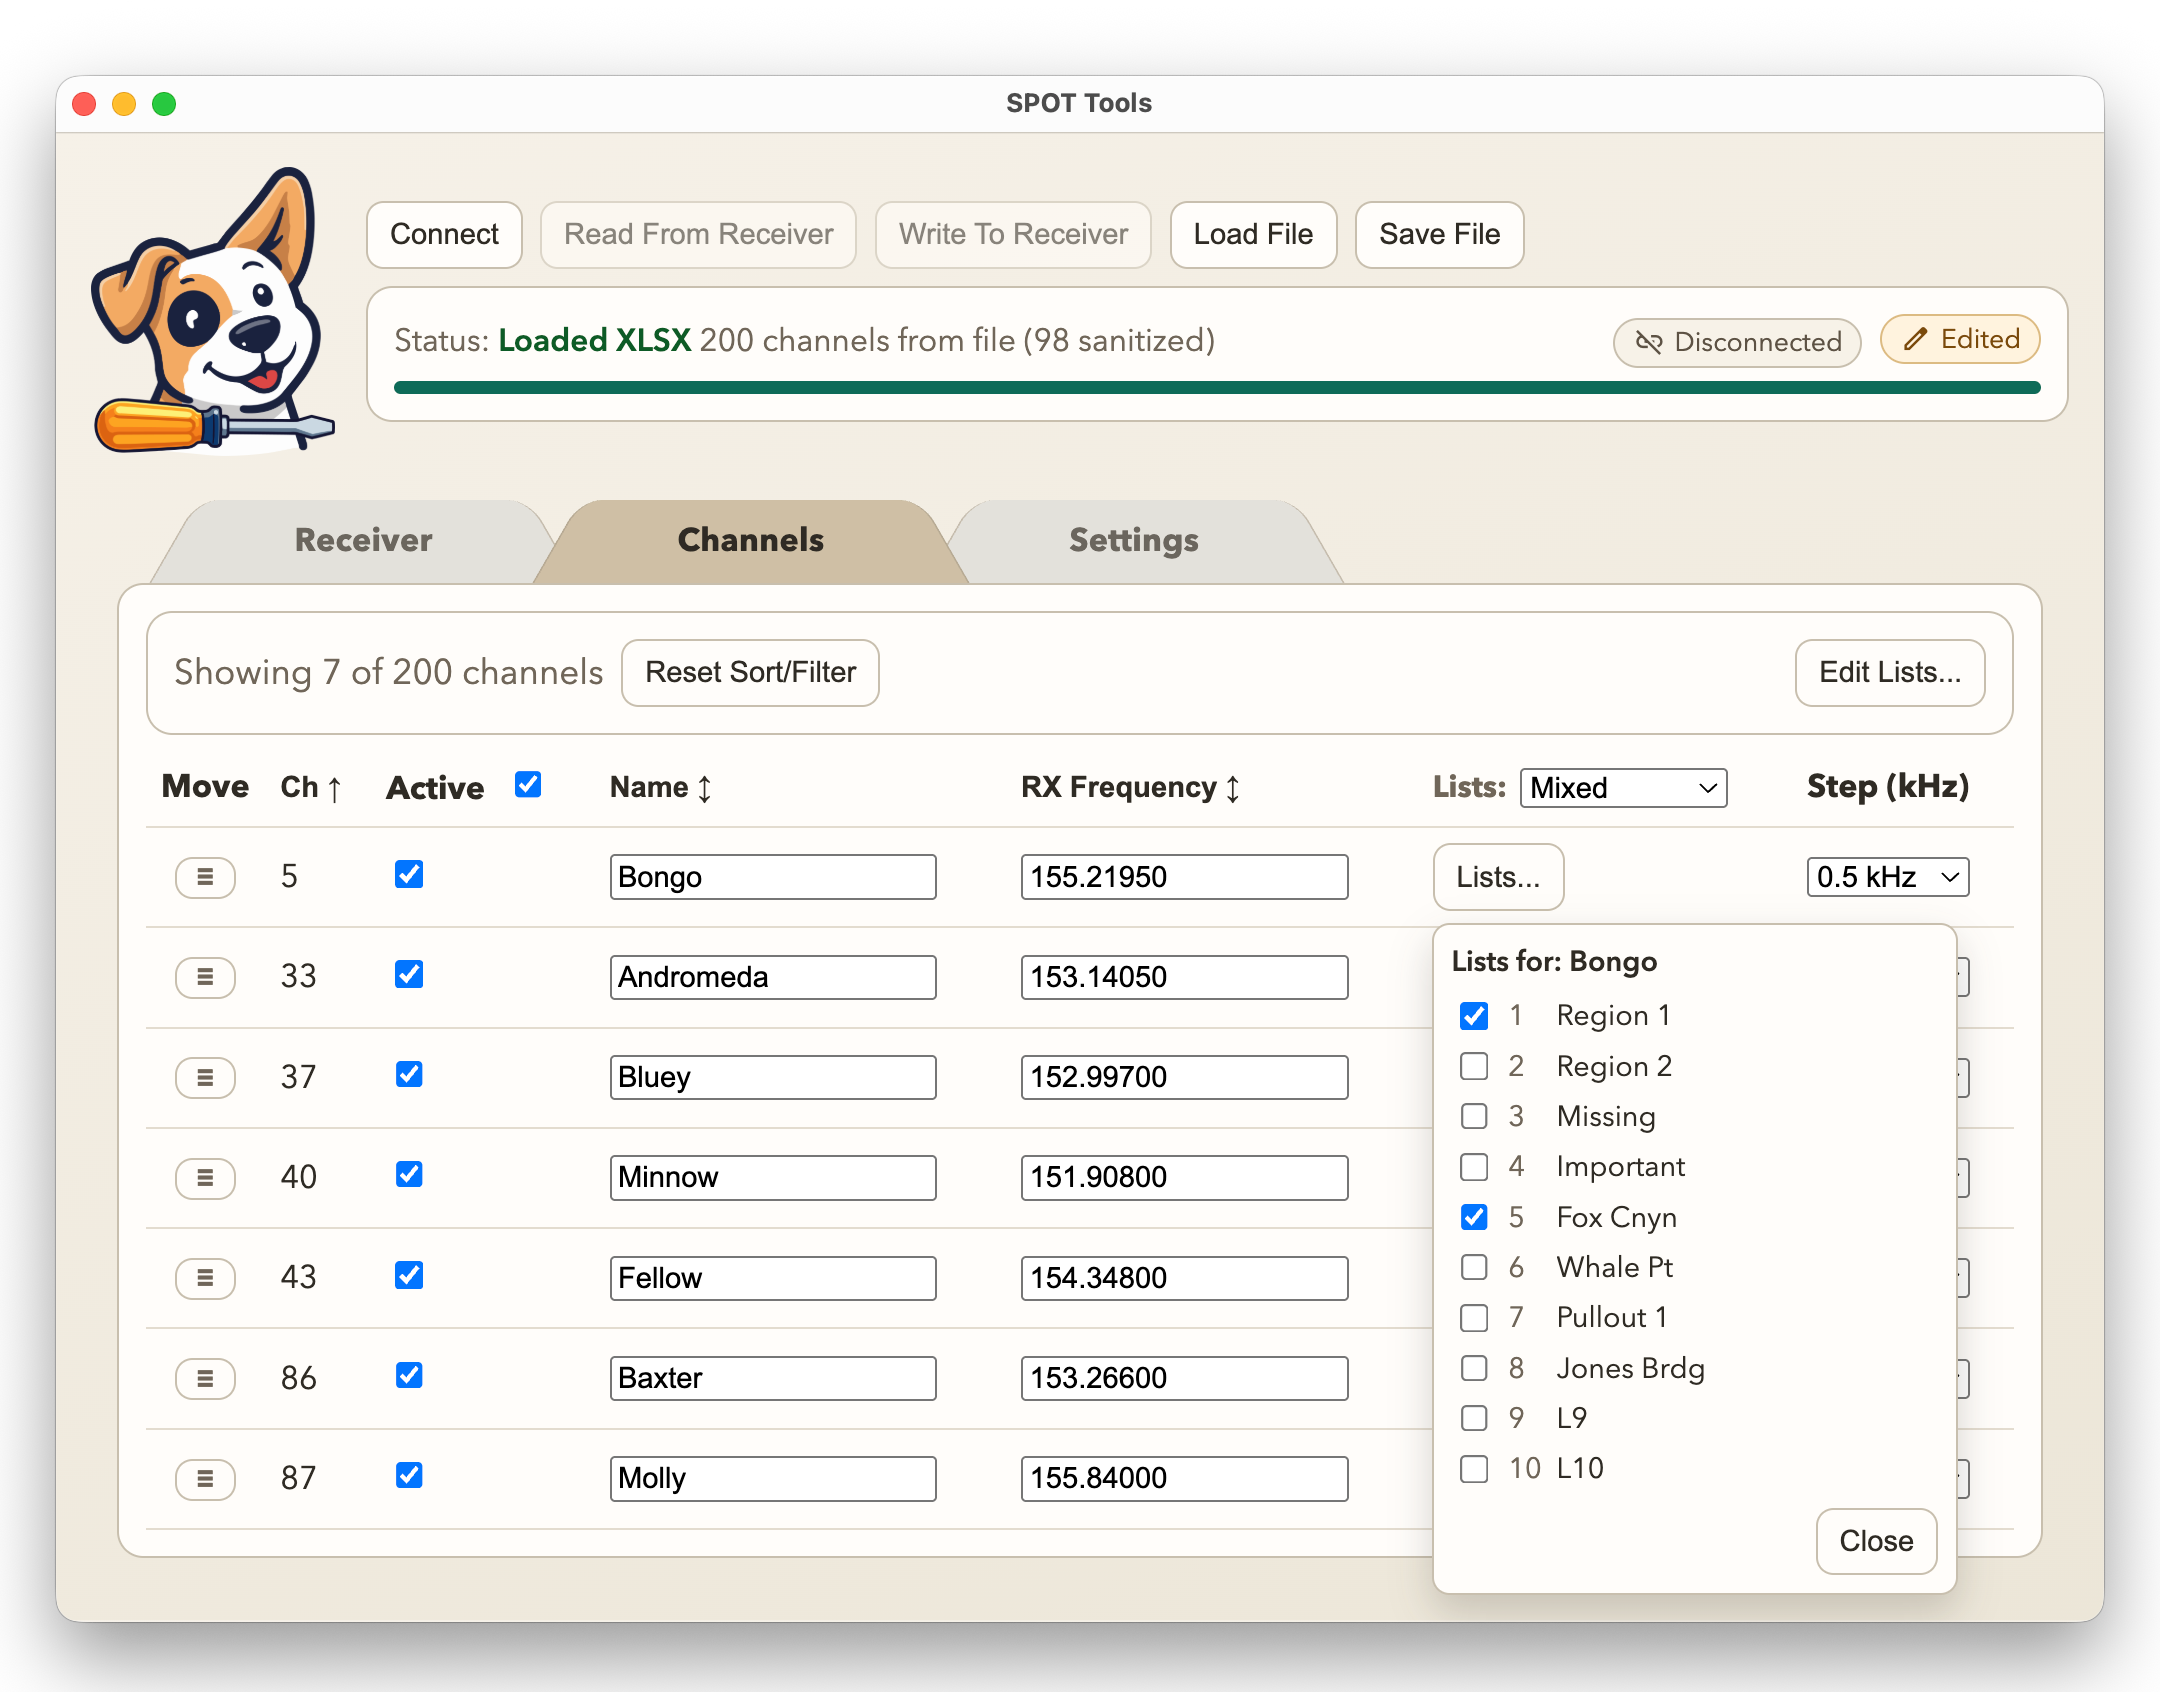
- List Membership: Click to view and edit which lists contain this channel.
- Tuning Step: When adjusting the channel frequency, how much should should a single click move the frequency.
Adding a Tag to Memory
SPOT can store up to 200 channels in memory. Each corresponds to a tag. When you are starting out, all of your memory channels will be unused (inactive). To add a new tag, select an unused channel and make it active by clicking the Active checkbox in the desired row. To ensure you are seeing the unused (inactive) channels, make sure the Active filter is not checked. Once the channel is active, you can fill in the frequency, name, lists, etc.
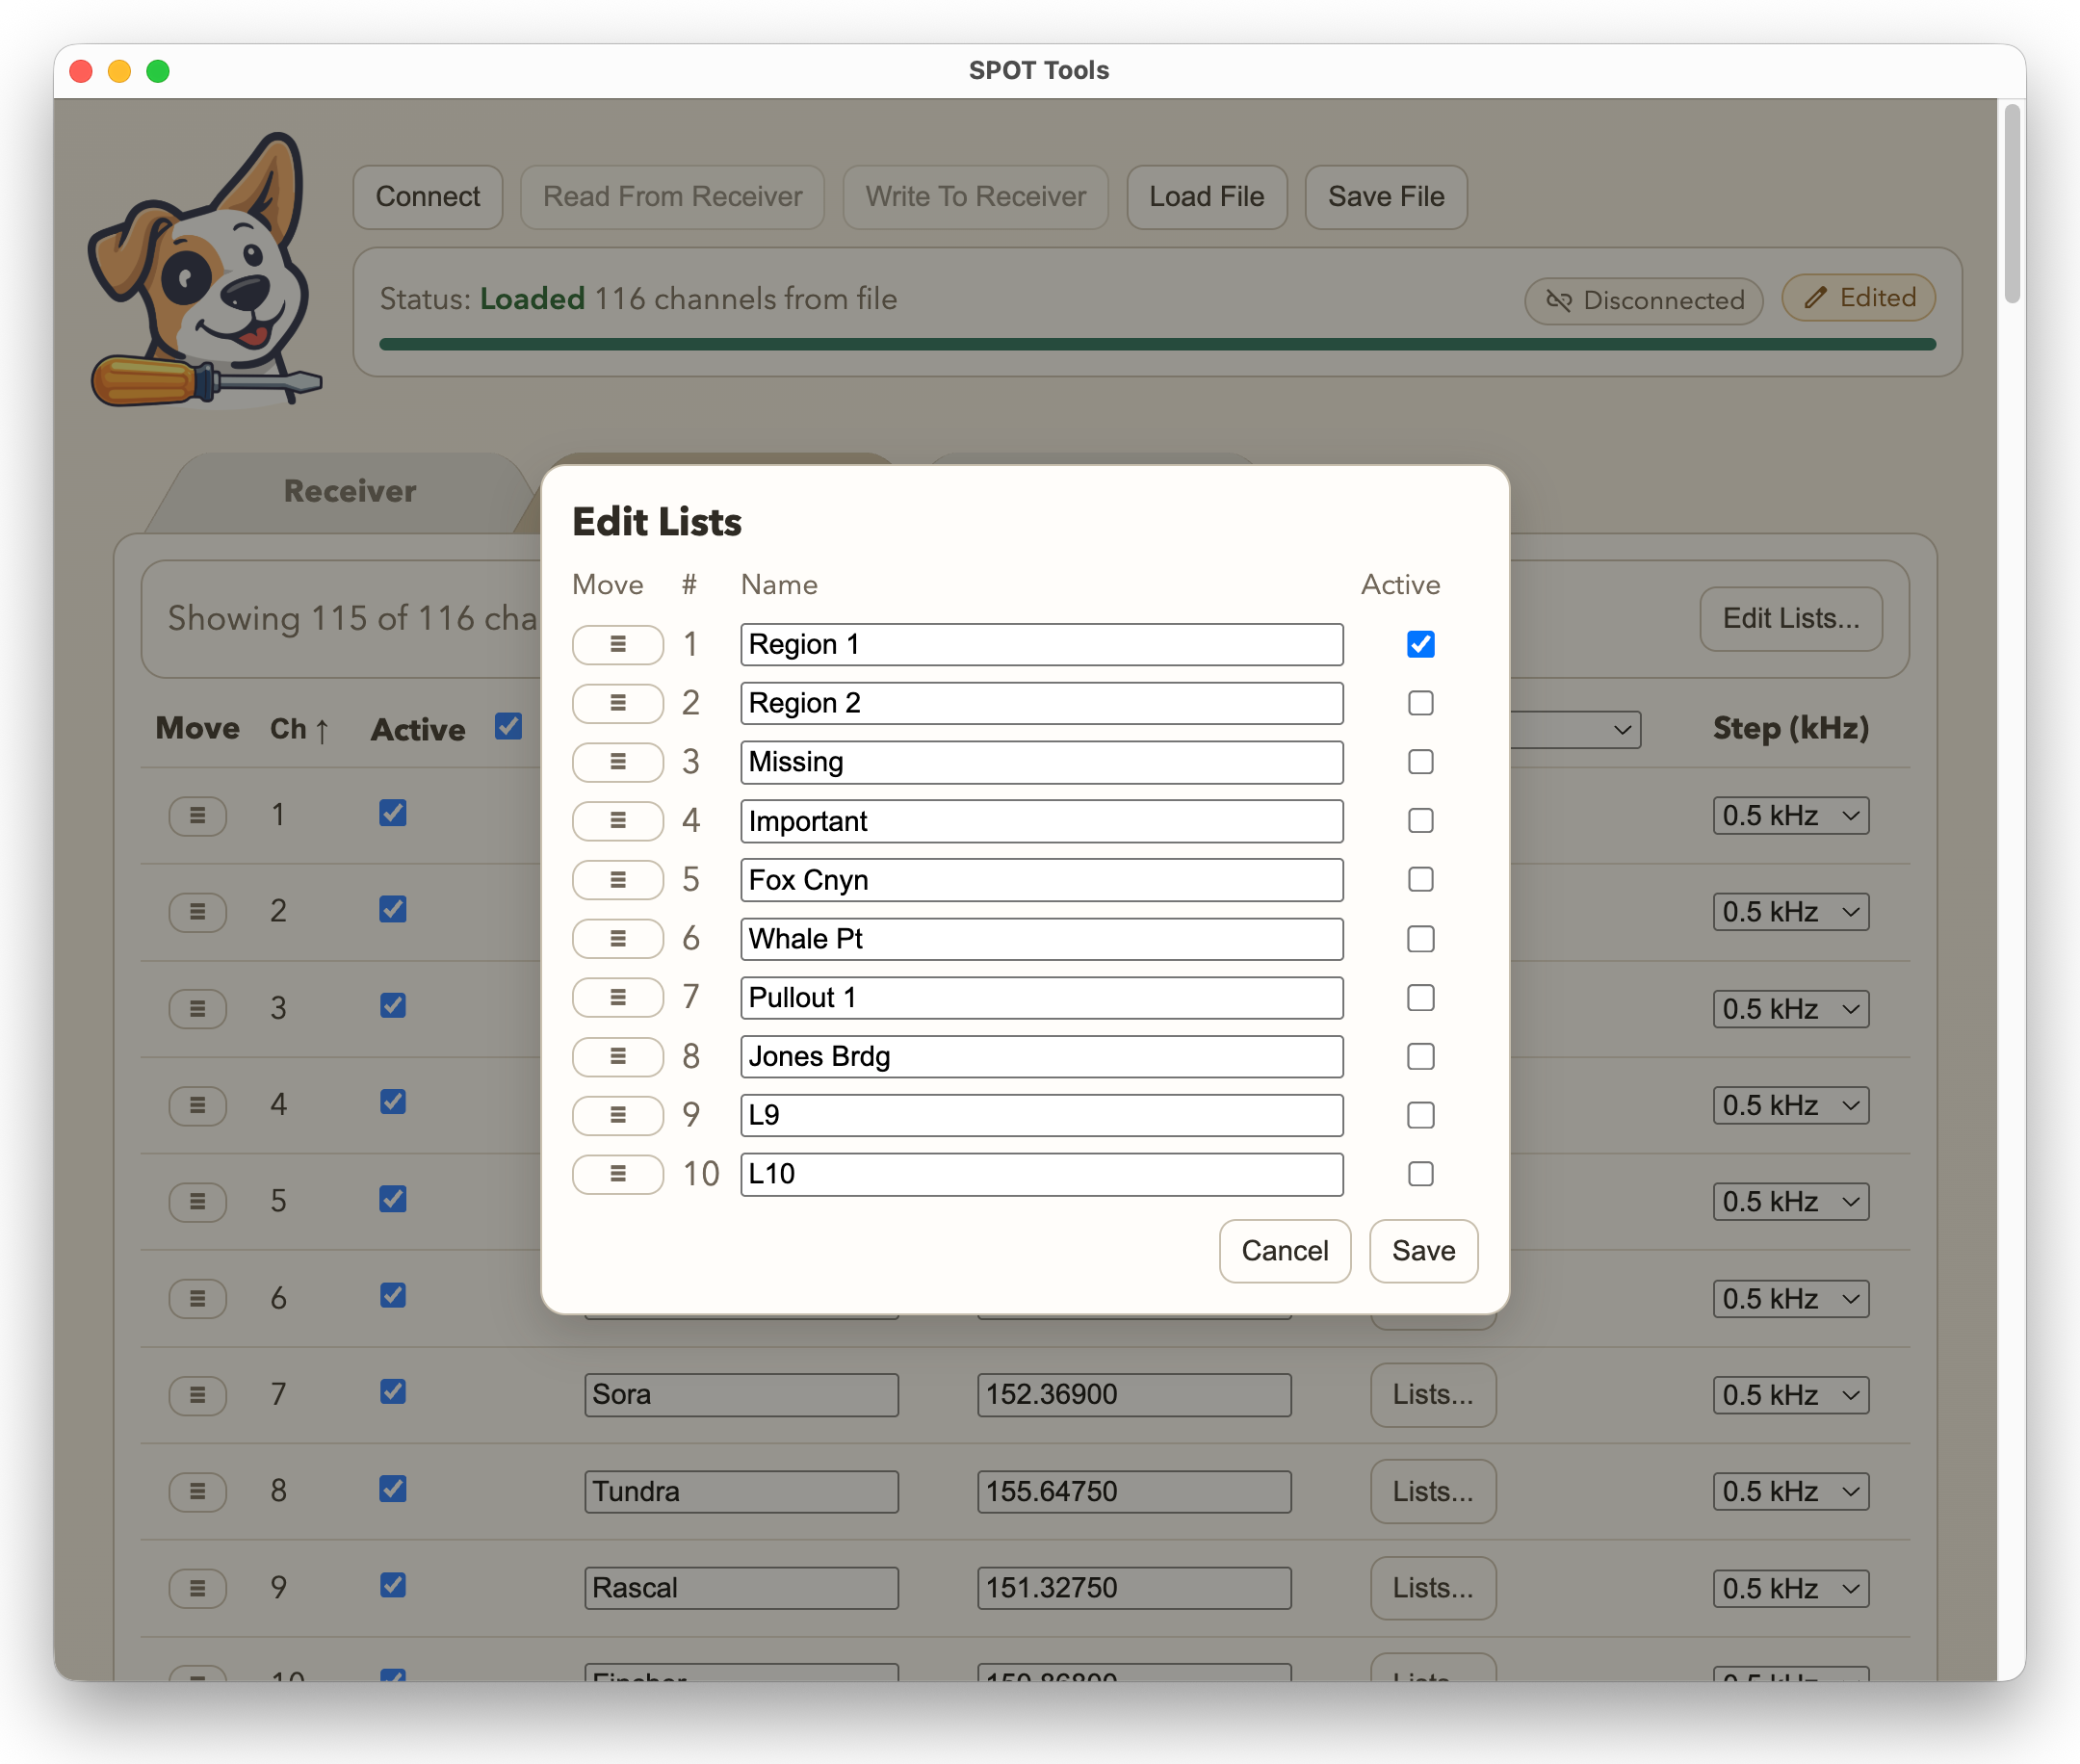
Lists
Lists allow you to organize your channels into subsets that make it easier to focus your tracking efforts. For example, you may want to focus on tags in a specific region, or tags on animals of particular interest. The SPOT receiver lets you select which of these lists will be active for manual or automatic scanning.
The Channels tab lets you define, view, and edit lists, and it lets you filter the channels being viewed, to just those in specific lists.
-
Click the button to manage your lists.
In the dialog that pops up, you can name your lists (up to 10 characters),
adjust their order using the drag handles, and select whether they are part of the
power-on active list (the lists that are selected when the receiver turns on).
SPOT supports 16 lists, but you don't have to use all of them (or any of them). By default, their names are "L1"..."L15", and the 16th is named "Ad Hoc".
- Each channel can be a member of zero or more lists. You can view and edit list membership using the channel's button. A channel can be a member of any number of lists, or no lists at all. There is a built-in list named . This list is managed automatically and includes every active channel.
Sorting and Filtering
You can sort and filter what you see in the table using the controls described below. This doesn't change the receiver, but it can make it easier to view and edit channels in the app.
- Sorting: You can sort the rows by the channel's number (default), name, or frequency. Tap one of those table headers to select it as the sorting key. Click to toggle between ascending and descending sort order.
-
Active Filter
- If the checkbox next to the Active column header is checked, then only active channels are displayed.
- This is usually what you want unless you are going to add a tag by using a previously unused (inactive) channel.
- The default setting of the Active Filter is an application setting.
-
Lists Filter
- The dropdown list next to the Lists column header lets you filter channels according to list membership. For example, you could show only the channels that are a member of the list "Important".
- You may also select , which allows you to select multiple lists at once. For example, you might choose the "Important" list and the "Missing" list. This will show any channel that is a member of either list.
- If you are in mode and you want to change the combination of lists you're viewing, select .
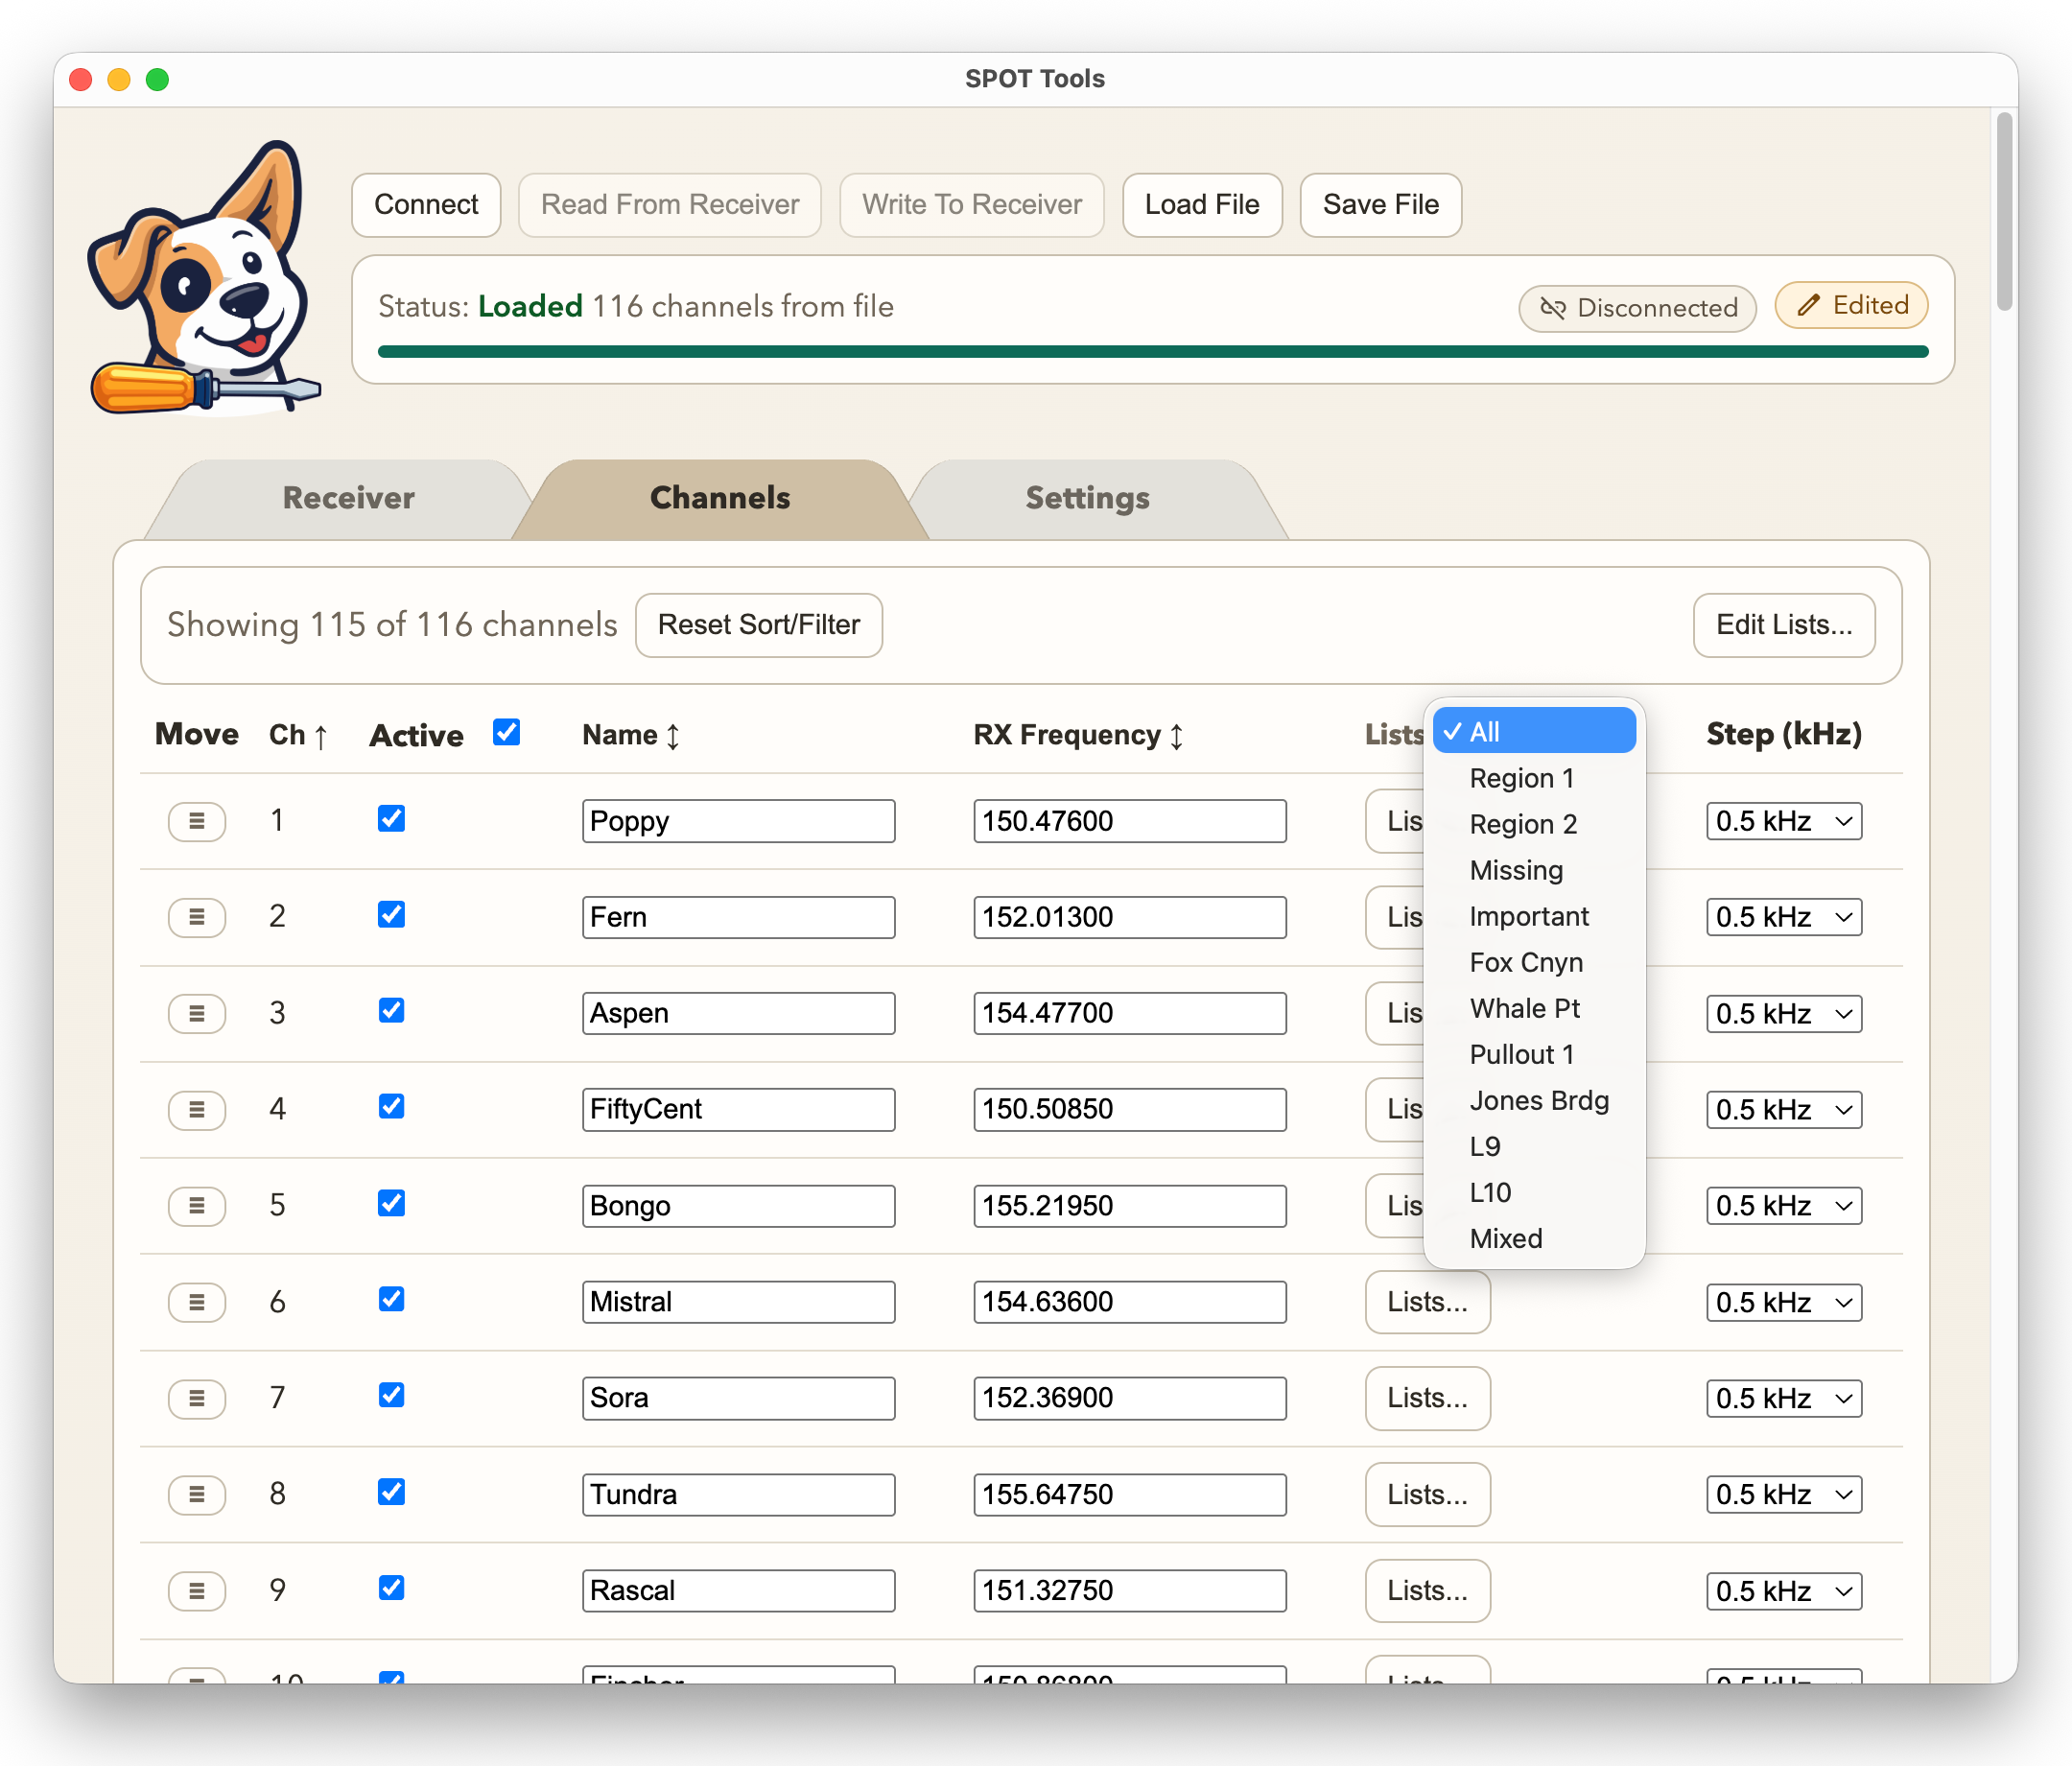

- You can combine the Active Filter and the Lists Filter.
- You can reset the sort order and filters to their default state by clicking the button.
Receiver Tab
The Receiver tab allows you to control receiver-wide behavior, and also perform administrative actions. We'll cover the latter separately below. The settings you make here can be changed using the receiver menus, but these will remain the defaults unless you make a change.
Scan & Receiver
- : This setting controls the RF Gain setting when the receiver powers on. The operator may change this on the receiver and the updated setting will persist even after they turn off the receiver.
- : Should the receiver or after a signal is detected. The latter means the receiver will complete its normal dwell period, then move on.
- : How long should the receiver spend on a channel before moving on during a scan. Options are seconds.
- : The receiver can hold the most recent peak power reading and display it in the power meter. This setting sets how long to hold the peak. Options are: seconds.
Interface
- : Determines whether the beats-per-minute reading will be calculated and displayed () or not ().
- : Determines whether on-radio navigation behaves primarily as channel navigation or tag-based navigation, matching the receiver's menu setting.
- : Determines how long the receiver backlight will stay illuminated. Options are: .
- : Determines whether the flashlight feature (operated by F-4) is enabled () or not ().
- : Determines whether UI beeps are enabled () or not ().
- . You have an option of what the receiver displays as it is booting (powering on). The choices are:
- : Displays the SPOT Logo.
- : Displays a two line textual message that you can set using the Welcome Message fields.
- : Displays the current battery voltage and firmware version.
- : A blank screen.
- : Like , but with a beep sequence.
- : When is set to , these lines will be displayed.
Receiver Details
- . This setting helps the receiver more accurately display battery status.
- : Sets arrow-key behavior to or , matching the receiver's menu setting.
- : this advanced setting should always be set to
0unless there is a specific reason to change it. - : When the app is connected to the receiver, this will display the computer port being used for the connection. This information can normally be ignored.
- Firmware: When the app is connected to the receiver, this will display the version of the firmware installed on the receiver.
- The remaining administrator options are described below.
Settings
The Settings tab contains options that influence the operation of the app, not the receiver itself. The settings are described below.
- : Choose which tab opens after read/load operations complete. You may want to jump right to the Channels tab, or stay on the Receiver tab.
- : While the receiver can store up to 200 channels in memory, you may be using far fewer. The Channels tab allows you to display only the active channels if you'd like. This setting controls the default setting of the Active filter.
- : On some systems, like macOS, closing an application window does not necessarily quit the application. This setting controls whether it will.
-
: This setting controls
what frequency step is used when importing channel data that lacks
explicit step values; for example, when importing a
.tr8file. -
Startup Template:
When SPOT Tools launches, and before you perform a or , the app fills in default values for the Receiver tab and the Channels tab from a template. You can adjust the startup template using the Default Startup Template controls:
- : Save the current Receiver and Channels settings as the default template to use at startup.
- : If you've saved your own settings, but want to revert to the the built-in default, press this button.
-
Saving your own settings as the default can be useful if you usually update your settings from a file that only includes channels (e.g. a
.tr8file).
Troubleshooting
Receiver Not Found or Not Responding
- Check cable seating at both computer and receiver ends.
- Confirm receiver power and battery condition.
- If the receiver stops responding, the app will switch to disconnected mode. Check power/cable, then retry .
- Verify correct USB serial driver installation for your adapter.
Read/Write Errors
- Retry with a short, known-good cable path.
- Avoid moving connectors during transfer operations.
- If write fails, reconnect and read the receiver before retrying.
Unexpected Data After Import/Load
- Review sanitization effects on unsupported values.
- Verify list mode and active-list defaults before writing.
- Save snapshots before major edits to preserve rollback points.
Settings Issues
The values from the Settings tab are saved in a JSON file named spot-tools-settings.json. To forcibly reset your settings to a default set of options, you can delete this file and it will be recreated automatically. The file is stored in a platform-specific location:
- macOS:
~/Library/Application Support/spot-tools/spot-tools-settings.json - Windows:
%APPDATA%\spot-tools\spot-tools-settings.json - Linux:
~/.config/spot-tools/spot-tools-settings.json
Administrator Tools
This section covers advanced tools that you may never need to use for normal operation.
Firmware Update Tool
From time to time there may be new versions of the firmware that runs on your receiver. It might include new features, bug fixes, or other user-requested changes. The firmware will be provided to you as a .bin file; for example, spot.bin. You can install the new firmware on your receiver using the following process.
-
Click to choose the
.binfile. Once you do, you'll notice that both the and buttons will be enabled. - (Optional) Click to view firmware details before flashing.
- Click to start the update workflow. A port-selection dialog will appear.
- Select a port just as you would when writing new settings to your receiver.
- Click in the port-selection dialog to install the new firmware.
- After success, connect to the receiver as usual to continue normal configuration work.
- NOTE: Some firmware upgrades require significant processing when the receiver reboots the first time. The screen will be blank for up to a minute. Please don't turn the unit off. Wait for the normal start screen then proceed as usual.
Screenshot Tool
For documentation, testing, or training purposes it is sometimes useful to be able to capture exactly what is on the receiver's screen at a given moment. You can use the button to do just that. You'll need to connect to your receiver using the button before this functionality is available.
You have three options for how to save the screenshot - all are PNG images:
- : This option creates a pixel-accurate monochrome render for advanced use where further processing is desired.
- : This is a common choice if the screenshot is to be used in printed documents. It creates a monochrome (black and white) image that looks like the physical display in terms of size, shape.
- : This is the most common choice. It creates an image that looks like the physical display in terms of size, shape, and coloring.
Logo Operations
When SPOT boots it can display a Logo screen. By default it is the SPOT logo. You can customize the boot screen by providing your own 128x64 monochrome image. To do so, use the Logo control button which appears just to the right of the button. It is a split control consisting of an action button and a dropdown selector. The selector lets you choose an operation and the button executes it. You must be connected to the receiver to perform any Logo actions.
The possible actions are:
- : Reads the current startup logo from the receiver and saves it to a file (PNG).
-
: Allows you to select a custom 128x64 monochrome image and write it to the receiver as the new startup logo. Supported input formats are
.png,.pbm, and raw binary data (.bin). - : Clears any custom logo that has previously been set and reverts to the built-in SPOT logo on the next power cycle.
Working with Excel Files
SPOT Tools can save its data into
Microsoft Excel files (.xlsx) for easy editing. Though
it uses Excel format, you can use any program that can import/export
Excel files such as Google Sheets.
The file contains several worksheets:
- Channels: This captures the channel data and is very similar to the tab in the app. You can create, modify, and reorder channels by modifying them in this workbook. List membership is stored in scanlist_ids using stable IDs like ID001|ID004, not by row order.
- ScanLists: This sheet carries the same information you would see if you pressed the button in the tab. Each row has a stable list_id (for example ID001) and a display name. Reordering rows does not change channel membership.
- Radio: This sheet carries receiver-wide options represented as key/value rows.
- Meta: This sheet has internal reference information that can be used by the app to check file integrity, but the entire sheet is optional.
The only required sheet is Channels. Any sheet that is not present is assumed to have default values. If the ScanLists sheet is missing, default list IDs (ID001 ... ID016) and current/default names are used.
Practical Tips
- The easiest way to get started is to use the app to save a file with default values. You can load that file into Excel, Google Sheets, or another compatible program, and then begin customizing it.
- If you are sharing settings with others, you can use Google Sheets or Excel for the Web to manage one or more versions that your team can download and load into SPOT Tools.
- To reorder channels, move rows on the Channels sheet.
- To reorder lists, move rows on the ScanLists sheet.
- Note: In the Channels sheet, each channel shows list membership with IDs (for example ID001). IDs are not tied to list row order, so you can reorder lists without breaking channel-to-list relationships.
Importing Telonics TR-8 Files
SPOT Tools can import (read) information from Telonics .tr8 files. If your organization publishes information in that format, you can use it to
program your SPOT receiver.
Practical Considerations
- Unlike SPOT Tools files,
.tr8files only contain information about channels and lists. Radio settings re not stored. This means that when you load a.tr8file, the information in the SPOT Tools receiver tab are not changed. Only the channels and lists are updated. - The Telonics TR-8 has memory for up to 25 lists, with 99 channels each. That's a total of 2,475 possible channels. Since the SPOT receiver can only store up to 200 channels, only the first 200 are imported.
- Because the SPOT receiver can currently manage 16 lists, while the Telonics TR-8 can manage 25, only the first 16 lists will be imported.
- Telonics TR-8 channel and list names can be up to 16 characters. Only the first 10 characters will be preserved by the SPOT receiver.
- SPOT Tools can read
.tr8files, but cannot write them. If there is user interest in that feature, it may be part of a future release.
Advanced Options
SPOT Tools has a hidden Advanced Options area in the Receiver tab. In normal day-to-day use, most operators will never need these controls. They exist for setup, troubleshooting, and service work.
Warning: These controls can materially affect how the receiver behaves. In particular, calibration-related actions should be used carefully and only when you understand the consequences.
To reveal this area, go to the Receiver tab and Alt-click the Receiver Details heading (Option-click on macOS).
The controls in this area are:
- Pulse Threshold: Sets the telemetry pulse-detection threshold in dBm used by the firmware meter and BPM logic. Lowering the threshold makes the receiver more willing to treat weak signals as telemetry pulses; raising it makes the receiver more selective. Change this only if you are intentionally retuning how pulse detection behaves.
- Full Scale: Defines what dBm level maps to full-scale on the receiver's on-device telemetry meter. This is primarily useful when tuning how the meter behaves or when comparing receiver behavior across units.
-
Receiver Squelch: Controls the receiver squelch level written to the radio service menu. For most SPOT use this should remain at
0. Raising it can suppress weak or noisy signals and may make the receiver harder to use for telemetry work. - Battery Calibration: Writes the firmware battery calibration reference used to convert battery readings into displayed voltage. Use this only if you are intentionally correcting the battery display and you have a known-good reference value.
- Calibration Data:
- Read: Saves the receiver's raw 512-byte factory/service calibration block to a file on your computer. This is mainly a backup and service function. The file is specific to one receiver and should be named and stored carefully so it can be matched to the same receiver in the future.
- Write: Restores a previously saved 512-byte calibration file to the receiver's default calibration location. Before writing, SPOT Tools asks you to confirm that you selected the correct file for this radio. After the write, the app reads the calibration block back to verify it. Do not treat these files as interchangeable between receivers. Writing the wrong calibration file can affect battery readings, receiver sensitivity, meter behavior, and other low-level tuning.
A good safety practice is to use Read before making any calibration-related changes, then keep that backup in a location where it can be traced back to the exact receiver it came from.
Preparing a New Radio
If you acquire a factory-fresh Quansheng radio, you'll need to upgrade it to the SPOT firmware. This is very similar to installing (flashing) a new version of the firmware, but the first installation requires a few additional steps.
Warnings:
- Replacing the radio's low-level firmware should be done carefully as it could render your unit inoperable. If you are not comfortable with the process, it's best to ask for help from someone who has done this before.
- Be sure you have a radio that meets the SPOT minimum requirements including hardware version 3 (v3) with 2MB of flash. Flashing this firmware onto an older unit will likely make it inoperable.
First-time upgrade to SPOT:
-
Obtain the correct firmware
.binfile for your radio. It often has a name likespot.bin. - Attach the radio to your computer with a USB cable.
- Every radio has built-in calibration information from the factory. it's best to save this information just in case something happens that requires it to be restored. To do so, follow the process given above.
- With the radio off, put it into flash-loading mode by holding PTT while powering it on. The display normally stays blank and the flashlight illuminates.
- Apply the upgrade using the normal firmware update process: choose the firmware file, press , and select the unit's serial port when prompted.
- After the flash completes, allow the receiver to reboot fully. The first boot can take noticeably longer than normal, and the screen will remain blank. Do not power it off during this process.
- Once the radio reaches its normal start screen, connect to it using the button.
- If you want the built-in SPOT startup logo rather than the factory logo, use the tool in Receiver Details (see the Logo Operations section). Now power-cycle the receiver again. This reboot may also take longer than usual. Please don't turn off the receiver.
- Program the receiver as usual.